
If your dacha area is more than 10 acres, then place an outdoor pool on it. In summer it will be especially useful as a relaxation option and will replace spending time at sea. Today we will consider the option of building a mini pool and a small selection of photos.
Planning the construction of a swimming pool at the dacha
Initially, you should decide on the location of the pools. The construction process, selection of materials, size and size of the pool will depend on this. If the soil is rocky, gravel or sandy, and the groundwater is deep, then there is no need to further strengthen the protection against water. On such soil you can install any country pool, even if its walls are made of brick or concrete.

Clay soil requires stronger reinforcement using impermeable and heat-insulating materials to prevent groundwater from deforming our dacha structure. For such soil it is necessary to build DIY pool in the form of a rectangle.

- Before construction, decide on the size and shape of the pool. And also with the type of soil and area of the territory.

- Prepare a design template for the future pool and the required materials for construction.
- Mark the contours on the ground and determine the area for drainage.

- Using the template, start digging a hole, the base of which should have a slope towards the drain. The pit should be larger than the pool itself by 0.5 m in width and 40 cm in depth.

- Lay a drain pipe and a sewer pipe on a slope before pouring concrete into the hole.
A pit is a well 1 meter by 1 meter, the base of which should be 35 cm below the bottom of the pool. Fill the bottom of the pit with crushed stone, and lay out a drainage pipe. Place stones or crushed bricks on top of the pit and cover the pit with a lid. A cover must be installed on the edge of the drain to prevent debris from entering.


At the same moment, concrete the walls.


 Finishing a swimming pool at the dacha
 Decorating the area next to the pool
It is not recommended to plant many plants near pools to prevent foliage from getting into it. Change the water in the pool once every 3 weeks or earlier as it becomes clogged.
You can decorate it with tiles, and plant a lawn next to it, on which sun loungers and tables are placed. Provide water slides for children.

 Beautiful pools in the photo


 Game with a pool, photo
 Read more useful information in the section.
On a hot summer day, it’s difficult to deny yourself the pleasure of cooling off in a cool pond. Not everyone has a country house on the banks of a river or lake, and building a permanent pool requires space, time, and material costs.
Is there an alternative to capital expensive construction? Fortunately, people's ingenuity did not ignore this issue. We have selected not just the most interesting and simple ideas, but also the most viable ones that can be realistically implemented on a summer cottage without special skills.
The presented structures are not designed for 10-year use; they do not comply with all swimming pool construction standards. But the authors set completely different goals: cheap, fast, seasonal. Nevertheless, certain rules must be followed during such construction, so first we will familiarize ourselves with the general recommendations.
Important points when planning and building a homemade pool
Regardless of the choice of material for the construction of a seasonal pool, we recommend paying attention to the following points:
- the place for the pool should be in direct sunlight, and not in the partial shade of the garden: the water will heat up faster and there will be less debris in the form of falling leaves and insects;
- the area must be leveled and compacted;
- the bottom and walls of a homemade bowl should not have sharp protrusions or a hard surface;
- you need to immediately think about how and where the water will be drained during regular replacement (especially if installing filters is not provided);
- the frame needs to be strengthened so that the structure does not fall apart under water pressure;
- when purchasing a waterproofing film (tarpaulin), take into account the size of the container with a margin of 50 cm around the entire perimeter.
When installing a budget pool, do not forget about landscaping the area around it. You can make an embankment of pebbles or river sand around the perimeter, decorate the approaches with decking boards, or simply knock down wooden flooring from old pallets. Also, for comfort, it is advisable to consider a towel rack.
Just dig a hole and cover it with film
The first stage is the most labor-intensive - digging a hole of suitable size and depth. When the pit is ready: the bottom is leveled and compacted, the walls are perpendicular to the bottom and do not crumble, proceed to the second stage - preparing the surfaces.
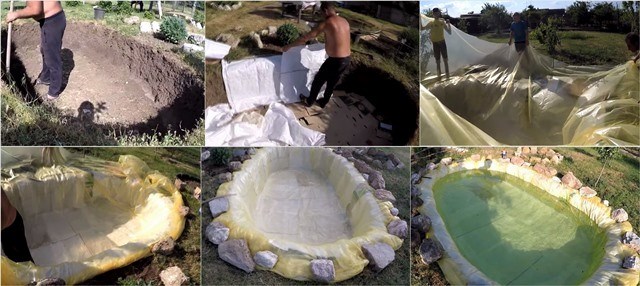
Cut cardboard boxes are laid on the bottom to make it soft to step on. The walls are covered with bags so that the film does not tear on uneven surfaces and plant roots.
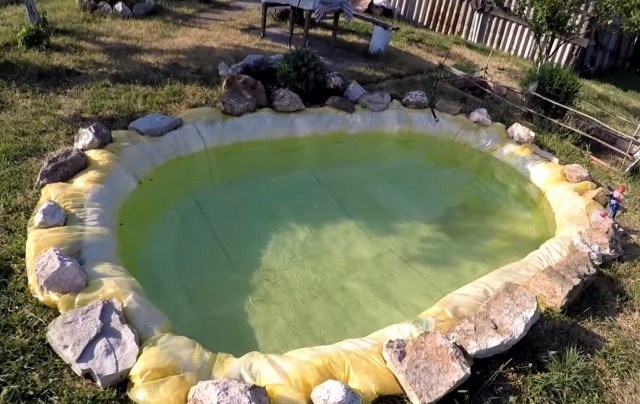
At the third stage, the pit is covered with waterproofing film. The upper edge is pressed with stones, which additionally plays the role of decoration.
You can bury a bowl made of scrap materials, covered inside with film, into the soil. This will require a lot of effort, but it will be possible to increase the depth of the pool. Since the edges of the bowl protrude above the soil surface, the soil will not be washed into the water.
We are sure that you will like the idea of having a swimming pool. And by next season you won’t want to build temporary structures. The optimal solution would be to organize a pleasant vacation spot for many years to come. To build a private pool, it is best to contact professionals who will help at all stages of its construction. The company "POSEIDONSTROY" has already received many good reviews. They will be able to make a pool according to your wishes or offer standard projects for implementation.
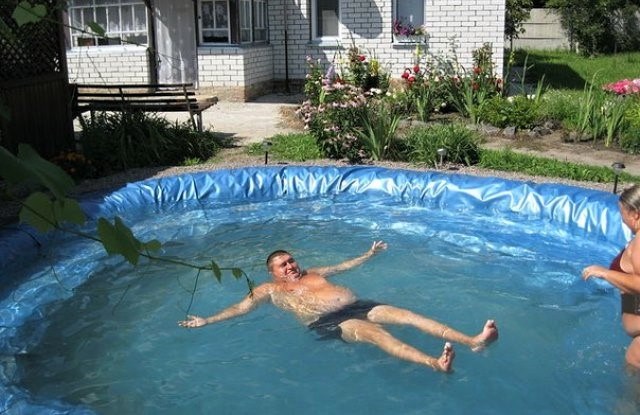
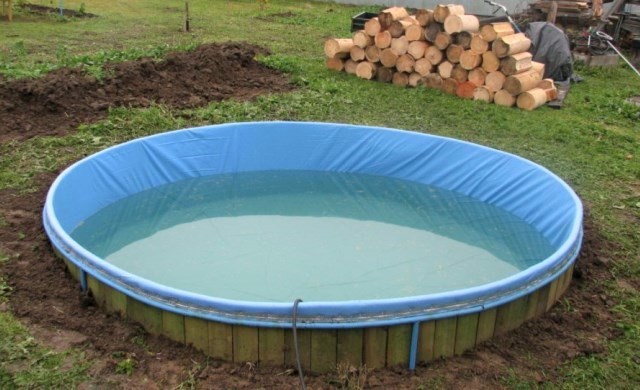
Frame pool made from pallets
To begin, choose a flat area and cover it with a thick tarpaulin (perhaps an old banner or canopy). Next, take 9 pallets and fasten them with screws and slats. Pallets are placed on edge, connected by a ring. When the round frame is ready, it is secured with tie straps for additional rigidity.
At the next stage, the inner surface of the “bowl” is covered with thick greenhouse film, and old towels, bedspreads or blankets are placed on top at the junction of the pallets and on the bottom. This is done to soften the surface so that while swimming it is comfortable to press against the stacks and walk along the bottom.
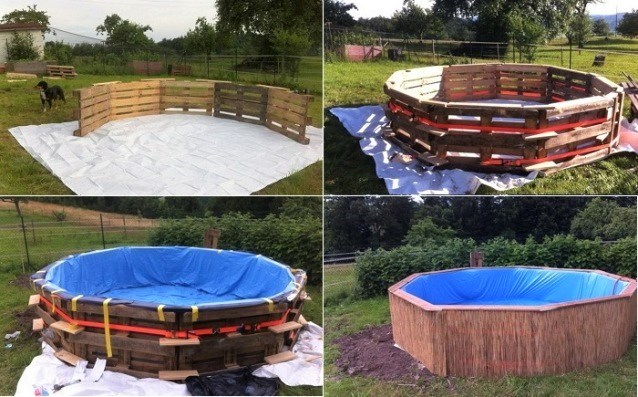
The final layer is a waterproofing film. If it is blue or blue, the water in the pool will always be bright. Some advise using black film to improve water heating. It is important that under the film there are no open sharp corners, protruding boards or rough surfaces on which the film will quickly tear.
The film is secured to the top edge of the pallets using a special adhesive tape. For decorative finishing of the outside of the pool, you can use reeds or bamboo. Narrow boards are nailed on top to hide the pallets.
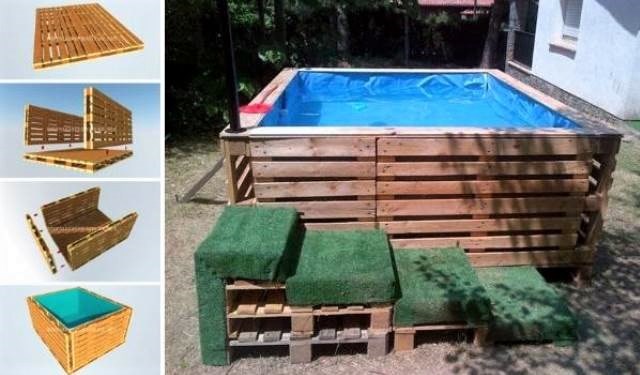
The frame can also be made rectangular by connecting the pallets at right angles. The bottom can also be lined with pallets.
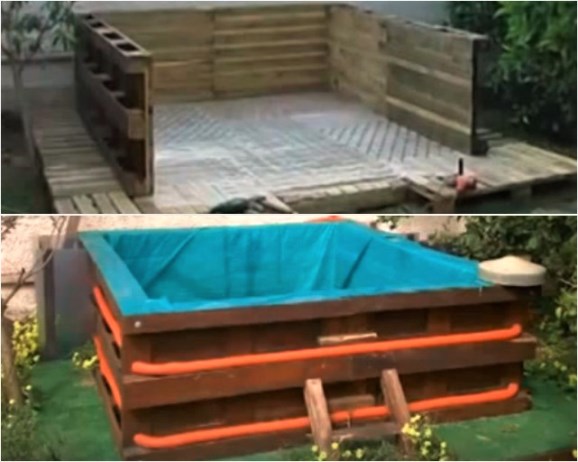
To create the most comfortable area, you can attach a lighting stand to the corner and make steps from pallets.
These pools are filled with tap water from a garden hose and drained manually or using a low-power pump. If chemicals were not used for disinfection, then vegetable beds and flower beds can be safely watered with water.
Pool made from old boxes
The frame of the pool can be made from old wooden or plastic boxes. They make up a rectangular box, fasten each one together and additionally wrap it around the perimeter with plastic tape.

The structure is assembled on a tarpaulin. The inside of the box is covered with a thick waterproofing film, pressing the top edge with wooden boards.
A pond made of hay - simple and cool

Looking for available materials for the construction of a swimming pond in the dacha sector, enthusiasts turned their attention to hay, which is an indispensable attribute of agricultural land.

It is spread out on a prepared area, and sides are built from rectangular compressed bales. Further, everything is according to the already shown scheme: a thick film is covered in the resulting bowl, the structure is tightened with belts. To protect the waterproofing film from damage, cardboard or a thick tarpaulin can be placed on the hay as the first layer.

Pool on a metal frame
For those who are familiar with welding, it will not be difficult to make a simple pool with your own hands from metal.
Each wall is made separately from a profile pipe and galvanized sheet. The structure can be assembled by welding or made dismountable with bolts.

An insert made of waterproofing film is installed inside, which, if desired, can be made to order according to the dimensions of the resulting structure. You can decorate such a pool using flooring from pallets, and also make a cover.

To increase ease of use, it is recommended to install a pump with a filter and use disinfectants for regular use. Thanks to this, your pool will not turn into a muddy swamp in a few days, the water from which will need to be completely pumped out and replaced with new water on a regular basis.
Mini-pool made from a large tire
Our selection will be completed by a very simple idea for making a pond from a large diameter tire from heavy special equipment.

To expand the future pool, the first step is to trim the sidewalls of the tire. The resulting workpiece is installed on a previously prepared concrete platform and filled with concrete. Thus, the tire and concrete form a bowl, which, after the concrete has dried inside, must be painted with a special paint.
As a result, you will get, albeit small, but not requiring much effort in maintenance and a very cozy pond that will help you cool off on hot days.
Having their own country house, cottage or plot, many people think about arranging a swimming pool. In hot summer weather, everyone wants to swim in cool, clean water, and it is not at all necessary to go to the sea or lake to do this.
A do-it-yourself pool is a building that is not difficult to organize, as many people believe, and it will not take much time and money.
Country pool: detailed description and types of structures
Artificial ponds allow you to fully enjoy the coolness on hot days. In addition, the pool on the site is a place of relaxation not only for adult family members, but also a place for water treatments and games for the younger generation. Out of season, the pool can be used as a storage tank for watering plants in the area.
The following types of reservoir structures are distinguished:
- stationary;
- collapsible;
- inflatable.
A permanent pool is a type of structure that uses a reinforced concrete bowl. They are reliable, durable and installed for a long period of time. Their sizes and shapes can be very diverse: medium, large, tall, oblong, round, two-level, etc.
Stationary structures include, as subspecies, frame and frameless reservoirs.
Frame structures can be purchased ready-made. It looks like a metal structure with a stretched fabric; as a rule, PVC films are used. In addition to the pool, the set includes ladders, a water purification system, a filter and a pumping station. A frame pool is installed only for the summer season, and then the entire structure is dismantled and stored until next summer.

A collapsible pool model is more suitable for summer cottages that are not fenced or guarded. Such pools are inexpensive, easy to assemble and disassemble, and also take up little storage space. Water is pumped into the reservoir independently, but it must be carefully filtered.
An inflatable pool is the simplest design of a reservoir and the most unreliable. However, it is inflatable pools that are widely popular among consumers. You can install it anywhere, and even take it with you in your car. It will be difficult to inflate it yourself, but if you use a pump, the process will be easier. The disadvantages of inflatable tanks include:
- weight restrictions;
- the material can be easily pierced or cut;
- sags when there is a large amount of water;
- the water is not purified and stagnates, it must be changed periodically;
- takes a long time to deflate.
To avoid the hassle of constantly assembling and disassembling the pool, you can build it yourself on your own site.

How to make a swimming pool at your dacha without any hassle
Setting up a swimming pool is not an easy task, and you need to carefully prepare for it.
If you have already decided on the type of construction, then you should think about where to place the future reservoir, what size it should be and how much material is needed to complete all construction work.
Before you start building a pool, you need to choose the optimal place on your site where it can be placed.
Experts recommend choosing a place where there is a slope of the soil. At the same time, it is advisable that trees and shrubs do not grow near the pool, because their root system can damage the waterproofing layer. In addition, in the fall, leaves will begin to fall from the trees, and the bowl will need to be regularly cleaned of debris.
When choosing a place on the site, you need to monitor the direction the wind is blowing. It is preferable if the wind flow passes along the bowl of the tank, then all the leaves and debris will accumulate at the edge of the pool and it will be convenient to clean it.

Groundwater plays an equally important role. It is recommended to organize the installation of a pool in a place where the groundwater level from the surface of the earth reaches at least 0.5-1 meter.
In this case, the type of soil also plays a special role. The best option for building a reservoir is clay soil. If the waterproofing is damaged or broken, clay can stop water leakage.
Dimensions and depth of the future reservoir
The size of the future reservoir should be determined based on its intended purpose.
If you plan to build a pool where you can swim freely, then it is better to choose rectangular or oval shapes. You can opt for a round bowl, but you won’t be able to swim much in it. The design can be of any shape, even the most atypical, but the main thing is that you can move freely in it.
The optimal dimensions for a rectangular pool are: width - 2.5 meters, length - 5-6 meters. At the same time, the width can be increased to 4-5 meters, as well as the length, if the size of your plot allows it.
If your goals include diving from a side or jumping from a high place, then the minimum depth of the bowl can be 1.5 meters. At the same time, if a springboard or tower is additionally constructed, then the depth should be increased, but a smooth transition of up to one and a half meters should be left.

If you plan to build a pool for children, then its depth should be 50-70 centimeters.
A multi-level pool or a pool with transitions to different depths is more difficult to arrange. The installation of such transitions should be carried out carefully so that sudden changes do not occur.
Construction materials and selection of suitable tools
In order to properly organize the construction of a swimming pool, it is worth thinking about all the materials in advance and preparing construction tools.
For arrangement you will need:
- concrete mixer;
- carpentry tools (hammer, knife, stapler, rules);
- carpenter's kit (self-tapping screws, screws, nails, tape measure, wrench, etc.);
- tamping machine;
- screwdrivers;
- sand and cement;
- boards 25 mm in diameter;
- beam 50 mm;
- waterproofing material;
- fittings;
- primer;
- stapler for reinforcement;
- adhesive base for tiles.
The finishing of the pool can be made of: tiles, mosaics, polypropylene, PVC film. The film can be selected in different colors: white, blue, light blue, pink, etc.

When choosing polypropylene as a finishing material, you can rest assured, because it is resistant to aggressive influences and is highly durable.
If you decide to equip your pool with tiles or mosaics, then when choosing, you should pay attention to the water absorption indicators - it should be low. At the same time, mosaic always looks respectable, more expensive and aesthetically pleasing.
How to build an inexpensive pool with your own hands
The pool equipment process consists of several main stages:
- Selecting the type of structure and drawing up a project for the future tank. Selection of the optimal location for placement on a summer cottage.
- The process of marking on the ground. Excavation.
- Construction of formwork and pouring under the pool bowl.
- Carrying out waterproofing and finishing work.
- Additional equipment for the pool: lighting, equipment, cleaning, filtration, etc.

The first step is to mark out the future reservoir on the site and carry out excavation work. To mark the structure, you can use small wooden blocks and brightly colored fishing line.
Following the markings, it is necessary to dig a pit for a pool of the preferred size, while digging half a meter more to arrange the formwork.
After excavation work, you can begin arranging the formwork.
The walls and bottom of the pit should be compacted - for this you can use a tamper.

Then lay a 25-30 cm layer of sand and compact the surface again.
Lay reinforcement along the surface and tie it with wire using a special hook.

The next step is to apply a layer of waterproofing. Choosing a waterproofing material is not difficult, and there are many options available on the market today. However, roofing felt and bitumen mass are better suited for a pool. Apply a layer of roofing felt waterproofing to the entire surface and even the very top, and then apply 4 layers of bitumen mass on top.

Next, you need to install the drainage system. The drainage of water from the pool can be organized into the general sewer system on the site. In addition, this is the most basic way to remove waste. The drain from the pool is connected to the sewer system, and the pipes are hidden under a layer of earth and laid at a slope. Then you can begin organizing the formwork.
Installation of formwork can be done using available tools and materials, and then pour everything with concrete mass. The walls should be poured in several layers. Only after the concrete has hardened is the formwork removed. This may take from two to 4 weeks, depending on weather conditions.
Laying a waterproofing layer and finishing work.

A layer of waterproofing is applied to the hardened concrete walls: it can be film, mastic or any other material. To finish the corner parts of the pool, you should use a special tape. This helps to avoid leakage.
Then you can safely begin finishing work.
Pool structures can be made of ceramic tiles, mosaics or PVC film. If tiles or mosaics are being laid, then after the main work, it is necessary to grout all the seams with white or cream grout and wipe the surface from grout residues.
Pool equipment and additional equipment. In addition to the pool, if desired and possible, you can add lighting, water purification devices and even heaters.
The final stage of work is the arrangement of the area in front of the pool and around the circumference.

Pool bowl: ready-made or homemade
As described earlier, excavation and filling of the bowl are the most labor-intensive processes. But today, from many manufacturers you can find ready-made pool bowls that only need to be inserted into the ground and fixed.
In addition to ease of installation, the advantages of such bowls include the availability of various shapes, sizes and colors. At the same time, if a concrete bowl may crack during operation, if movements in the ground begin, then such a fate does not await the finished bowls.
Similar designs are produced in plastic and composite. According to the installation principle, they are similar, the only differences are in the characteristics. The plastic must be additionally insulated around the perimeter of the walls. In plastic construction, the main material is polypropylene. Polypropylene blocks are not afraid of fading, do not require regular draining of water, and are not afraid of damage.

Composite structures are made of fiberglass, which is resistant to temperature changes.
Of the many advantages, there is still a disadvantage to ready-made bowls - they are too expensive in price.
Therefore, arranging a swimming pool with your own hands is a more economical and profitable business than buying a ready-made structure.
The most affordable and favorite vacation for many is a vacation in the country. In your own landscaped area it is so nice to relax, chat with family and friends, have a party or have a nice time in solitude. Therefore, the desire to make a summer cottage as convenient, comfortable and suitable for a good rest as possible is quite understandable.
A swimming pool would also be useful at the dacha. Many people refuse this luxurious element, believing that its installation will be very expensive. But this is not at all true, because it is quite possible to make a pool with your own hands at the dacha! You can also decorate your summer cottage with a pond or a small fountain. These simple structures will help you master the basic types of work required to build a pool. There are many ways and techniques for building a swimming pool. We will introduce you to the most popular and convenient for self-implementation.
Step-by-step diagram for constructing a monolithic pool
Construction of a pool requires the following stages to be completed in stages:
- development of a plan, preparation of drawings;
- drainage arrangement, thermal insulation;
- gain;
- laying communications;
- pouring the solution;
- waterproofing, sealing;
- Finishing work.
Our instructions will help you quickly and efficiently build a swimming pool at your dacha with your own hands. At the initial stage, it is important to decide on the place where you want to organize the pond. In this case, it is important to take into account not only your own preferences and desires, but also the capabilities of the site and its features. In order to make the right choice, it is necessary to draw up a site plan with all the details and analyze it. Several parameters will help you determine two or three suitable locations for your pool.
It is advisable that the selected area be free of large plants and trees. In an open place, the water will heat up faster, but in the shade it will remain cold for a long time. Tree roots can also cause the bowl to collapse, and leaves, grass and other debris can cause a lot of problems. All this will have to be constantly fished out of the water.
Correctly calculate the depth of the pool. An adult can swim more or less comfortably at a depth of at least 1.5 m. If there is less water, the pool will only be suitable for children. At the desired depth of the pool, you need to add 1.5 m for drainage and take into account the thickness of the concrete walls of the bowl.
An equally important issue is communication. It is important not to spoil them during the preparation of the pit. Before starting work, it is necessary to determine where they are laid. After all the preparatory work is completed, you can proceed directly to the excavation work. When digging a pit, take into account the need to slope the walls. It should be about 5º. This nuance will save you from problems with constantly crumbling soil.
The next task that needs to be solved when building a swimming pool with your own hands at the dacha is installing waterproofing. The first stage of solving this problem is the creation of a fifteen-centimeter sand-crushed stone “pillow”. It must be compacted and leveled. Roofing material is placed on top of the “pillow”. First one layer, and then a second layer on top of it. The edges of the sheets should rise above the ground by at least 20 cm.
The next stage is strengthening. It is performed using a reinforcement cage. You will need material 20 mm in diameter. After the frame is ready and laid, the pit is filled with concrete.
The best option is to fill the entire bowl at once, without dividing into layers. But this is not so easy to do, especially if the construction is carried out on your own.
Therefore, as a rule, this stage is divided into several substages. First of all, fill the bottom. It is important to leave a slight slope towards the drain. After the bottom, the walls are prepared.
To achieve high quality pouring, it is recommended to use vibration installations. While the solution at the bottom dries, you can start laying communications.
After the bottom has hardened, work on the walls begins. To do this, you need to create formwork. Please note that the future wall of the pool must be at least 40 cm. If you fill it in two stages, then the reinforcement is also done accordingly. After you have made and installed the formwork, you need to make a frame connecting to the horizontal parts. Now you can pour the concrete. It also needs to be compacted using a vibrating machine. After it hardens, you can perform finishing work.
Do you want to know how to make a pool at your dacha inexpensively with your own hands? The video on this page will help you understand the basic principles and methods of performing all the necessary work. Read our descriptions, watch photos and videos, and you can build the pool of your dreams on your summer cottage. For example, a luxurious multi-level swimming pool.
In this section you will find detailed recommendations for each stage of construction of a multi-level simple pool without complex communications. In it, the bowl is simply filled with water, and after a while it is suctioned, and the bowl is filled with fresh, clean water.
The first thing you need to do is choose a place. Then it is necessary to carefully consider each stage of the work, assess the reality of their implementation at a specific selected location. Next, an optimal plan is drawn up that will allow you to accomplish everything you need with maximum savings and efficiency. After this, you can start digging.
Since a multi-level design is planned, it is necessary to calculate the size of each level. In the process of digging a pit, level by level, filling is also carried out. So, gradually, you will reach the bottom. After hardening, you can carry out a test draw of water to find out where there are leaks. If there are no defects, then the water needs to be pumped out. Next, you can finish the concrete according to your personal preference.
This is one of the simple and accessible ways to build a swimming pool at your dacha with your own hands. In this case, you will not have to bother with sewerage, wastewater and other communications. Such a pool does not require cleaning devices. A simple, comfortable and economical pool, which not only allows you to enjoy the coolness of the water, but also serves as a wonderful decoration for the site.
Polypropylene is a modern and practical material, perfect for creating a swimming pool. Among its characteristics are high strength, resistance to temperature changes, reliability and ease of maintenance.
If you decide to build a polypropylene pool, then, as in previous cases, you need to determine a suitable place for it. The selected area must be marked in order to be able to properly dig a hole. It is recommended to leave a reserve of space, about a meter wide, so that in the future it will be convenient for you to walk around the pool, as well as perform various work with pipes and other communications.
Determine how high the board will reach. You need to dig half a meter deeper than the location of the bowl in order to provide space for a special “cushion.” Geotextiles are placed at the bottom of the prepared pit. A crushed stone “pillow” is prepared on top of it. The layer should reach 30 cm. Then reinforcement is performed and concrete is poured.
You can dig a hole yourself or order special equipment. Unneeded soil can be scattered around the site or removed.
Then the surface of the pit must be leveled in height and lined with geotextiles and crushed stone. The resulting “pillow” is compacted. Then preparing the reinforcement frame, crosswise tying the rods with wire every 25 cm. The resulting frame is laid on top. To prevent it from lying on the crushed stone, bricks are placed under it in places.
If you are planning to build a large pool, then you will need a lot of mortar. We recommend ordering it ready-made. This will give you the opportunity to perform a one-time fill of the entire base. Before filling, you need to install pipe beacons. They will form the basis for the finished floor in the future. The base is poured with a margin of half a meter around the entire perimeter.
While the base is gaining strength, you can prepare the bowl elements from polypropylene. To do this, you need to purchase a welding extruder with the function of making different types of seams. The optimal choice of material is polypropylene sheets 4x1.5 m, 5 and 8 mm thick. Thinner material is easier to bend, so it will be used to build a Roman staircase.
When sewing outside seams, use a 90º seam shoe. The seams inside are made with an oval rod.
Welding of the bottom elements is carried out directly on the base. First of all, you need to go through the outside with a hand extruder, and then with an oval rod and a hot air gun on the other side.
Before laying the polypropylene bottom, the base is covered with geotextile. Expanded polystyrene is layered on top of it.
If you do not know how to build a pool at your dacha with your own hands from polypropylene, before starting work, read not only these instructions, but also the specifics of welding this material.
After the bottom has been assembled and laid, the locations of the elements of the future walls are determined. Marking is necessary so that the bowl turns out exactly as you planned. The wall prepared for installation is placed in its designated place. The connection is made from the inside using a hot air gun. But this is not the main mount. This is a temporary measure to keep the structure in general shape while external extruder welding is being done.
When all the walls have found their place, we move on to creating the stairs.
After this, it is necessary to install stiffening ribs. They are made of thick polypropylene and should be located at a distance of 60 cm from each other. The ribs are welded with a welding rod. Holes for fastening reinforcement 12 mm in diameter are prepared in advance in strips. The distance between them is half a meter. In places where the bowl has a rounded shape, additional rigidity is not needed; polypropylene is already strong enough. The bowl must be insulated by placing sheets of foam plastic between the stiffening ribs.
Equipment for such a pool requires:
- nozzles;
- skimmer;
- drain
Be sure to leave an appropriate drain hole when pouring. If you forget to do this, then the drain will have to be moved to the wall. And in this case, the water that will be below the drain level will have to be pumped out with a pump.
Holes in polypropylene can be made with the same tools as in wood.
The nozzle piping is made of PVC pipes. The connection is ensured with a special glue. It's not difficult to do this job. The pipe must be sanded to the length of the gluing and the element that will connect it (angle, coupling). Then a chamfer is removed from the pipe at an angle of 45º. The glue is spread on the pipe and the connecting element and the pipe is inserted tightly. In 4 minutes you will have a reliable connection.
Pipes installed in their proper places are insulated. To prevent the insulation from being torn off during the concrete pouring process, it is wrapped with tape.
It is important to connect the nozzles correctly to obtain uniform pressure in each of them. First, the connection is made in pairs, and after that a central line is introduced at the center of the connection of each pair.
Filtration devices, heat exchanger and other equipment are best installed in the basement. The pipes must be insulated and trenches dug for them.
To avoid strong concrete pressure on the walls of the pool, formwork is installed on the inside and outside. From the inside it must be fixed so as to maintain a strictly perpendicular position to the ground and sides. Concrete is poured as follows:
- The formwork is being installed. Its height is 30 cm;
- The pool is filled to 30 cm with water;
- Next, the solution is poured with the same layer;
- A day later, the pool is again filled by 30 cm;
- After moving the formwork, the next layer of mortar is poured.
After the solution gains strength, you can proceed to finishing work.
Types of pools
Explore all possible types of designs if you are planning a pool at your dacha with your own hands. Photos will help you choose the best option suitable specifically for your site. Perhaps in your case it is better to do without construction and limit yourself to a portable or inflatable structure. We bring to your attention a brief overview of the most popular pool designs.
Such a pool will not only refresh you in the heat, but will also be an excellent decoration for your dacha area.
Good shape, comfortable and beautiful. You can play with water levels to your advantage by choosing a place with a difference in elevation.
A small and compact pool of shallow depth will make your children happy! It is convenient to assemble it for the summer and disassemble it for the cold season.
Usually one is made shallow and the other deep. So, both adults and children can enjoy water treatments.

It is difficult to find the owner of a country house who has not at least once thought about building a swimming pool or a plunge pool in the house. This desire is understandable. The opportunity to swim regardless of the time of year and weather conditions, to always be in good shape and the incomparable pleasure of taking water procedures is captivating.
Many novice developers believe that making them is not very difficult. Enough desire, free funds, and the dream came true. The many pitfalls and features hidden in the “wet” area arranged inside the house are overlooked. This is exactly what we will talk about in today’s material, from which you will learn:
- How does a swimming pool in a private house differ from an ordinary plunge pool?
- Is it worth building a “wet” zone in the house;
- What nuances should you learn about before starting construction of a swimming pool in your home?
- How to build a swimming pool in a house;
- How much will it cost to build a “wet zone” inside the cottage?
Swimming pool and plunge pool: similarities and differences.
If you look at the results of our survey, you can see that the majority of FORUMHOUSE users were in favor of the “wet” zone.

But, before moving on to the specifics of arranging a font or swimming pool in a private house, you need to understand these concepts, because Already at this initial stage, confusion arises, because a font is often called a pool, and vice versa.
A swimming pool is a complex engineering and hydraulic structure that includes a bowl, filtration equipment intended for water treatment, pumping equipment necessary for recirculation (changing and, if necessary, draining water), and a water heating system.

A classic font is a relatively small container (sometimes mobile, made of wood) filled with cold water, intended for contrasting water procedures. Traditionally, a font is an attribute of a bathhouse, and a small pool is an attribute of a sauna. In the font there is a more frequent change of water.

An indoor pool is primarily intended for entertainment and swimming, and equipped with attractions - waterfalls, geysers, hydromassage, countercurrent (artificial current) - it becomes a center of attraction for the whole family.

Few people can afford to build a full-fledged swimming pool in their home for several people, “with three lanes of 25 meters each.” Therefore, developers choose a different type of pool: a therapeutic and recreational pool, small (sometimes also called a font), equipped with SPA equipment with a water volume in the bowl of 1-3 m3.
The second option - sanitary and health facilities with a volume of 3 to 8 m3, just like the first type of home “reservoir”, are used as an addition to a sauna, hammam or bath complex.

To swim, they build a larger structure - 15-50 m3, 1.5 meters deep (which is enough for swimming). Accordingly, the requirements for such structures, as well as their price, increase in direct proportion to their size.

But even if you want to build a relatively small pool in your house, with a bowl measuring 3x5 meters, you should prepare for the costs in advance. Therefore, before you begin its construction and make an informed decision, you need to understand what requirements are imposed on the room within which the “wet” zone is located.
Construction of a wet zone: pros and cons
The advantages are obvious - the pool is in the house itself, you can use it whenever you want. This, as follows from the comments of our users, becomes the main driver of the desire to build it.

Lutsenko User FORUMHOUSE
For me, this will be a place of cultural relaxation, where you can splash around and sing karaoke.

Barnauleichik User FORUMHOUSE
I planned to build a big house for the whole family, as they say, “for centuries.” I want a pool in the cottage that is 5 meters long. I will equip it with a countercurrent and will “swim” against the current.
The participants of our portal are echoed by a user with the nickname Sintetik, who planned to build a house measuring 11x16 meters with a swimming pool and a sauna. In his opinion, the main idea of such construction is to get all the water activities without leaving the building.
The advantages are obvious, but there is a second side to this issue. The disadvantages become real “underwater reefs”, on which the desire to build a “wet zone” can be broken.
First, here are the results of our second survey:

As you can see, most of the users of our portal chose the option of placing it on the site, in an extension to the house. This is due to the fact that the pool in the house is not just a large “bathtub” filled with water, but, as mentioned above, it is a real water complex equipped with expensive engineering equipment. There are special requirements for its design, premises and building, which should be known in advance.
How to build a swimming pool at home
Already from the name “wet” zone it is clear that this room must meet a number of specific characteristics. This includes reliable waterproofing, the use of waterproof materials and compounds for finishing the “wet” area, the provision of all necessary communications, and a well-designed ventilation system.
In addition, a swimming pool or plunge pool in a house always means additional and heavy weight. The stone bowl, the construction of which took tens of cubic meters of concrete, plus the water in it, puts a significant load on the underlying structures or soil layers.

There are projects of private houses where the pool is located in the basement, on the first floor, or on the second floor (in this case, additional load is placed on the ceilings and walls).
Based on this, we remember this rule - the pool is designed together with the house. The main mistake is to erect a building and then think about how to place a swimming pool in it, or try to place a large plunge pool in the basement. In this case, the base plate may simply not withstand the load and crack.
The pool and the house should be two structures independent of each other. The pool bowl must not be connected to the walls of the house; building ceilings or walls cannot be supported on the bowl.

rex@ User FORUMHOUSE
The principle of construction is the following - first we make a general design and coordinate it with the organization that will build your pool. According to the technology, first a bowl is built, and then a building is erected around it. The depth of the building's foundation in the place where it runs next to the pool is determined by the authors of the project.

Timidjar User FORUMHOUSE
The foundation of the house should not be connected to the foundation of the pool.
During construction, special attention should be paid to the strength and tightness of the bowl, as well as reliable waterproofing of the “wet” area. Reinforcement, grade of concrete, additives that give the mixture increased water resistance, waterproofing, additional equipment that is planned to be equipped with an individual pool, the presence of all necessary utilities - all this is taken into account in advance, and not after.

The waterproofing of the bowl must be continuous over the entire surface. When casting a concrete bowl (if this is the construction option chosen), it is undesirable to make cold seams - in the future they may become a possible source of leakage. Hence, the walls of the bowl are filled in one go.
In addition, if you plan to build a swimming pool in a house, you need to find out whether the soil can withstand the combined weight of the building and the bowl filled with water, or whether the soil may settle unevenly over time, which will lead to an emergency: the walls of the building or the bowl will crack, and water will flow out of it will begin to flow out, washing away the foundation. In this case, expensive repairs will be required.
It is impossible to understand how to build a swimming pool at home without solving a number of engineering and design problems. Moreover, building a bowl is not always one of the most difficult tasks.
How to build a swimming pool at home - problems and solutions
The organization of premises for a swimming pool or plunge pool and the availability of free space are one of the main factors influencing the final decision on their construction. Those. - an additional room is added to the area of residential and non-residential premises of the house where a swimming pool or plunge pool will be located.
Considering that people don’t swim in the pool every day, we come to the conclusion that there will be a room in the cottage that will actually be idle for a large amount of time. And the cottage itself will have to be built with an increased area, and all its engineering systems will have to be designed and tied to servicing the pool.

Full-fledged indoor pools are built in cottages with an area of 300-400 square meters. m or more.
But even having decided to build a huge house (which still needs to be maintained and heated), you need to ask the opinion of the household - how often will they use the pool, and whether it will eventually turn into an expensive and useless toy that requires constant investment.
Many developers miss such an important point in arranging a “wet” area as ventilation. In one of our previous articles we already talked about, but we repeat - a large volume of water constantly present in the house is a source of high humidity.

From 1 sq. m of pool, approximately 0.25 (the figure is given as a guide) liters of liquid evaporates per day. Without installing supply and exhaust ventilation (which is calculated in relation to the area of the water surface in the pool bowl or font and the temperature of the water and air in the room), the pool in the house will turn into a constant headache.
In the absence of ventilation, the evaporated water will condense and fall out in the form of droplets on the surfaces of the “wet” area. Over time, this will lead to deterioration of the finish, dampness, the appearance of fungi and an unpleasant odor.

And this is just one of many factors that complicate the arrangement of the “wet” area of the house. Let's add the need to install engineering and filtration equipment, heat water, and arrange mortgages in the premises for additional communications.

You also need to think in advance about where to drain the water. A septic tank or storm drain may not be able to handle large volumes of discharge. That is, all systems in the house and the pool area must be calculated with a reserve for its long-term operation. Don’t forget to add in the costs of laying additional routes for electrical cables in the “wet” room, installing another electrical panel, the cost of purchasing waterproof switches and switches, pumps and electricity costs. After all, for a swimming pool to function, it is necessary to equip it with appropriate equipment powered by electricity. We calculate whether the allocated power is enough for the normal operation of the “wet” zone in the house. For reference, we will resort to the following approximate figures given by a user with the nickname Besrom:
- Filtration system - 0.55 kW;
- Backlight: two LED lamps 12 volts - 100 W;
- Control system, valve - 0.50 kW;
- Counterflow - 3.5 kW;
- Waterfall - 2 kW.
Moreover, it is best to use a three-phase network of 380V. It is not surprising that the monetary component becomes a decisive factor when answering the question “to be or not to be in a “wet” zone in the house.”
Make a pool in your house: cost of construction and maintenance

NahNah User FORUMHOUSE
I planned to build a swimming pool 15x5x3 meters. Now I’m wondering how much it will cost me to maintain it for 1 year and for 10 years, taking into account all the necessary planned activities and major repairs.
The “wet” area in the house can become a significant expense item, because the pool or plunge pool must be filled with water and its level maintained (the water constantly evaporates; to reduce the level of evaporation, the pool is covered with a special blanket or blinds). It is not enough to understand how to make a swimming pool in a country house, and what budget to set aside for construction - you will also have to spend money on “chemistry” to disinfect the water and, most importantly, maintain acceptable conditions and above-zero temperatures in winter. Those. the water will have to be heated, and the home’s heating system may not be able to cope with this. Considering that the climate in our country is harsh, and the heating season, depending on the region of residence, will last 6-8 months, the pleasure of water treatments can cost a pretty penny. 
rex@ User FORUMHOUSE, Moscow.
From my experience I will say, build a building with a bathhouse, shower, toilet and recreation room accommodating a 3x6 meter pool cost 1.7 million rubles. Swimming pool with a concrete bowl and all heated equipment, countercurrent, waterfall - 1.2 million rubles.
According to user Step48, owning a house with a wet zone can be compared to owning a car. The more complex and expensive the machine, the more expensive its maintenance. It’s the same here: you have to spend money on water treatment, water heating, maintenance (not everything can be done with your own hands), monitoring the operation of equipment, performing scheduled maintenance, etc.

Sintetik User FORUMHOUSE
I built a swimming pool in my house with my own hands. Bowl 3x4x1.5 meters. It took about 10 cubic meters of concrete. Construction cost 100 thousand rubles. Equipment + another 400 thousand rubles. Mosaic finishing – 200 thousand rubles. The total is already 700 thousand rubles.
Based on these figures, the construction of a home “wet” area with a swimming pool measuring 15x5x3 will cost 10 times more expensive, because a heavy bowl will pull down a serious foundation; it is necessary to make engineering equipment, pumps, etc. In fact, in terms of costs and further maintenance, this is not the construction of a room for a “wet” zone, but the construction of a second house, not even a house, but a full-fledged house.
Summarizing
Undoubtedly, having a swimming pool in a private home is both prestigious and useful, but only if there are sufficient funds for its construction and, importantly, constant operation and maintenance. In other cases, you need to think ten times before deciding to build it. Therefore, when arranging a “wet” area or room for taking water procedures, first of all, you need to use common sense and, as an option, build a small pool or plunge pool. Moreover, our portal has accumulated extensive experience in the construction of such home structures.
Called "Fairy Tale".