
It does not need to be introduced - it allows you to automatically synchronize local files with cloud storage. Describe the process of registering and installing client software, I believe, is also not necessary. The process is simple, well-documented, and there are numerous reviews of Dropbox features available online. Instead, we will focus on less obvious things.
Launching a Second Dropbox Instance
The creators of the service proceeded from the assumption that the user launches only one Dropbox client during a session with the operating system. It’s hard to blame them for this - it’s hard to imagine the situation of simultaneously connecting to the service with another account, and with one it doesn’t make sense at all. Nevertheless, discussions of this issue often arise in the forums, so let's try to figure it out.
The Dropbox client is launched in Windows as a regular user program using a shortcut placed in startup. Simply changing the working directory does nothing, and the only way out here is to make a copy of the shortcut to run it as a different user. An account must first be created through the control panel.
On Windows XP it looks like this
The method has another interesting application: if several people work on the computer with different accounts, then they can use the installed Dropbox instance independently of each other (there is no need to change the properties of the shortcut).
When you try to launch the client program for the first time, it asks you to enter your Dropbox login and password. All configuration steps are standard here, but you should pay attention to the choice of the directory for synchronization - by default it will be in the profile of the user on whose behalf you run the client. If this does not suit you, then instead of automatic configuration (Typical), you need to select manual (Advanced) and specify the directory yourself.
As a result of simple manipulations, we got two instances of the Dropbox program, working simultaneously and with different service accounts. There are also two directories for synchronization - in the My Documents folder and on the desktop.
 Two Dropbox client instances and two directories on Windows XP
 There may be nuances with file access rights, but for home users they are not critical, since they work on the system with administrator rights and have full access to the disk. Another issue is autorun. For example, in Windows XP, it was not possible to find a regular way to automatically start the program on behalf of another user using a shortcut. The issue is solved by third-party utilities, of which there are many.
Sync files outside of the Dropbox directory
Dropbox is purely for syncing files over the network and doesn't know anything about app data (unlike some proprietary services like iCloud or Ubuntu One). In addition, it works with a special directory on the local machine and cannot synchronize data outside of this directory. On Linux, the problem is solved by creating a Dropbox folder inside - let's try to do the same on Windows.
The most interesting question here is how correctly Dropbox for Windows will perceive a soft link, which is an independent object of the file system, somewhat reminiscent of a shortcut. The screenshot shows that everything went well - the program perceives the symlink as a directory and uploads its contents to the server.
You can achieve similar results in other ways - by creating hard links to files or, say, by mounting partitions inside the Dropbox directory. As for these applications, there are also options here: for example, you can make a symbolic link to the Thunderbird profile in the synchronized folder - and a backup copy of your mail will be in the cloud.
Dropbox is the world's first and most popular cloud storage service. This is a service thanks to which each user can store any data, be it multimedia, electronic documents or anything else, in a safe and secure place.
Security is by no means the only trump card in the Dropbox arsenal. After all, this is a cloud service, which means that all the data added to it goes to the cloud, remaining tied to a specific account. Access to files added to this cloud can be obtained from any device on which the Dropbox program or application is installed, or simply by logging in to the service website through a browser.
In this article, we will talk about how to use Dropbox and what this cloud service can do in general.
Installing this product on a PC is no more difficult than any other program. After downloading the installation file from the official site, just run it. Then follow the instructions, if you wish, you can specify the location for installing the program, as well as specify the location for the Dropbox folder on your computer. It is in it that all your files will be added and, if necessary, this place can always be changed.
Create an account
If you still do not have an account in this wonderful cloud service, you can create one on the official website. Everything is as usual here: enter your first and last name, email address and create a password for yourself. Next, you need to check the box, confirming your acceptance of the terms of the license agreement, and click "Register". Everything, the account is ready.

Note: The created account will need to be confirmed - an email will be sent to the mail, from which you will need to follow the link.
Setting
After installing Dropbox, you will need to log into your account, for which you need to enter your username and password. If you already have files in the cloud, they will be synchronized and downloaded to your PC, if there are no files, an empty folder will simply open that you assigned to the program during installation.

Dropbox runs in the background and minimizes to the system tray, from where you can access the latest files or folder on your computer.

From here you can also open the program options and make the desired settings (the "Settings" icon is located in the upper right corner of the small window with the latest files).
As you can see, the Dropbox settings menu is divided into several tabs.

In the Account window, you can find and change the sync path, view user details, and, most interestingly, configure sync settings (Selective Sync).

Why is this needed? The fact is that by default, all the contents of your Dropbox cloud are synchronized with your computer, downloaded to it in the designated folder and, therefore, take up space on your hard drive. So, if you have a basic account with 2 GB of free space, this most likely does not matter, but if you, for example, have a business account with up to 1 TB of cloud space, you are unlikely to want all this terabyte also took up space on the PC.

So, for example, you can keep important files and folders synchronized, documents that you need in constant access, and bulky files can not be synchronized, leaving them only in the cloud. If you need a file, you can always download it, if you need to view it, you can also do it on the web by simply opening the Dropbox website.
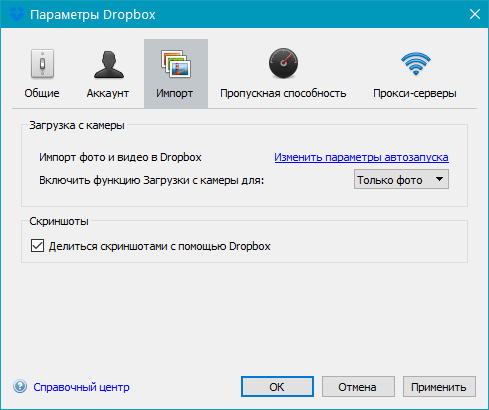
By going to the "Import" tab, you can configure the import of content from mobile devices connected to a PC. By activating the camera upload function, you can add photos and videos stored on your smartphone or digital camera to Dropbox.
Also, in this horse, you can activate the function of saving screenshots. The screenshots you take will be automatically saved to the storage folder as a ready-made graphic file, to which you can immediately get a link,

In the Bandwidth tab, you can set the maximum allowed speed at which Dropbox will sync the added data. This is necessary in order not to load the slow Internet or simply make the program work inconspicuously.

In the last settings tab, if desired, you can configure a proxy server.
Adding files
To add files to Dropbox, simply copy or move them to the program folder on your computer, after which synchronization will begin immediately.

You can add files both to the root folder, and to any other that you can create yourself. You can also do this through the context menu by clicking on the required file: Send - Dropbox.

Access from any computer
As mentioned at the beginning of the article, files in the cloud storage can be accessed from any computer. And for this it is by no means necessary to install the Dropbox program on your computer. You can simply open the official website in the browser and log in to it.

Directly from the site, you can work with text documents, view multimedia (large files can take a long time to load), or simply save the file to a computer or a device connected to it. The account owner can add comments to Dropbox content, link to users, or publish these files on the web (for example, on social networks). 
The built-in site viewer also allows you to open media and documents in viewing tools installed on your PC.

Access from a mobile device
In addition to the program on the computer, Dropbox also exists in the form of applications for most mobile platforms. It can be installed on iOS, Android, Windows Mobile, Blackberry. All data will be synchronized in the same way as on a PC, and the synchronization itself works in both directions, that is, you can add files to the cloud from your mobile in the same way.

Actually, it is worth noting that the functionality of Dropbox mobile applications is close to the capabilities of the site and in all respects surpasses the desktop version of the service, which in fact is only a means of access and viewing.

General access

Note: if you want to allow someone to view a particular file or download it, but not edit the original, just provide a link to this file, and do not share it.
File sharing function
This possibility follows from the previous paragraph. Of course, the developers conceived of Dropbox solely as a cloud service that can be used for both personal and business purposes. However, given the capabilities of this storage, it can also be used as a file sharing service.

So, for example, you have photos from a party where there were a lot of your friends, who, of course, also want these photos for themselves. You just share them, or even provide a link, and they already download these photos to their PC - everyone is happy and grateful for your generosity. And this is just one of the applications.
Dropbox is a world-famous cloud service that can be found in a lot of use cases, not limited to what its authors intended. It can be a convenient storage of multimedia and/or work documents aimed at home use, or it can be an advanced and feature-rich business solution with large capacity, workgroups and extensive administration options. In any case, this service deserves attention, if only for the reason that it can be used to exchange information between various devices and users, as well as simply save space on your computer's hard drive.
At one fine moment, 18.8 GB on the dropbox stopped being enough, it was decided to look, is it possible to use several Dropbox accounts on one computer? It turns out you can…
1. We need to download the DropboxPortableAHK program the latest version.
2. Unpack it to the root any drive (D:\DropboxPortableAHK)
3. In order to know what files are there, I create a folder at the root of the same drive (D:\test)
4. Run from the unpacked folder DropboxPortableAHK.exe
5. After a while, such a window will start
8. We are prompted to point to the previous folder with Dropbox files. In principle, everything is clearly written there

9. After clicking Next, you will see the update settings. I check only "Check for updates to DropboxPortableAHK \ Update automatically too respectively" and "Check for updates to Dropbox". Click Further
10. Add-on settings

12. Click Upload Dropbox Files and click Further
13. Click Launching the Dropbox installation and we are waiting
14. The standard Dropbox window appears. Select "I already have a Dropbox account" (I created it earlier) and click Next

15. Enter email and password. Next
16. Choose 2GB Free. Next
17. Choose Typical. Install
18. If you are not interested in learning, click Skip tour and Finish
19. Will throw out such a message, click Yes

20. Should return to the DropboxPortableAHK installation where you need to click Complete
21. Open the DropboxPortableAHK folder and run DropboxPortableAHK.exe again
22. Synchronization should begin, and files from your folder should appear on the Dropbox website.
P.S. I noticed that if you want to add more than 2 accounts to your computer, then you need to download DropboxPortableAHK again. I've tried copying previous folders from DropboxPortableAHK to another partition, but NOTHING worked.
At the moment I have THREE simultaneously working accounts.

Thus, you can get almost unlimited space for files that will be synchronized with the wonderful dropbox service, and from there you can open them on any other device (Mac, PC, iPhone, iPad, etc.).
Hello, dear readers of the blog site. Not so long ago, I published an article, which now acts as a kind of l add-on (the "Files" tab in the web interface).
The piece is comfortable and I actively use it. But it would probably not be right to ignore the service that was first implemented by cloud storage idea and which, at the moment, has one of the largest user audiences, whose account is already in the tens of millions. I'm talking about of course dropbox.
The problem of exchanging files between computers, tablets and phones is solved by creating a folder on a cloud server on the Internet that will contain all the data that you upload to the Dropbox folder on your computer. Access to this folder can be obtained either through the web interface, or using the program installed on your other computers, tablets and phones.
Which is better - Yandex disk or Dropbox (after all, there are other storages, for example, or)? Let's answer this question for yourself by trying both cloud data storages and evaluating their functionality and convenience. The fact that many programs can use it to synchronize their data can speak in favor of Dropbox, or the fact that the bourgeois service maintains and stores a history of changes to all files (up to one month on a free account) and you can always roll back (this is convenient, especially when co-editing documents).
Create a cloud storage account
In order to try Dropbox in action, you first need to fill out a simple registration form on this page (unfortunately, so far this bourgeois service has not acquired a Russian interface, which is probably due to the small number of paid accounts registered by Runet users).
P.S. It is noteworthy that a week after the publication of this article, the Dropbox web interface and the program that you install on your computer became fully support the Russian language. Either they heard my groans, or a coincidence. Although, my megalomania votes, of course, for the first option.
If in some incomprehensible way Russian was not selected as the default language, then this misunderstanding can be easily corrected by clicking on the language selection button in the lower right corner of the Dropbox website window:
Well, actually, the registration form (already in Russian):

You can enter your data in Cyrillic, as well as later you can use Russian characters in the names of files and folders that will be synchronized and stored in Dropbox. In the future, the login will be the E-mail specified by you during registration.
After clicking on the button to create an account, you will be redirected to a page where, without any preamble, your browser will display a dialog for downloading the program to install it on your computer. Indeed, after all, someone may not notice the button for downloading the program, and so for sure. However, for your other computers, you you can download dropbox from this page:
At the first step, the installation wizard will ask if you already have a Dropbox account (second checkbox) or if you still need to create one (check the first line):

We have already created an account, so we mark the second option and click on Next. Next, you will be prompted to enter your account information and, if desired, change the name of the computer to which this version of the program will be linked:

After clicking Next, the program will connect to the service, checking the account data you entered, after which you will be faced with a choice - do not pay anything and have only miserable 2 GB cloud storage, or pay ten or twenty dollars a month for a hundred or even two hundred gigabytes on a paid account:

What Russian does not like freebies. This is probably why the owners of Dropbox were in no hurry to translate it into Russian. Of course, 2 GB is not enough, but it is possible to expand this space by performing a few simple passes, or by attracting new users to this cloud storage in your own way (on refs you can dial up to 16 gigs, which is already much better than two).

I have to use Google Chrome integrated into the browser, because in English I am extremely weak and helpless. By the way, he translates every year better and better.
Moreover, the referral program is very tricky. For each new recruit, you will be given an additional half a gigabyte of disk space in the cloud storage. However, the same half a giga will be received by the one who registered using your referral link. For example, I went to the Dropbox website via a reflink and after a while I received an email explaining that I now have as much as 2.5 gigs in cloud storage and suggested where I could get your referral:

Here is my ref. In general, they have everything thought out. Dropbox, by the way, is a very profitable company, whose revenues are measured in hundreds of millions of dollars a year, and all thanks to a huge audience of users, a simple and intuitive interface, as well as high reliability and availability. Well, the referral program helps to increase these very incomes, which is probably not so easy to do lately, because several dozen analogues have appeared that are not inferior to Dropbox in functionality, and sometimes even surpass it.
Installing and configuring the Dropbox program on a computer
Okay, back to our sheep. At the final step of the application installation wizard, you will be prompted to change the location of the Dropbox folder on the computer ("Typical" by default, and "Advanced" - with the possibility of self-selection):

Personally, I try not to put anything extra on the system drive so that the image created in Acronis is not too large, so in this case I select the “Advanced” option and specify a different path for the shared folder (not on the system drive):

Next, you will be asked exactly which folders you want to synchronize with the cloud storage server and, accordingly, with all other Dropbox programs installed on your own computers. A check mark in the first line will mean full synchronization of all subfolders and files, and when checking the second position, you will need to uncheck those folders that you do not want to synchronize for one reason or another.
That's it, the installation wizard steps are finished, after which you will be offered to see explanatory pictures for working with this cloud storage service and its desktop part. By the way, it turned out quite clearly, the large green arrow that appeared was especially cool, which swayed and pointed to the Dropbox program icon flashing in the tray, double-clicking on which will open a window to the cloud data storage:

If you click on the program icon in the tray with the right mouse button and select the settings item from the context menu of the gear icon (it would be possible to bury it even further):

Then a window will appear where you can adjust something and see the percentage of fullness of your limit in the cloud storage. At the time of synchronization, the percentage of completion and data transfer rate will be displayed. Well, a list of files recently added to your cloud will also be displayed. We are still interested settings, so we choose "Parameters".
On the first “General” tab, you can disable the appearance of notifications about various events that have occurred in the cloud storage (adding a file, changing a document that you are working on with someone, etc.), and you can also disable program startup Dropbox along with Windows and turn off fast data synchronization with computers on your local network.

Let me explain the last point. If Dropbox is installed, for example, on the computers of you and your significant other, which sits on the same local home network, and you are logged into it under the same account, then the files placed in the shared folder first copied over the local network to the second computer, and only then they will be uploaded to the cloud storage via the Internet. This will significantly speed up the exchange of heavy files within the local network, thus eliminating the double download of files over the Internet.
The next tab in the Dropbox settings window is called "Account" and allows you to perform only one action - disable the program on this computer from your account in the cloud storage. On the tab "Traffic" you can limit, if desired, the speed of downloading and uploading files from the cloud and to the cloud during synchronization. It probably makes sense to do this with a common Internet channel for many users, for example, in a home or work network.
You can also set the proxy server settings if for some reason you use it to access the Internet. On the tab "Advanced" you will see all the same settings as when installing this program on a computer - the ability to change the location of the Dropbox folder and disable synchronization for individual folders in your cloud storage. It would be possible, of course, to choose the language, because recently there has been full support for the great and mighty Russian language.
How to use Dropbox?
After the installation of the program is completed, the contents of your Dropbox folder will open, where, in fact, there will be nothing except for the “Photos” folder and a brief manual. In the "Photos" folder you will find a folder with a demo album. Photo albums in Dropbox are formed based on folders created inside Photos:

After creating a folder for a new album and dragging new photos into it, a blue tab will appear to the left of its icon, which will change to green after synchronization is completed (uploading new files from your computer folder to the cloud storage).
To give the opportunity to view photos from your photo album to your friends or everyone, you can, by right-clicking on the folder with the album, select from the context menu of this folder "Dropbox" - "Share a link" (share a folder or file):

After that, you will be transferred to the browser, which is the default in the system, and you will see a window offering to send a link to view this photo album by mail (it can be seen in the background of this window) or copy the public link to it to the clipboard by clicking on the button "Get the link":

Any person who received this link from you or copied this link on the site will be able to view the list of photos in the album, download them all as one archive, or just view them in full screen mode by clicking on the screen with the left mouse button to load the next photo:

Dropbox allows you to share more than just folders but also individual files. For example, I applied everything described just above to the Getting Started.pdf file, which was present in the default cloud folder. Now this file is available to everyone via a shared link:
https://www.dropbox.com/s/pfmmievx9tshh05/Getting%20Started.pdf
Depending on the default settings of your browser, it will either be opened for viewing in a browser, or a dialog for downloading it to your computer will be activated.
A little higher, we made it possible to view the contents of the folder by all Internet users, without exception, who follow the appropriate link. But often there is a need to shared folder to work together with the files located there, and access to it should be limited.
To do this, you will need to select from the context menu of this folder the items "Dropbox" - "Access to the folder":

A window will open in the browser where you will need to specify the Email address of the person with whom you want to share files in this folder, and click on the "Grant access" button:

As a result, a letter from Dropbox of the following type will be sent to the specified mailbox:


Now the two of you can edit the files available there, add and delete them if necessary. Thanks to Dropbox's ability to rollback any changes and maintaining a detailed history of edits, you can be calm about inconsistent actions. We'll fix everything. You can, if desired, add the required number of users in the same way, who will be able to work with files in this folder.
View a previous version of a file in DropBox and restore it
How file changes rollback works stored in Dropbox cloud storage? Surprisingly simple. For example, I placed the Draft file in the “Public” folder and edited it in both accounts for which this folder was shared. Now right-click on this file and select View Previous Versions:

As a result, a browser window will open with the web interface of this cloud storage, where for this particular file all the changes made to it will be scheduled every minute, indicating the name of the person who did it. In addition, you can check the box next to the desired backup copy of the document and click on the "Restore" button to roll back unsuccessful or accidentally saved changes:

This is exactly why I love Dropbox. Now I have all the files that I periodically make changes to are stored in my local Dropbox folder, in order to be calm not only for their safety, but also for the fact that erroneous saving will not kill all the years of work. True, in a free account the history of changes will be kept for only one month and then removed.
If it is important for you to keep the history of changes longer, then you will have to activate the Packrat service by first switching to one of the paid tariffs. By the way, about the birds.
Cloud storage expansion through bonuses
In addition to the attraction of referrals described just above (this can be used to grind up to 16 gigs of additional space), there is a promotion Samsung + Dropbox, which in my case brought me immediately 48 GB additional space in this cloud storage for a period of two years:

I just installed Dropbox on my wife's mobile phone (Gnusmas Galaxy C3), logged into my account and received a letter of congratulations almost immediately. If you add all the other bonuses to the maximum, you get somewhere around 64 gigs, which is already comparable to the first paid tariff of 100 gigs, for which every month you would have to give ten evergreens. Pretty nice hack.
By the way, in addition to referrals, it will also be possible to fill out a checklist on the page " Where to begin" , thereby adding a few more hard gigabytes to your cloud, especially since this will be the very “young fighter course”, after passing which you will completely get used to Dropbox. In general, combine business with pleasure:

Let's now take a look at online version of the service, which will be available to you always and without installing additional programs - through a regular or mobile browser. To access your cloud drive, you will have to enter the Email specified during registration and the password invented there.
Working with the Dropbox web interface
By default, the contents of the Dropbox folder are opened, where the entire folder and file structure you created on your computer will be repeated (due to synchronization). Actually, the web interface allows you to do everything the same as the desktop program, but at the same time you can work with cloud files from any computer - you just need to log in.
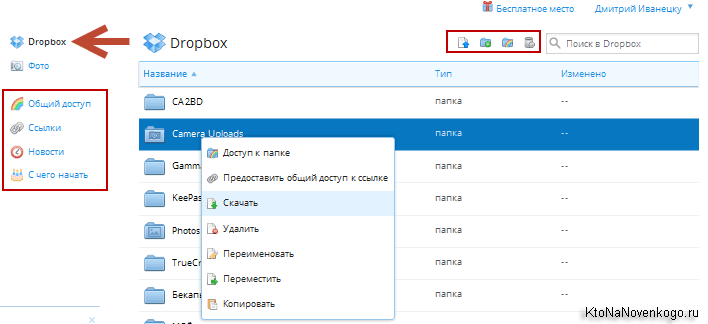
When you right-click on a file or folder, a context menu will open, allowing you to perform a number of actions on this object, shown in the screenshot (download for editing, delete, share, share the folder, move, copy or rename).
A little higher are buttons for uploading an edited or a new file, for creating a new folder, for sharing it (you will be prompted to either create a new folder and make it shared, or select from existing ones), as well as to show all deleted by you or other users file account.
On the tab "General access" all shared folders in which you work with files together with other invited Dropbox users (well, or with those who invited you) will be listed. And on the tab "Links" you will find a list of all public links to folders and files in your account:

There it will be possible to copy the public link again, or eliminate the possibility of public viewing of these folders and files using the crosses located at the end of the lines. On the tab "News" you will find an event log (protocol) where you can track over time all the actions ever taken by anyone in your account. We just talked about the purpose of the “Where to start” tab.
If you click on your name and surname, which are located in the upper right corner, then from the drop-down list you can select items to log out of your account (if you need to log into another one); to switch to another tariff plan (Expand opportunities); in order to download the latest version of Dropbox (Install), and finally, in order to get into settings of this wonderful cloud service(Settings):

On the first tab of Dropobox settings, called "Intelligence", you will be able to view your available disk space in this cloud service and how much of it is still free.
On the tab "Account settings" you can change your first and last name, linked email address, as well as connect your Dropbox account with Twitter, Facebook, Gmail or Yahoo. Well, and something else can be configured there, up to the complete removal of your account from this cloud (link at the bottom of the settings window).
DropBox Hack Protection
at the bottom of the window "Protection" you will find a list of devices from which this account has ever been accessed so that an unauthorized connection can be tracked, and just below there will be a list of browsers in which you worked with Dropbox using your login and password.
At the top of this window, you can just change this very password and uncheck the boxes about notifications coming to your mail when a new device is connected to your cloud or an application accesses it.

Interestingly, there it will be possible enable 2-Step Verification, which can seriously increase the security of working with your account in this cloud service (read about similar ones). What it is?
Everything is simply banal. In addition to entering your login and password, now when you connect from a new device, you will be required to confirm by the mobile phone specified in the settings (either a code will be sent in an SMS message, or a code from a mobile application). When you log in again from the same device (computer, mobile phone, tablet), normal authorization will suffice. It is very convenient, and most importantly, it greatly increases the security of working with your files in this cloud storage.
So feel free to click on the link. "Change" and in the pop-up window, click on the "Getting Started" button. Since this is a very responsible matter, you will be asked to enter the password for your Dropbox account again. Next, you will be offered a choice of two options for working - either enter the code from incoming SMS messages, or install a special application on your mobile phone:

SMS messages are free, so I chose the first option without further ado, and at the next step I indicated the country and number of my mobile phone, which immediately received an SMS with a code that I had to enter in the next window of the two-step verification connection wizard. Next, I was asked to indicate a backup cell phone number, which may be needed if the first one is unavailable or lost.
Well, at the very end they offered remember (write down) the security code, which will help disable two-step verification if it is impossible to access your Dropbox account using it:

Now if anyone even learns your username and password from your Dropbox account, then when you try to log in, he will be very puzzled by a request to enter a security code that will be sent to your mobile phone:

How to use mobile versions of Dropbox
Let's now talk a little about the mobile versions of the Dropbox program, which will allow us to view documents and files from this cloud folder on a tablet or smartphone, as well as edit them or add our own. The principle of operation of mobile versions of programs is somewhat different from how the desktop version works.
The fact is that the default desktop version of the program tries to fully synchronize files from the cloud storage folder with files from the local Dropbox folder. This is quite logical and convenient, because the Internet for the vast majority of users of this program is unlimited, and hard disk gigabytes are such that the size of files downloaded from the cloud is unlikely to be too noticeable. However, you are always free to exclude unnecessary folders from the synchronization process in the settings of the desktop version of the program (see above).
Another thing is mobile phones or tablets, where the size of the data storage space can be significantly inferior to the size of your folder in the cloud storage. How to be here? The developers acted quite simply - by default, the files in the cloud are completely are not copied or stored on mobile devices. When a user opens one of the folders and wants to see a picture, an office document, or something similar, this file is downloaded to his mobile phone upon request.
If you need to have copies of files from the cloud storage on your smartphone or tablet that would be available offline, then you will need everything add such files to favorites. It is very convenient, for example, by connecting at home via Wi-fi, you can add to your favorites all the documents or media files that you will need on the way to work, and you will not be able to splurge on expensive mobile traffic, which is not always the case to be all in the same subway .
Well, if you have a Gnusmas (Samsung) smartphone based on Android, then by finding the Dropbox program on Google Play, installing it and logging into your account, you may well receive a bonus in the form of additional gigabytes to your cloud storage. Personally, I got about 50 gigs of freebies.
But this does not mean at all that it makes no sense for iPhone and iPad owners to go to the App Store and install a similar program - even without additional goodies, Dropbox will give you a lot of convenience and pleasant sensations.
Automatically save photos from your gadget to Dropbox
When you first start the program, you will be prompted automatically save all made by you on mobile phone or tablet Photo and video to a separate folder in the Dropbox cloud. At the same time, by default, they offer to automatically download footage only when connected to the Internet via Wifi, so as not to spend mobile traffic, but you are free to choose the second, more wasteful option:

This was a screenshot from the iPad, but on an android smartphone, the picture will be similar:

Here you will really be asked about the fate of the photos and videos already on your phone - when the checkbox is checked, they will all be merged into a cloud folder Camera Uploads. What is noteworthy, for each of your mobile devices will not create a separate folder - everything will be merged into one "Camera Uploads". But it's still very convenient.
Documents or files that you create in other programs on your mobile devices can be transferred to the Dropbox program, which will merge these files, in turn, into the cloud service, so that at home you can continue working on this document on your computer. As an example, there are a lot of use cases for Dropbox and not all of them are obvious. You need to install the program and try to understand the beauty of the cloud.
Program window on iPad you can see in the screenshot below:

At the bottom of the left column are four tabs: the contents of the Dropbox folder; photo and video storage for your iPad; selected files and program settings, which were just opened in the screenshot above. There are not many settings, but it's still something.
Any file from the Dropbox folder you can Add to favorites using the icon in the form of a star, which is located in the upper right corner of the screen. All files added to favorites will be stored in the memory of your mobile device and you can access them even when you are offline on the corresponding tab in the left column of the program window. When viewing files in the Dropbox folder, favorites will be marked with asterisks:

Just above the second tab icon in the left column of the program (your iPad photo and video storage) will show the number of new files that have not yet been uploaded to the cloud service. In order to correct this annoying misunderstanding, it will be enough to go to this tab and the file synchronization will start immediately (if you are connected via Wi-Fi). It is quite convenient to download media files captured on a mobile device to a computer in this way.
Approximately the same work is organized in the program for smartphones. based on android:

You can add individual files from the Dropbox folder to your favorites for storage in the device's memory and upload all the photos and videos captured by your mobile device to the cloud. Quite comfortable and unobtrusive. For example, in this way I transfer books to the iPad that are installed there.
Some mobile applications can use this cloud service to sync your files with desktop apps. Somehow I wrote about, which I now use in order to avoid stealing passwords from a computer by trojans (after that). So, Kipas stores passwords in an encrypted database, which, however, no one bothers you to place in the Dropbox folder, for its greater safety and accessibility from other computers.
Then on the iPad it will be possible to install, for example, the KyPass application, which can use the Kipas database downloaded from Dropbox. And there are many such programs. They can access your cloud storage and use it for their own purposes, some of which may be quite unexpected.
There are also desktop apps that can connect to your Dropbox account and use its folder to transfer files or data. For example, in this way you can monitor another computer - the program takes screenshots of the desktop at specified intervals and sends them to the cloud. There is a program that simplifies the synchronization of program settings on different computers by placing files with settings in a cloud folder, and leaves shortcuts in their place.
There are also programs that allow you to encrypt the contents of the Dropbox folder on the fly, and another program installed on another computer decrypts the whole thing on the fly. However, it seems to me more acceptable in this case to use a time-tested encryption program. For example, it is quite easy to create in a cloud directory, and put a portable version of the same program next to it so that this container can be decrypted on another computer.
There is even one called wp Time Machine, which can create and place your blog in the folder of this cloud service (wp-content directory and database dump). You will only need to specify the login and password from your Dropbox account in the plugin settings and name the folder where the backups will be stored.
In general, there are a lot of opportunities and I will be glad if you share your work on using Dropbox.
Good luck to you! See you soon on the blog pages site
You may be interested
 How to upload photos and transfer videos from iPhone or any other phone to computer OneDrive - how to use Microsoft storage, remote access and other features of the former SkyDrive Mailru Cloud features - how to use the Files program, web interface and mobile applications
  How to put a password on a folder (archive or otherwise password-protect it in Windows) How to search by file content in Total Commander
  Clip2net - how to take screenshots and post them online for free
  Yandex Disk - how to enter and create your page, how to upload photos and videos, as well as 7 reasons to use this particular cloud
Sooner or later, many users have a problem with the amount of storage provided for storing data on the Dropbox service. Therefore, it becomes relevant to open a second account to work from one computer. This feature exists in the paid version of Dropbox, but using some simple tricks, you can solve this problem.
The first, most obvious method to get the right to use two Dropbox accounts on the same computer is to install the application for the main account and open the second sub account through the browser. In the second, additional account, the user gets the right to access the hosted files, the ability to create folders and upload files.
The main disadvantage of this method is the inability to synchronize databases in the background. Therefore, it is best to place files that you rarely use in the second account.
The main problem with this method is the inability to use the root folder for shared browsing. All files and folders needed to work with two accounts should be placed in a shared folder. This method leads to the use of memory on both accounts, but allows you to easily work with the necessary files.
Another way is to create multiple Windows users. For this you need:
- Open a second account in Windows. If you only need an account to work with Dropbox, don't link it to a Microsoft account.
- By pressing the Windows + L button combination, you can log into a second Windows account without leaving the main one.
- Download and install the Dropbox application for Windows, and log into it using an additional account (password and login from the second Dropbox).
- We return to the main Windows account and open the "Users" folder located on the disk with the operating system.
- Open the folder of the new user created before and click the "Continue" button. We get access to files with administrator rights.
- We return to the Dropbox folder.
- Your account information will only sync with the Dropbox server if you sign in to your second Windows account and then return to your primary account.
To work under macOS, you can use the Automator program:
- Install Dropbox and log into the main account.
- In the personal Home folder, create a new Dropbox 2 folder.
- Open the Automator program and press the "Process" button and then "Select".
- In the "Library" submenu, select the entry "Run shell script" and drag it to the right window.
- We use the following script, pasting it into the address window and replacing Dropbox2 with your name of the created folder (p. 2): HOME=$HOME/Dropbox2 /Applications/Dropbox.app/Contents/MacOS/Dropbox &
- Press the "Start" button. You will have a copy of the Dropbox program, allowing you to open an additional account for setup.
- Go to the File → Save command to save the actions performed in Automator. In addition, the script can be added to the "Login objects", then it will be launched every time the computer is turned on.