
Having a well on your site is quite profitable, but in order to draw water from it, you will need any pump. Submersible and surface pumps are best suited for these purposes. To simplify the process of water intake, the water supply system uses automation for a borehole pump, which almost every owner can independently install.
It makes no sense to buy automation for surface pumps used only for watering the garden. You can turn it on for a certain time and then turn it off. But connecting a borehole pump to the water supply system of the whole house will not do without a smart device. Giving preference to one or another model of automation, you must first find out which protection system is already installed by the manufacturer in the pump. Usually, modern units are already equipped with protection against overheating and dry running. Sometimes a float is included. Based on these data, they proceed to the choice of automation for the pump, which is presented to the consumer in 3 options.
Important! The concept of dry running refers to the operation of the engine without water. The liquid, passing through the pump housing, serves as a coolant for the engine. Without automation, which has a dry-running protection device, a running engine will overheat and burn out the working windings.
The simplest automation of the 1st generation
This protection is most often used for automated water supply. Automation consists of 3 devices:
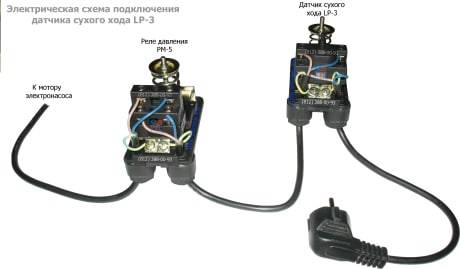
Installing any pump with 1st generation automation is the easiest, since there is no complex electrical circuit. The system works simply. When the flow of water begins, the pressure in the accumulator decreases. Having reached the lower limit, the relay turns on the pump to pump a new portion of water into the tank. When the pressure in the accumulator reaches the upper limit, the relay turns off the unit. During operation, the cycle is repeated. Regulate the minimum and maximum pressure in the accumulator using a relay. The device sets the lower and upper limit of operation, and the pressure gauge helps in this.
Electronic automation 2nd generation
The 2nd generation automatic control device is an electronic unit with a set of sensors. The latter are located on the pump itself, as well as inside the pipeline, and allow the system to work without a hydraulic accumulator. The signal from the sensors is received by the electronic unit, where the system is controlled.
How the installed sensor is able to replace the accumulator can be understood from the operation of the system. Water accumulation occurs only in the pipeline where one of the sensors is installed. When the pressure drops, the sensor sends a signal to the control unit, which, in turn, turns on the pump. After the restoration of water pressure in the pipeline, according to the same scheme, a signal is sent to turn off the unit.
To install such automation, basic knowledge of electrical engineering is required. The principle of operation of the 1st and 2nd generation protection is almost the same - in terms of water pressure. However, the electronic unit with sensors comes out much more expensive, which does not make it popular among users. Automation also allows you to refuse to use a hydraulic accumulator, although it often helps out when there is a power outage. There is always a supply of water in the tank.
Advanced electronic automation 3rd generation
The most reliable and efficient is the 3rd generation automation. Its cost is quite high, but electricity is significantly saved due to the fine tuning of the engine. It is better to entrust such an automatic unit to a specialist. Automation of the 3rd generation 100% protects the engine from all kinds of breakdowns: overheating from dry running, burning of windings during voltage drops, etc.
As in the analogue of the 2nd generation, automation works from sensors without a hydraulic accumulator. But the essence of its effective work lies in fine tuning. The fact is that any pump electric motor, when turned on, pumps water at full power, which is not always required at low flow rates. Automation of the 3rd generation turns on the engine for such power, which is required for a certain amount of water intake and flow. This saves energy and prolongs the life of the unit.
Attention! Intentional overpressure of water in the system reduces the efficiency of the pump and increases energy consumption.
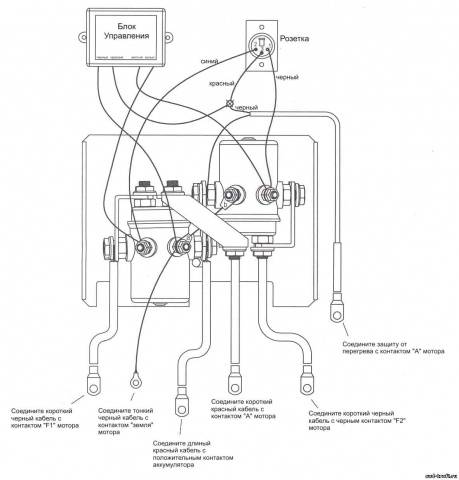
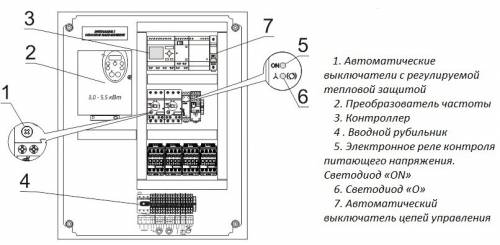
Purpose of the pump control cabinet
Connecting the pump to automation is not complete without installing an electrical cabinet. It is especially important in a water supply system powered by a submersible unit. All control units, controls and fuses are placed inside the cabinet.
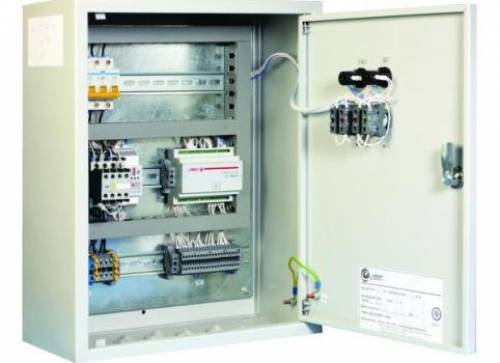
Automatic machines installed in the cabinet perform a smooth start of the engine. Easy access to the equipment allows you to adjust the frequency converter, measure the characteristics of the current at the terminals, adjust the speed of rotation of the pump shaft. If several wells with pumps are used, all control devices can be placed in one cabinet. The photo shows a typical diagram of the equipment that may be in the cabinet.
The video talks about pump control:
"Aquarius" - the best solution for home water supply
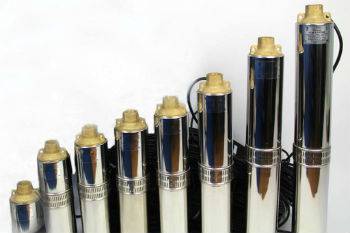
The market offers the consumer a huge selection of pumping equipment. For a home water supply system, the best option is a submersible pump for a well and a well "Aquarius" from domestic manufacturers. The units have proven themselves for a long time with high performance, long service life and high-quality workmanship. In addition to these advantages, the price of the product is several times less than that of imported analogues with similar characteristics.
The submersible pump works underwater. It is often undesirable to get the unit out of there. Aquarius, like all submersible analogues, is made in the form of an elongated capsule. The body is made of stainless steel. On top there are 2 loops for fixing the safety cable. In the center there is a branch pipe for fixing the supply pipe. The power cable enters the housing through a sealed connection. Inside the housing there is an electric motor, on the shaft of which impellers are mounted in a separate working chamber. According to the design and method of water intake, "Aquarius" refers to centrifugal units.
Surpasses the well submersible pump unit of superficial installation by simplicity of start. It is enough to apply power, and the blades will immediately begin to capture water, supplying it to the system. To start the surface pump, you will have to pump water through the filler hole into the intake pipe and the working chamber with the impeller. Produce pumps "Aquarius" of different capacities and dimensions. In everyday life, models with a diameter of 110-150 mm are used, depending on the section of the well casing.
The video tells how to choose a pump and what models there are:
Installation of a submersible pump and its connection to automation
The connection diagram of the submersible unit depends on which automation is used for the pump, and it is usually reflected in the instruction manual. For example, let's consider the option of assembling a circuit with class 1 automation powered by a hydraulic accumulator.
These videos show step by step how to install a submersible pump:
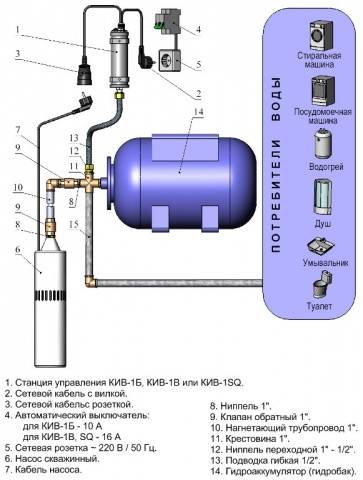
Work begins with the strapping of the accumulator. According to the scheme, equipment is connected to it in turn. All threaded connections are sealed with tape. In the photo you can see the sequence of assembly.

The “American” is screwed onto the thread of the accumulator first. This detachable connection will be useful in the future for servicing the water storage, often associated with replacing the rubber membrane. Americans screw a bronze adapter with threaded taps onto a free thread. A pressure gauge and pressure switch are screwed into them. Next, one end of the PVC supply pipe is fixed with an adapter fitting to the end face of the bronze adapter on the accumulator. The other end of the pipe is fixed with a fitting to the pump nozzle.
The supply pipe with the pump is laid on a flat area. A safety cable is attached to the loops on the body of the unit with a length margin of about 3 m. A cable with a cable is fixed to the pipe with a pitch of 1.5-2 m with plastic clamps. The free end of the cable is fixed near the well casing. Now it remains to lower the pump into the well, and pull the safety cable. The casing pipe is closed with a protective cap that prevents clogging of the well.
When everything is ready, the cable is connected to the relay and leads to the electrical control cabinet. After the first start, the pump will immediately start pumping water into the hydraulic tank. At this stage, you must immediately open the tap to bleed the air.
When the water begins to flow evenly without air impurities, close the tap and look at the pressure gauge. Usually the relay is already adjusted to the upper water pressure parameter - 2.8 atm., And the lower limit - 1.5 atm. If the pressure gauge shows other data, the relay must be adjusted with the screws inside the case.
Scheme of installation of a surface pump with automation
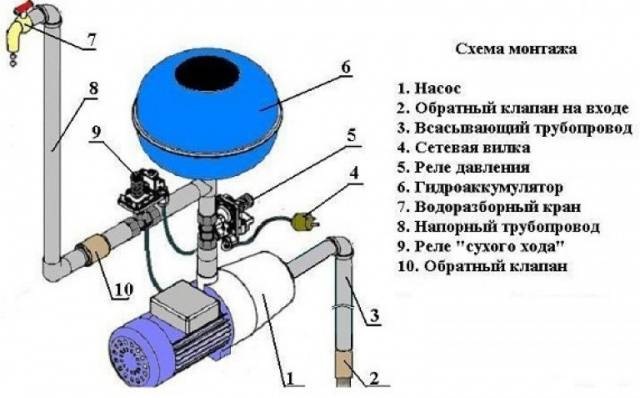
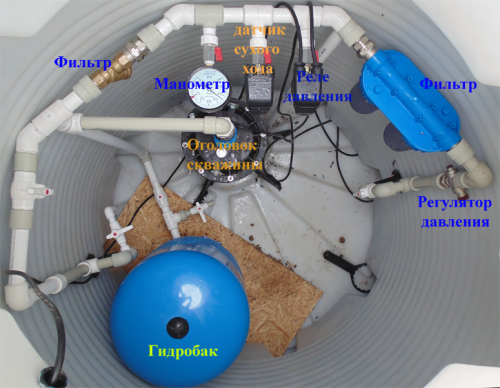
The scheme for assembling a system with a surface pump has several distinctive nuances. The entire chain of automation is recruited in the same way as for the deep pump. But since the unit is installed near the well, a PVC water intake pipe with a diameter of 25-35 mm is connected to its inlet. A check valve is attached to its second end with a fitting, after which it is lowered into the well. The length of the pipe is selected so that the check valve is immersed in water to a depth of about 1 m, otherwise the pump will capture air.
Before starting the engine for the first time, water must be poured through the filler hole to fill the suction pipe and the working chamber of the pump. If all connections are made tightly, after switching on the pump will immediately begin to pump water.
A well equipped with an automatic water supply system will create the comfort of living in a private house and ensure timely watering of the garden plot.