
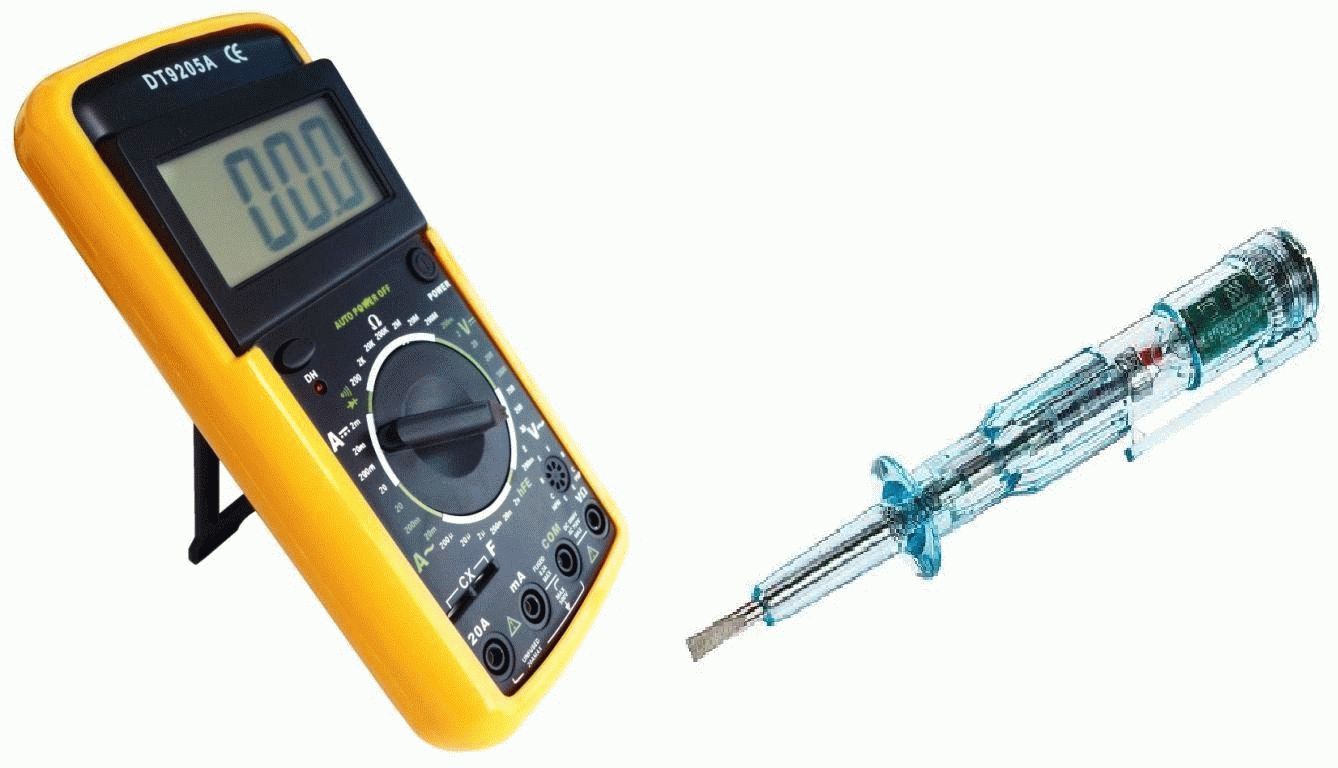
Often in the network there is information that it is allegedly possible to measure the resistance of a copper wire with a tester. This succeeds if the equipment is sensitive enough, but in a typical case, it will not be possible to carry out such an operation. The resistance of a kilometer of core can be, for example, 10 ohms. How much will show on a particular segment? As a rule, losses are concentrated on poorly made electrical connections, a counter question was born - is it worth ringing with a multimeter or a wire tester. We believe that the indicator screwdriver is cheaper and is better suited for such operations.
How to test the integrity of a wiring
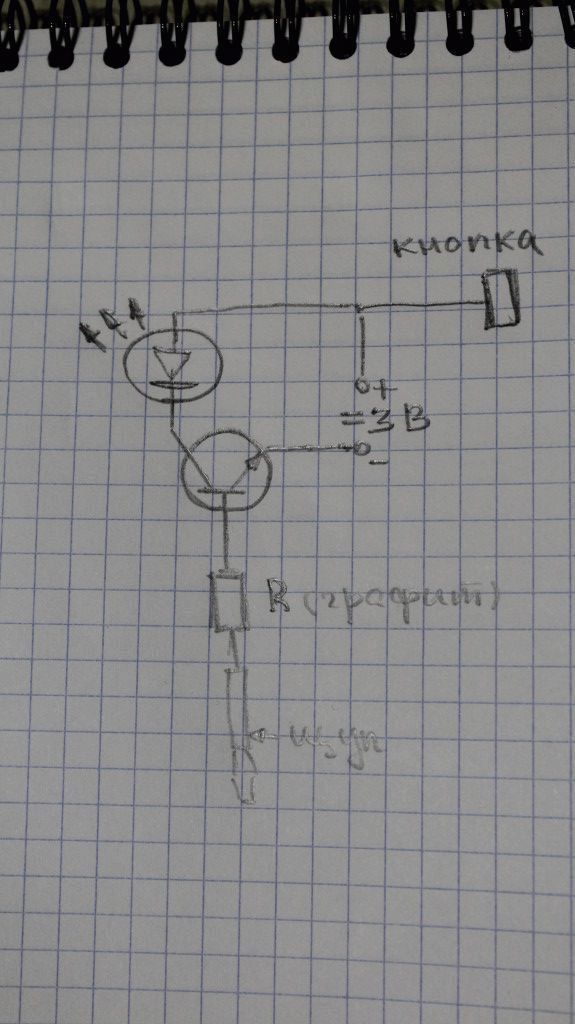
It is believed that a tester is needed to check the integrity of the wiring. Look at the photo: the simplest active indicator screwdriver is presented in disassembled form. She rings the wires without much difficulty. The picture shows:
- Transparent plastic housing with a permanently built-in steel probe.
- Metal clip for attaching to the pocket of the master's clothes.
- Contact button in the form of a cover with a thread.
- Two 1.5 V batteries.
- Electrical part made of NPN transistor and small red LED. The spring serves as a place for attaching the positive potential, the anode of the LED is attached here.
- The high-resistance hard graphite resistance exhibits a high rating. Limits the current in the circuit.
- The plate is attached to the indicator screwdriver at the time of sale, as a result, it is convenient to store the product in the house.
We drew a diagram of the product to illustrate the work. Let's see: a probe will be connected to the base of the n-p-n transistor through a high-resistance resistance. The emitter is tightly leaned against the negative pole (battery pip), and the collector goes to the cathode of the red LED. When we take the indicator screwdriver button with our hand, and the second for the probe, we give a weak positive impulse to the base of the transistor. As a result, the p-n junction collector-emitter opens, and current flows, igniting the signal light. Everything is as simple as two and two.
Please note that you no longer need to grasp the contact button with your finger to indicate the phase. Otherwise, the readings will come out incorrect. Instead, the probe simply touches the phase wire, charges a small amount of energy from the AC circuit (due to transients), and as a result, the LED lights up. Note that the meter does not register a low constant potential. In this case, there are no conditions for creating transient processes with a change in charge, and there is no unlocking pulse on the base.
Advantage of the product: the screwdriver serves as an indicator of the presence of grounding. You will need to touch the contact button with your finger. In this case, a person informs the body of the indicator screwdriver with a potential that is different from that available underground. As a result, due to the resulting difference, the transistor opens, the red LED lights up. Rather, it resembles a flicker, since the levels of the earth and atmospheric potential do not differ much. But if the indicator screwdriver is made with good sense, it will be possible to find a zero wire.
However, do not rush to rejoice! If you turn off the light and measure the phase readings, you will quickly realize that any long conductor will cause the light to burn. This is not mysticism. The core of the cable becomes an excellent antenna for electromagnetic waves, the energy is enough to make the indicator screwdriver flicker. It responds directly to alternating current, as already mentioned. However, the EMF is expected to be increased in order to open the base of the n-p-n transistor. It turns out that an indicator screwdriver is not considered the perfect tool to assess the quality of grounding. But ringing the wiring is easy and simple, and the tool is much more convenient than any tester.
Consider the features of the device.
- The easiest way is when an electrical device is being tested. Let's put it on our knees and check the insulation resistance in a matter of seconds. To do this, we touch the core with one finger, and the contact button with the second. With a probe, we look for a place on the case where the metal is visible. If the light is on, the insulation is broken, the repair starts from the specified place.
- Easy to ring out the power wire. If we are testing a lighting device, we pull out the plug from the socket, unscrew the lamp and put our finger in the socket. It is permissible to touch both contacts at the same time. Take turns feeling the pins on the plug. Finger on the contact button. When the switch is closed, both cores ring, when the switch is open, only one.
- When it is required to determine the integrity of the chandelier wiring, we proceed differently. First, the buttons are removed from the switch. Then we find the phase. We turn on the light. If a phase has disappeared, the breaker is not positioned correctly, but the wiring is wrong and the contactor is fine. It is recommended to turn off the lights for further operations. Then a wire of any cross section is taken so that the length is sufficient to the shield. According to the rules, earth is started on the cartridge, the terminal must ring with the body. When working, be careful, inside the switchboard there are exposed live wires (the difference between the phases is 380 V). If the wiring is incorrect, the ground goes to the switch, and this branch already rings to the body. We recommend checking the phase with an indicator screwdriver. Ringing live wires is deadly. Turn on the light, take an indicator screwdriver and check if there is a phase in the right place (the second terminal of the cartridge, or one of the switch contacts). It remains to ring the wires between the switch and the chandelier. You will need to unscrew the light bulb, turn on the light (illumination, not plugs), then assess the presence of a phase on the cartridge. Then we act on the basis of the received data. If the phase is present, we put the incandescent light bulb in the socket, while the voltage must appear on the switch. This indicates the integrity of the wire. If initially there was no phase on the cartridge (correct type of wiring), it is proposed to unscrew the light bulb, turn on the light (illumination). In this case, the indicator screwdriver fixes the appearance of voltage on the chuck. So the wire is intact.
See how easy it is? With the help of an indicator screwdriver, it is possible to check any circuits, and save the multimeter and tester for the case when you need to measure voltage, current or resistance. We have already told you how low-power diodes and transistors are checked using an indicator screwdriver. This is a truly versatile tool. And most importantly - it costs (for the fall of 2015) 30 rubles. Equal to a loaf of bread. In addition, the indicator screwdriver will help you find the wire in the wall!
What to do if you need to ring the wires with a tester
If it is impossible to buy an indicator screwdriver, you will have to work with a multimeter. The algorithm of actions is simple for those who bothered to read the text under the previous subtitle. It is highly recommended to purchase a headlamp for work. This will simplify the operations. Let's say you needed to ring the wires in the wall going to the chandelier with a multimeter:
- First, we find the place of summing up the phase. Obliged to turn on the switch, but often the other way around.
- First of all, we unscrew the light bulb. This will break the chain in the area of the chuck.
- We estimate the presence of a phase at the top. Please note that the switch is turned off and the plugs are on. In this case, there is no danger of short-circuiting the contacts.
- We expose the scale of alternating voltage with a limit obviously exceeding the mains voltage of 230 V. Usually, the upper limit is 700 - 750 V. We lean the probes against the contact terminals of the cartridge and ... we see zero on the indicator. This is correct because the switch is open. Provided against the risk of short-circuiting. Now you need to make sure that the probes do not short-circuit the cartridge contacts. Please note that the E27 metal thread is usually isolated from the phase and the neutral wire, it does not pose a danger. The main thing is not to short-circuit the terminals.
- If everything is in order, ask the assistant to press the switch. Hard? We have already said that the indicator screwdriver works much better. Phase is now detected by the headlamp. The indicator screwdriver does not need a backlight. In most cases, natural light levels are sufficient, even in dark places. And then, to wield an indicator screwdriver, you need only one hand, but for a tester, two are not enough: a pair of probes and a body, it turns out three. The conclusions are clear. So, if at the 220 V terminals, further ringing of the wires with a multimeter is meaningless, the voltage is present, it's time to climb down.
The advantage of the multimeter: it is possible to ring the wiring with a single operation. But appreciate how dangerous and difficult the action is. The indicator screwdriver will do this in several steps, and it is safer. Now let's try to ring the wire of any device with a tester. We warn you that you cannot work under voltage. In addition: power supplies in separate circuits retain their potential after switching off (charge of containers), there is a chance to burn the device. The indicator screwdriver, as can be seen from the photo, is suitable for work at voltages up to 500 V.
Do not rush to climb inside the power supply with it, the voltage can be over 600 V! The power cord is also unsafe to ring. It is supposed to use a spark gap in both cases. A light bulb is suitable, screwed into a socket, to which two bare wires are connected. The standards explicitly prohibit the use of such delights. You do this at your own peril and risk. In selected manuals, it is recommended to use resistors with a nominal value of 1 kOhm with a power dissipation of 5-10 watts in such cases.
The study of Runet shows that most masters do not pay attention to prohibitions due to the obvious convenience of the lamp - it immediately shows the presence of a charge and removes it at the same time. With the help of such a cartridge, craftsmen often look for a phase, which is prohibited by law. So, let's take a household appliance, let's say an iron:
- It is not always necessary to disassemble the case. It is supposed to set the temperature with the regulator to the maximum and try to measure the resistance.
- If the obtained value is less than infinity, the wiring is intact, and the fault is supposed to be looked for in the area of the bimetallic relay.
- It happens that the malfunction is floating: it disappears and appears again. Then you just have to change the entire cord, the place of the defect will become extremely hot, which looks like the cause of an imminent fire.
In power supplies, it is usually not difficult to ring high-voltage wires, and the difficulties lie somewhere in the circuit. It is strongly recommended to download a drawing of the electrical part from the Internet, and then study each element separately. Already raised the topic earlier.
So, readers will understand that measuring the resistance of a wiring is difficult. Small sections of the cable are absorbed by the tester's internal error. When measuring such resistances, it is permissible to use indirect methods. For example, make up a resistive divider and, based on the measured voltage of the section, try to calculate its resistance. In this case, the accuracy is expected to be an order of magnitude higher.