
By installing an intercom, residents are waiting for an increase in the level of security and comfort. Agree, this useful device limits unwanted access to your territory, successfully complementing a reliable front door or gate. The function of audio or video communication that appeared after installation will not be superfluous, which is especially practical and useful for residents of apartment buildings. There is nothing difficult in the installation of all components, so it is not so important to resort to the services of specialists. This article will help to verify this, in which we described how to install and connect an intercom with an electromagnetic lock.
How to install an intercom in a private house?
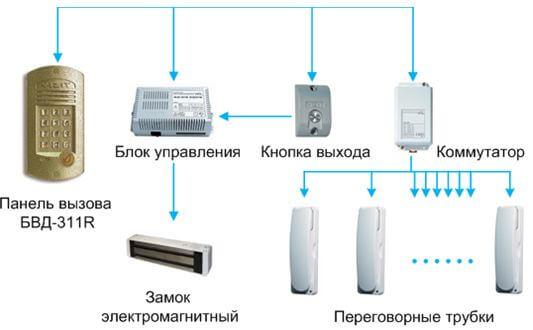
The main elements of the access system are:
- calling device;
- locking lock (systems with an electric lock or with a magnetic lock);
- voice tube (or video intercom);
- power unit.
The auxiliary part is the connecting part.
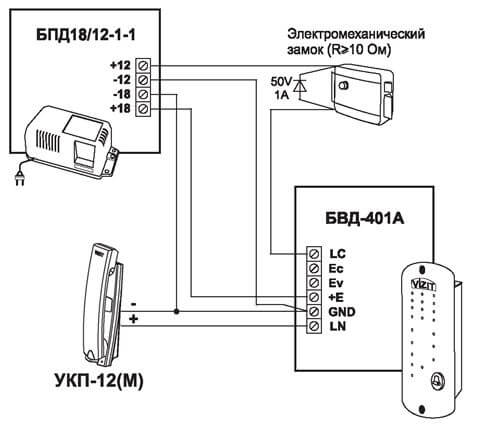
First, let's deal with the installation of the main parts of the system, and then proceed to the installation and wiring. To understand what will be discussed further, let's turn to the visual diagram of the intercom in a private house:
Let us first analyze the installation of its elements indoors. Namely, the conversational handset (No. 1) and the power supply (No. 2).
- The power supply provides constant voltage to other elements of the system. It can be installed next to the conversational handset or near the power distribution board. The connection is made by means of an ordinary plug into a 220 V socket. The ringing device and the electromechanical lock of the intercom are powered from it.
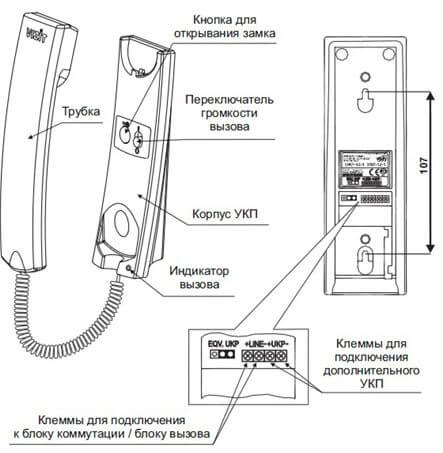
- The tube is mounted in a convenient place. The place for installation is usually the wall at the front door. We attach it to the wall and mark the points for the holes. We hammer dowels into the finished holes. Now the intercom can be securely fixed with self-tapping screws. The intercom handset is connected according to the diagram below:
From it it is clear that the intercom is connected by two wires. As a connecting cable, you can use a telephone two-wire wire or twisted pair.
On this, the work on installing equipment inside the premises is over - we move on to the street. Here we have to install an electric lock and a calling device.
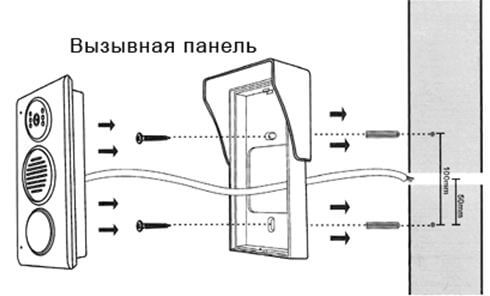
- The calling device is attached at the entrance to the site. But it would be wrong to install it directly on the gate, as this is associated with the arrangement of an additional flexible connection, which entails a decrease in reliability and an increase in the wear of the connecting wires. Therefore, it should be installed and connected on a fence or on a column at the entrance. We fasten the call panel in the same way as the handset - with self-tapping screws. For example - like this:
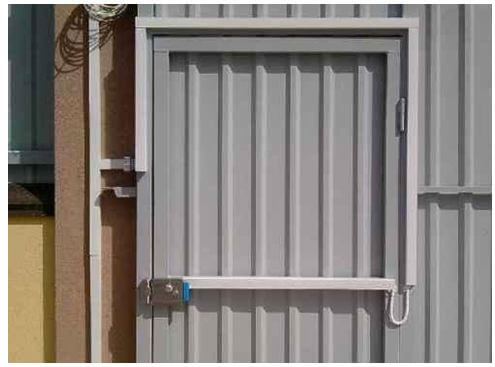
In real life it will look like this:

- In a private house, an electromechanical lock is used as a locking device. It is installed on one of the "rigidity" of the entrance gate design, and the counterpart on the frame. Connection will not pose any particular problems, since a two-core cable is connected to it and sit on the marked terminals. According to the design of the fence and the gate, the wire is laid in plastic channels, and the flexible connection transition point is laid in the corrugation.
A few words about connection. It is much easier to mount the wires if the installation of the system is known at the design stage. Then all the control and power lines are neatly hidden inside the walls, without violating the aesthetics of the room. Otherwise, in order not to ditch the walls, the cable is hidden in.
The video below clearly shows the procedure for installing and connecting an intercom system in a private house:
Features of video intercom installation
The video intercom is attached in the same way as the voice tube - in a convenient place for communication. Additionally, you will need to install a video camera near the entrance to the room or area. But to connect it, you need to use a circuit that uses 4 wires, and not 2, as with an audio tube. Let's consider it:
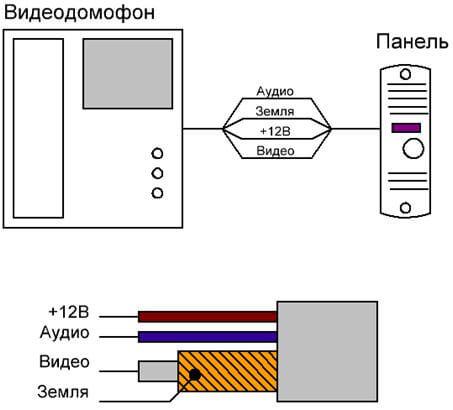
As you can see, the cores are responsible for powering and transmitting audio and video signals. The wire responsible for video transmission is braided to reduce interference and interference from nearby power wires. To connect a video intercom with your own hands, you can use the KVK P 2 2x0.75 cable. It would also be useful to look into the instructions for the video intercom, where you can find a specific scheme.
You can learn how to connect the wires correctly from this video:
How to install an intercom in an apartment
The principle of connecting an intercom in an apartment is not much different from a private house. The only thing is that the cable footage is significantly increased, and special switching equipment is also required to connect all subscribers to the call panel. Now more. Let's start traditionally with the scheme:
It is worth noting that a magnetic lock is usually installed on the front door in the entrance, with a large holding force.
Perhaps the most difficult stage is to connect the intercom to the call panel at the entrance to the front door. We start by laying the cable from the apartment to the shield located on the landing. We lead the wire from the apartment to the shield, laying it in a plastic cable channel, then carefully lower it down the access shield shaft to the first floor. Further, laying in the corrugation, we lead to the call panel or to the installation site of the switch.
Then you need to install and connect the handset. The installation site should be convenient and accessible - as in the case of a video intercom in a private house, this is the wall near the front door. We fasten it with self-tapping screws into pre-hammered dowels. Let's move on to connecting the intercom in the apartment. Having removed the front front cover, we will see the terminals. There may be two or four, depending on the selected device type. The presence of four terminals indicates the possibility of connecting another additional voice tube. The photo shows the connection procedure:
It is also possible to organize a simpler connection when the ringing device is mounted directly behind the entrance apartment door, as in the picture:
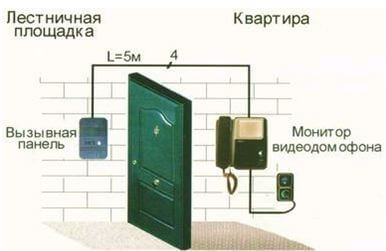
In such a scheme, there is no electric lock, and the system is used only for video communication.
At the end of the article, I would like to talk about which wires to use. As mentioned above, to connect a video intercom, use signal cables of the type KVK P 2 2x0.75 or twisted pair FTP 4x2x0.51. You can connect an audio handset with a two-wire telephone wire or twisted pair. To power the electric lock, a two-wire 2x0.75 is suitable.
We also note one important nuance regarding electric locks associated with access to the premises. When the electromagnetic lock stops working and the door opens automatically, the electromechanical one will still remain closed. Keep this important detail in mind both during the operation phase and when choosing a kit for your own conditions.
Here, according to this principle, do-it-yourself installation and connection of an intercom is carried out. As you can see, in a private house and apartment it is not difficult to do the installation yourself, the main thing is to know the rules provided and have the right tool at hand!
Like( 0 ) I do not like( 0 )