
Everyone tries to make their home comfortable, reliable and safe. Intercoms are replacing the usual means of protection. If such a reliable sentry has already appeared in your house, but is still languishing in a box, then you can contact a contractor or install it yourself. With self-assembly, a video intercom connection diagram will come to the rescue.
Intercom equipment - device system
To date, the consumer is offered a wide range of device models on the market. Any video intercom is equipped with the following components:
- Monitor (diagonal, color reproduction, handset compatibility);
- Video camera (color reproduction, viewing angle);
- Call panel;
- Lock (electromechanical or electromagnetic);
- Power Supply.
There are a number of models with a controller equipped with additional functionality. So, video intercoms with built-in motion sensors have recently appeared on the market. Such an intercom turns on when any movement occurs in front of the camera.
To connect a video intercom with your own hands, you will need the following tools:
- Perforator;
- Drills for work on concrete;
- Hammer;
- wire cutters;
- Crosshead screwdriver;
- Flat screwdriver;
- Dowels and screws;
- Insulating tape.
Before installing the intercom, check it for any faults.
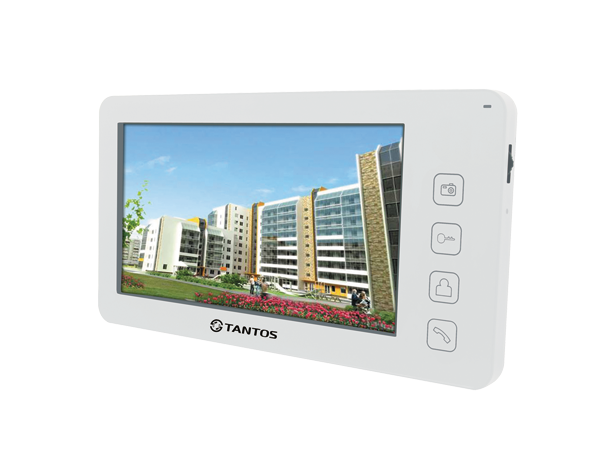 In this photo you see an image of a video intercom
 Installing an external call panel
First of all, it is necessary to determine where the call panel will be located. It should be installed at a height of 150-160 cm, based on the average height of human growth. It is very important to take into account the viewing angle of the video camera and exclude places that would give visual interference:
- The place where the screws will be attached is indicated;
- Holes are drilled;
- Dowels are inserted;
- The external call panel is fixed.
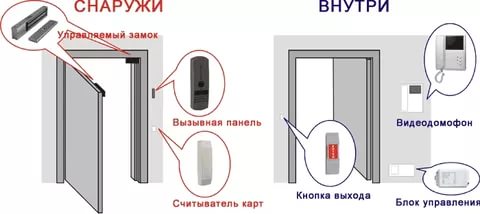 An example of the location of the call panel
 Installing the indoor monitor
A place for the monitor inside the room is selected. The height is selected based on the fact that it is convenient to look at the monitor. It is necessary to make sure that there is a power supply connection nearby (220 V):
- Do-it-yourself cable box is mounted;
- The cable is laid and output through the bracket of the call panel;
- The places where the screws will be attached are marked;
- The exit point of the cable is marked;
- Holes are drilled;
- Dowels are inserted;
- Wall-mounted indoor monitor stand;
- Based on the connection diagram, two cables are connected (the first is audio, video; the second is the power cable);
- The internal device is installed in place.
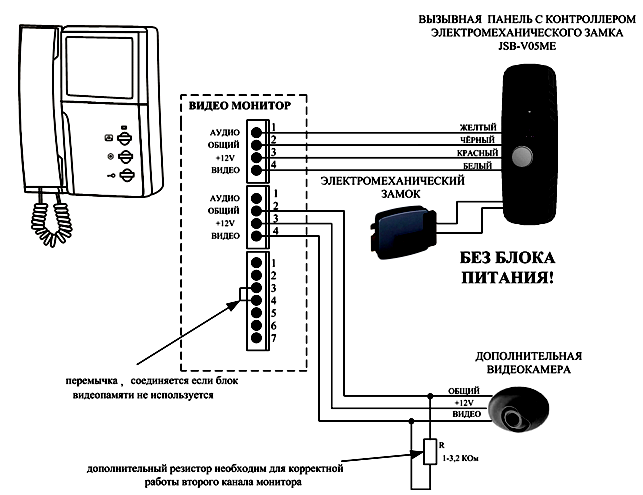 Wiring plan
 Installing an electromechanical lock
The standard package of the video intercom includes an electromechanical lock, to which it is recommended to connect an independent power source, which ensures the autonomy of the lock with electricity.
The locking device is fixed in such a way that the lock itself will be located on the door frame, and the response device on the door itself:
- Holes are drilled in the box and door;
- Both parts are fixed with screws;
- The closer is installed;
- Controllers are connected;
- The power supply is connected.
In this video you can see how the electromechanical lock with intercom works:
When installing the device with your own hands, you should listen to a few useful tips:
- The intercom panel should not be attached to the moving part of the door. Constant fluctuations can serve to shift the lens, which will reduce the angle of view;
- A seal is installed on the reverse side of the call panel. When connecting an intercom, it cannot be broken or damaged. Otherwise, there may be problems with the warranty for the device;
- Replace the panels of the external and internal device after assembling and checking the entire system. This will help you make adjustments as you work;
- If the distance from the front door to the intercom (private and apartment buildings) is large, you can install a special signal amplifier.
You will learn how to install an intercom with your own hands after watching this video:
Installation work on it is quite affordable to do it yourself without professional training. Such work should be treated with all responsibility and care. The better each step of the instruction is performed, the less adverse weather and other negative factors will affect your security system. This will save you both energy and time.
2015-01-16