A deep well pump creates a pressure sufficient to lift water from a great depth (even up to 100 m) and supply it to the water supply system. Many pump models are designed for pumping water, including sand or clay impurities.
The first type is used for shallow wells. The price of such pumps is quite affordable, but the quality is low. Basically, a vibration pump is used to extract water in small volumes. For example, for seasonal water supply of a summer residence or household plot. One of the disadvantages of this type of pumps is the destructive effect on the walls of the well due to vibration. Centrifugal pumps are more efficient than vibratory pumps. They can be used to supply water to your home day after day, all year round. Models in which all parts are made of stainless steel are able to withstand the abrasive action of sand and other impurities. Almost everyone can independently connect a deep pump, regardless of its type. Consider the basic connection rules, but first a few words about the use of accumulators. Why do you need a hydraulic accumulator?The principle of operation of the deep pump involves its inclusion at the moment of lowering the water pressure in the water supply system. At the same time, frequent opening and closing of the tap leads to frequent turning on and off of the pump. Even with the tap open, the pump generates enough pressure to automatically shut off, so it can turn on and off several times. The result of this mode of operation: premature wear of the pump motor. That is why, to protect the engine from frequent pressure drops, the pump is connected through a hydraulic accumulator.
This device is a container divided into two parts by a special flexible membrane. One part contains air, the other contains water. A working pump fills part of the accumulator with water until the air in the other part balances the fluid pressure. When the faucet is opened, the air pushes the water out. Hydraulic accumulators are also used, in which the water accumulator is made in the form of a pear located in a tank filled with air. The hydraulic accumulator performs three tasks:
Because the accumulator maintains a constant pressure, the pump runs less frequently and wears less. The volume of the required accumulator is calculated based on the amount of water consumed. For a private house, 100 liters is usually enough. General rules for connecting a deep pump
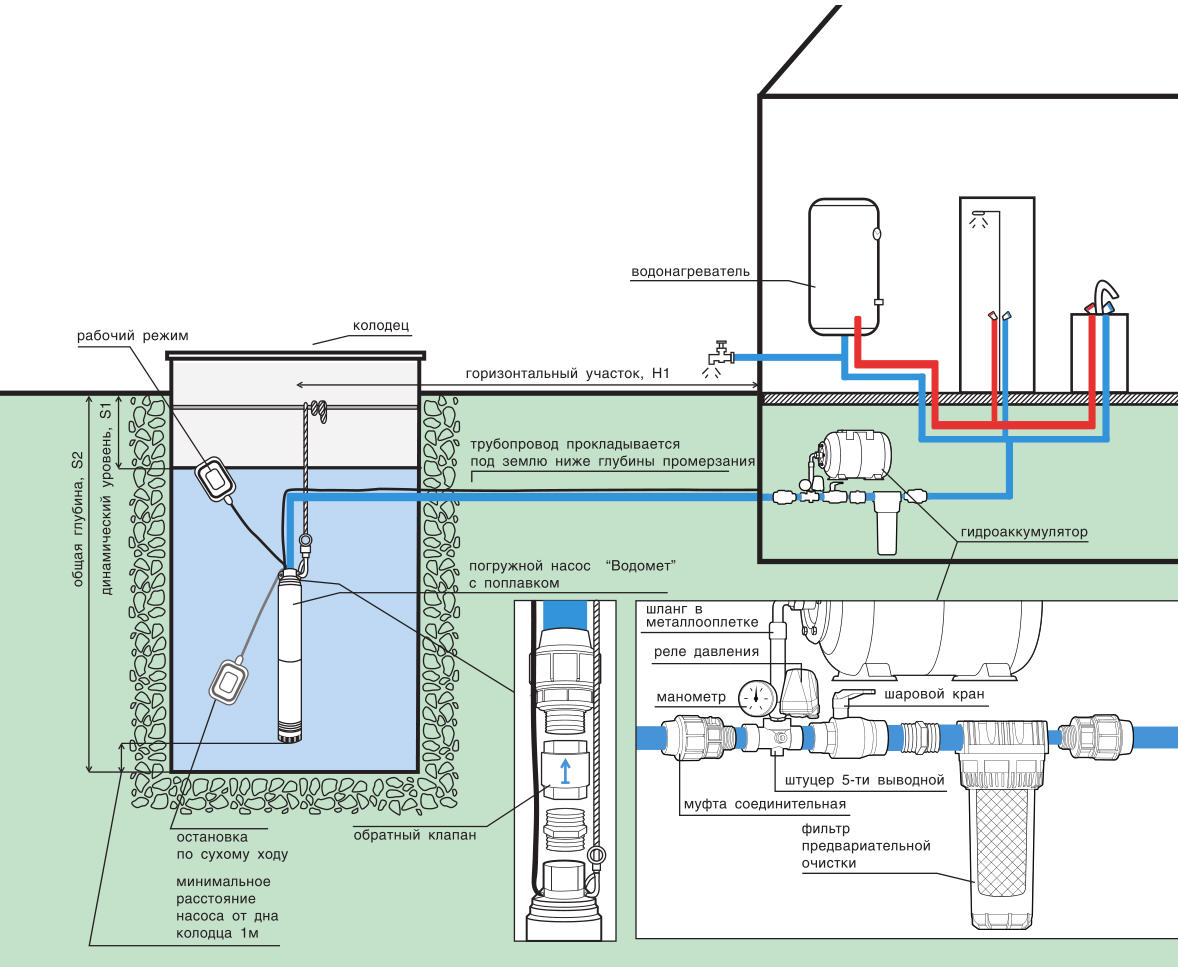
The connection diagram of the deep pump shows the order in which all parts are connected. The depth of groundwater determines the depth of the well. The minimum distance of the pump from the bottom of the well should be 1 m. The distance from the top of the groundwater to the surface of the earth is called the dynamic level. The detailed procedure for connecting a deep pump is shown in the photo below. To ensure the possibility of winter use of the well, a special well (caisson) is equipped, the depth of which should be below the freezing depth of the soil layer. The well pipe at the exit to the caisson is cut and connected to the pipe laid in the trench. Thus, the trench for the pipeline is laid at the level of the lower boundary of the well (caisson), below the freezing depth. Two pipes must be laid in the trench: water and for the electrical wiring of the pump. It is obligatory to install a coarse filter in front of the pressure control unit with a hydraulic accumulator. The water purification filter is also installed in the section after the accumulator before it is supplied to the house's water supply system, although this is not necessary. The sequence of connection of electrical wires is made according to the electrical connection diagram of the deep pump. The pump control panel is located in the boiler room. The pump is powered by a submersible cable (wire) that provides reliable grounding. A regular waterproof wire will not work. The length of the wire is equal to the sum of the dynamic level of the pump plus the distance from the well to the boiler room. The cable is soldered to the deep pump. The insulation is made using a heat-shrinkable fluid coupling. It is not recommended to perform heat shrinking yourself, as the process is quite delicate. Exceeding the heat shrink time is fraught with loss of elasticity and water resistance. Insufficient heat shrinkage leads to incomplete hydroprotection of the cable. If the deviation from the nominal voltage is high, then it is necessary to install a voltage stabilizer with a threefold excess of the pump power. It is recommended that the electrical connection be carried out by a qualified electrician. The hydraulic accumulator is connected to the deep pump through a pressure switch and a pressure gauge. The pyaternik through passage serves as a connection node between the supply, analysis, hydraulic accumulator, pressure gauge and pressure switch. Factory settings of the pressure switch: lower - 1.5 bar, upper - 2.8 bar. If it is planned to drain for irrigation, it is possible to install an additional hydraulic accumulator in the caisson, through which irrigation water will be supplied. It is possible to use one accumulator, which regulates the water pressure for irrigation and for the house, and is located in the well. But for ease of maintenance and pressure control, it is better to place the accumulator in the boiler room. Descent of the deep pump into the wellWe connect the pump to the water supply pipe through the connection: barrel + check valve + fitting. All threads are sealed with FUM tape, except for the metal-plastic transition. Anpak paste plus linen tow is used here. After trimming the well pipe, but before lowering the pump, the lower part of the head and the rubber seal ring are put on the pipe section. All connections must be carefully sealed to protect the system from leakage.
The pump is lowered into the well using a stainless steel cable with a diameter of 4-5 mm. The length of the cable is determined with a margin of 2-3 m to secure it at the ends. Attach one end of the cable to the top of the pump, pulling it through the special holes. For strength, a rivet is made with a copper pipe, but you can use special clamps (at least two). The clamps are carefully wrapped with electrical tape. Clips or a rivet are also mounted on the other end of the cable. The pipe supplying water from the pump must be straightened on a flat surface. Then unwind the cable and also place it on a flat surface. Same with rope. The pump is ready to run. The rope and cable are fixed in the pipe every 1.5-2 m using construction ties. After descent, a borehole tip is put on the casing pipe. It is possible to thread a water hose, cable and cable through the opening of the head in advance, before descending. The cap will protect the well from debris. Connect the condenser and check the operation of the pump. If water is pumped out, then you can cut the pipe near the head and connect it to the pipe laid in the trench to supply water to the boiler room. The connection is made through a coupling with a collet clamp. Starting the pump after system assemblyWe connect the socket. The warning light on the control panel lights up. We turn on the water supply in order to release air from the system. The pump starts to work, and water enters the accumulator. The sound of water should be heard.
After the air is released, water begins to flow. We close the tap. We follow the readings of the pressure gauge: the pump is turned off after a pressure of 2.8 bar is built up. Then we turn on the water from the tap and check the operation of the pump after the pressure drops to 1.5 bar. The pump is back in operation. So the cycle of work is repeated. If you tightly connected the entire system, then the pump will turn on and off in accordance with its settings. Pump connection successfully completed. The process of connecting a deep pump is clearly shown in the video: |