
Let's say you've read several articles on the Internet and are interested in the free Linux operating system. Perhaps they even put it on a virtual machine or booted in Live mode and tried how everything looks and works. You liked it, and now you want to install it on your computer and start using it. But at the same time you do not want to lose the already installed Windows, so that in case of an unforeseen situation you can return to a fully working system, and your favorite games and necessary programs will always be at hand. It is possible to install Linux and Windows 10 on the same computer. At one time, for me, as for many other users, this was the ideal option.
In this tutorial, we'll walk you through how to install Linux alongside Windows 10. I say Windows 10 because it is the newest operating system from Microsoft, but these instructions will also work for earlier versions such as Windwos 7, 8 and 8.1.
I assume that you already have Windows installed, you have found and decided which disk to separate a little space from for Linux, just do not know how to do it correctly. You will receive a detailed answer to this question here. Let's touch on another important topic - UEFI. This technology is used on all new Windows laptops, and many users are interested in how to install Linux on UEFI and what problems can arise.
To install a Linux operating system alongside Windows 10, you will need to create several additional disk partitions. The minimum number is three sections. It is not customary to install Linux on one partition as Windows, although this option is possible. Linux is so flexible that it allows you to place the system, user files, and settings on different partitions. This is very beneficial during reinstallation. You reinstall the system in the system partition, and all your files on the desktop and settings of the working environment will remain in place.
These three sections are:
- Systemic;
- Home;
- Swap partition.
The minimum volume requirements for a system partition in various distributions vary from seven to twenty Gigabytes. But this is enough to install the system itself and a few additional programs. If you are going to use a lot of programs and games, especially if they take up a lot of space, you need to take a couple of dozen Gigabytes in reserve. I recommend using 30-40 Gigabytes for the Linux system partition in the same way as for the Windows C drive.
The swap partition is used when the system runs out of RAM. At a certain percentage of fullness, Linux gradually starts dumping unused data into this file. Therefore, for this section, a volume of half the size of your RAM is suitable. But if you plan to use hibernation or hibernation, then you need to allocate an amount of disk space equal to the size of the RAM for the swap partition, because in these modes all the contents of the computer's RAM are transferred to the disk. The home section is the section with your files, movies, music, downloads. Estimate how much you need.
Preparing a disk in Windows
To install Linux next to Windows 10 that is already in use, you will need to "cut" space from the system drive. Therefore, before decisive action, it is important to create a backup of the system or at least important files. If everything goes well, nothing bad will happen to the files or the system, but due to some kind of failure, for example, a power outage, the file system can be damaged. You yourself, through inattention, can do something wrong and delete the wrong thing.
Therefore, if you work with the system disk, copy important files to external media, and, if possible, create a backup copy of the operating system using the appropriate item in the control panel:

When working with a non-system partition, for example, D, E, F and so on, just copy the files from there.
Now let's go directly to preparing the disk for installing Windows 10 and Linux. The easiest way to do this is using the standard Windows disk management utility. Right-click on the " This computer"on the desktop and open the item" Control":


Here at the bottom of the window we see two drives: C (system) and D (normal). I will give an example of how to resize drive D. For drive C, the steps are the same.
Right-click on the desired disk and select the option Shrink volume:

This will open a window in which you need to enter the size of the volume to be created in the field compressible space size:

Please note that you cannot specify a size larger than the amount of free disk space. Therefore, first free up some space if you haven't already. Click on the button squeeze... After that, an unallocated space will appear, from which you can create the necessary partitions:

That's all. Now you have a place to install Linux next to Windows 10. There is no point in further partitioning the disk in the Windows utility, since we have already done all the dangerous operations that could damage the system, and it is best to configure partitions for Linux using Linux tools.
Preparing a disk in Linux
This is not the next step for installing Linux along with Windows 10. This is an alternative disk partitioning option without using Windows. If for some reason you do not want to use the standard Windows utility to allocate the necessary space, this can also be done using any LiveCD of the Linux distribution with the preinstalled Gparted disk management program. For example, the same Ubuntu.

Boot from the Ubuntu disk, search for Dash and type Gparted:

The following window of the program for disk management in Linux will open:

It is important to note here that disk partitions are named differently in Linux than in Windows. Here disks are simply addresses of files in the dev virtual filesystem. Later you will understand what it is, but for now it is only important that the name of each partition begins with / dev / sd. Next comes the letter for the physical disk (sda, sdb, sdc, sdd, and so on). Behind it is a number, which denotes the number of the partition on the disk, for example: sda1, sda2.
In the utility window, in addition to the disk partition name, we can see the file system, size and free space on the disk. Now, by the size and file system, we can understand on which disk we have the system.
In my example, / dev / sdb1 is the C drive on Windows, and / dev / sdb2 is the D. We will do the same as in the previous example. Let's reduce the size of the / dev / sdb2 (D) partition to 10 Gigabytes in order to install Linux on Windows 10 in the free space. To do this, right-click on the section and select the item Resize / Move:

In the window that opens, you can enter the desired size manually in the field New size or use the slider:

Then press the button Resize / Move.

As you can see, free space has appeared, but there are no real changes on the disk yet. In order to burn everything to disk, click the green checkmark, or in the menu Edit select item Apply All Operations:

The file system resizing process can take a little time:

Now you can see that the / dev / sdb2 partition has shrunk and there is more free space:
For the system partition, the operations are the same, only there is one note: do not touch the beginning of the partition. You can safely reduce the size of the partition by adding free space after it, but do not try to do it before it, like this:

You do not need to do this, otherwise the Windows bootloader will be damaged, it is very easy to restore it, but I think there is no need to solve these problems at the very beginning of your acquaintance with Linux.
We will not create partitions for Linux here either, it is better to do all this during installation, with a specially designed utility for this.
Installing Linux alongside Windows 10
I will not consider in detail how to install Linux here, all this has already been discussed in detail in my articles separately for different distributions. Let's take a look at just a few aspects of disk layout. Take Ubuntu as the most popular OS for newbies, but other distros are pretty much the same.
At the stage of choosing a marking method, I advise you to take the manual option. Since this will give you a better understanding of how to set up the system:
Here, from the previously vacated space, you create those sections that we talked about at the very beginning of the article. For the root partition, the mount point must be /, for the home partition, / home, and for the swap partition, the mount point is not specified.
Installing Linux alongside Windows 10 UEFI
All modern laptops released with Windows 8, 8.1, 10 use UEFI technology. This is a new progressive technology that replaces the outdated BIOS. The first important and most noticeable change is the use of the GPT partition table, instead of the obsolete MBR, as well as the creation of a separate disk partition for operating system loaders. Many users fear that UEFI will make it harder to install Linux with Windows 10 on their laptop. And in vain - in most cases there is nothing complicated. If you already have Windows installed, then, most likely, the efi partition has already been created, and when partitioning the disk, you just need to select it to install the bootloader. The efi partition is usually created with the fat32 file system and takes up about 30 Megabytes of memory:

If you have a clean hard drive, you need to create a GPT partition table. This can be done using the same Gparted by opening the menu Devices ->Create Partition Table:


Then we specify this partition during the installation of Linux along with windows 10, for it you need to specify the mount point / boot / EFI. That's all the difficulties with installing in UEFI. In general, all distributions running in Grub2 support installation in UEFI.
Completing the installation
Many new users are interested in: "How do I boot my Windows later?" Don't worry, the Grub bootloader will automatically find the Windows bootloader and, before starting your computer, it will offer you a menu where you can select your operating system:

This way, dual booting Windows 10 and Linux will be configured automatically.
If things don't go according to plan, although this is unlikely to happen, everything is very easy to set up. So if done correctly, you will definitely be able to access your Windows after installing Linux.
conclusions
Today we looked at how to install Linux on Windows 10. We figured out how to partition, how to select partitions, and what to do if your laptop uses UEFI. It's pointless to talk about installing any specific Linux distribution together with Windows 10, since, firstly, all the actions are similar, and, secondly, you can find detailed instructions in the corresponding articles. I would also like to note: for the comfortable work of Windows 10 with Linux on one computer, you need to disable Windows FastBoot, otherwise you will not be able to. If you have any questions, ask in the comments!
Windows and Linux are used for different purposes. The user decides for himself which system is more convenient for him to work with. But why not choose both operating systems at once? After all, each of them has its own advantages. It is quite possible to load them on one machine. And you don't even need virtualization technologies for that. The systems will be located next to each other. And you can switch between them. Installing Linux from under Windows will allow you to work on both operating systems, even if you don't have a second computer.
Installing Linux from under Windows will allow you to work on both OSs at the same time
There must be enough space on the PC to run both systems. Different versions require different amounts of memory. On average, this is 7–20 Gigabytes. But for stable operation, you need to allocate 30-40 GB for each OS.
It is best to install two hard drives. Otherwise, you will have to cut the disk space. Win and Linux must be on different logical drives. That is, one distribution is in the C: \ section, the other is in D: \. At the same time, you need to leave space for storing personal data: documents, images, music, videos, games, programs, and more. If this all ends up in the system drive, problems may arise.
As a result, you should have at least three partitions: two for Linux and Windows, the rest for personal use. Better yet, two hard drives. The following utilities are suitable for partitioning disk space:

- MiniTool Partition Wizard.
- Paragon Partition Manager.
- AOMEI Partition Assistant.
The OS changes the boot records in the MBR that control the startup order. If you reinstall Win, you won't get into Linux anymore. That is why it is not recommended to use one local disk for these systems. If you place them in different sections, they will not interfere with each other.
Installation takes place in order: first Windows, then Linux. A Microsoft product erases important components of other operating systems and replaces them with its own.
It is best to back up your existing system before installing. If you run into problems, you can return your computer to its normal state. This copy must be saved to external media or to a local drive that does not contain system files.
In Win, the following programs are suitable for this:
- Acronis True Image.
- Paragon Backup & Recovery 2013.

- Macrium Reflect Free.
Windows also has a built-in function:
- Go to Control Panel.
- Menu "Backup and Restore" (or "Data Archiving"). It's in the System category.
- Configure backup button.
- Select the drive to place the copy. Or you can direct it to the web. But for this you need a suitable online storage.
- To restore the system, go to the same menu.
On Linux, you can use the Back In Time utility for backups. It is Ubuntu's Software Center. Ubuntu's built-in tool Deja Dub is also fine.

To work with him:
- Go to System - Backup.
- Click the "Storage" tab.
- In "Folder", specify the directory where your copy of Linux will be stored. Do not place it next to the OS. Select a directory on another drive.
- Instead of a folder, you can use network storage.
- Go to the “Overview” section. There will be options for creating and restoring backups.
The installation should start with Windows anyway. If you have a Linux computer, you will have to remove this system.
Save your personal files. It is not necessary to transfer all of them to the drive. Only the data that you need can be backed up.
Partitioning a disk with MiniTool Partition Wizard
MiniTool Partition Wizard has a free version and a professional one. To partition a disk with the application, you do not need to buy it. This feature is also available in the Free package.
- Search on the Internet, download and install the program on your computer. It is available on the developer's site partitionwizard.com.
- Run it.
- Local disks are displayed in the middle of the work area. Click on the one you want to cut.
- In the list on the left, click on "Move / Resize".

Click on "Divide" ("Move / Resize")
- In the next window there will be items "Original size" ("Partition Size") - the one that will remain on the disk. And the "New Size" is what the new volume will have. Allocate memory and click OK.

- You can change the name of the newly created section. To do this, click on "Set label" and type a name. For example, "UbuntuDisk".
- If you are going to use the disk to boot a new OS, select it and select "Set as primary" in the list on the left.
- Click on the "Apply" button. She is on the top left. Next to it is a checkmark icon.
- Reboot your computer. Wait for the system to cut the partitions. In this case, you cannot turn off the PC. Otherwise, you will lose all the data that was stored on the disk being processed. You can see the changes after restarting.
Other partitioning programs work the same way. It will not be difficult to figure it out.
Acronis True Image can run not only on Windows, but also on Linux. But this program is paid. Unlike Partition Wizard.
Installing Windows
Let's say you decide to start over from scratch and uninstall all the old operating systems. Now you have a "clean" PC with no distributions installed. Run Win from a disk or flash drive. To do this, change the boot order.
- Go to BIOS. It can be called if you press a certain key immediately after turning on the PC. It differs depending on the motherboard. F1, F2, F5, F7, DEL or Ctrl + Alt + Esc. The information on which button is needed will appear next to the "PRESS TO ENTER SETUP" line.
- In BIOS, all controls are configured for the keyboard. Move through the menu - using the arrows, go - Enter. There is a small manual with instructions in the BIOS menu on the right.
- Open the Boot tab.
- Subsection "Boot Device Priority".

- Put USB or CD-ROM first. Depends on which drive you are using to boot Windows.
- Press F10 to save your changes. The computer will restart.
- The message "Press any key to boot from CD" may appear. It means "Press any key to load data from CD".
- Reading information from the source will begin. Do not interrupt the process.
- The installation wizard will open. Just follow his instructions.
- You will need to select the section into which the system will boot. You can also split it there, if you have not done so earlier. Select the volume and click on "Disk Setup". After that click on "Create" and set the sizes in megabytes.
- Save all changes and click on the "Next" button. The installation will begin. Do not interrupt it, do not turn off the power of the PC. The computer may restart several times.
- After that, you need to configure Win: select a password and name for the account, time zone, specify which update settings to use.
- Go to BIOS and change the boot order again so that the PC starts from the hard drive.
Linux
Before booting Linux, you need to prepare the disk. This can be done in Win.
- Right click on "My Computer".
- Select "Manage".
- In the "Storage" category, click on "Disk Management".
- Right-click on the partition where you plan to install the system. It cannot be loaded onto the same Windows disk.
- Click on "Shrink Volume".
- In the "Compressed space" field, specify how much space should be allocated for the OS (in megabytes). This memory will be reserved for the system.
- Click Compress. "Unallocated space" appears in the disk bar.
- If you want to return the volume to its original size, instead of Shrink, choose Expand.
- Insert the operating system CD into your drive.
- Go to BIOS and change the boot order so that the computer starts from disk.

- When the installer opens, select the interface language.
- The Installation Type menu will offer installation options. Check the box "Others".
- Create partitions for the OS in the previously compressed volume. For the root directory, just specify "/" (forward slash, forward slash). For the home directory - "/ home". And for the swap partition, you do not need to enter anything.
- Follow the advice of the installation wizard.
- A little setup is required: creating an account, entering a PC name, and the like.
- During the installation, pictures showing the capabilities of the system will be shown.
- The installation will complete and a notification will appear on the screen prompting you to restart your computer.
- Go to BIOS and change the boot order.
Now, when you turn on your PC, you can choose whether to use Linux or Windows.

Linux has a multi-boot function for operating systems. Ubuntu even includes Win collaboration.
- Prepare the disk, allocate memory for the OS on it.
- Run the installer. It will automatically detect if there are other systems on the PC.
- The option "Install Linux next to Windows" should appear. Select it.
- Follow the instructions of the installer.
- Do not boot two OSes into one partition.
Installation on two hard drives
The easiest and most effective option is to download to different hard drives. So the systems will work stably even without dividing the space.
- You have Winchester 1 and Winchester 2.
- Disconnect hard drive-2, put Windows on hard drive-1.
- Disconnect hard drive-1, put Linux on hard drive-2.
- Connect both hard drives.
Now you will be able to select the OS through the BIOS Boot menu. Just change the boot order to boot from the correct HDD.
Installing completely different systems next to each other is not that difficult. This does not require software virtualization. You will be able to take full advantage of the operating systems. And work in the environment that is best suited for the tasks at hand.
To successfully install Linux and Windows on one computer, you need to allocate enough memory for each OS and upload them to different partitions.
Which of these systems do you think is better?
If you nevertheless decide to try Ubuntu, but you are afraid to part with Windows, or there is no way - do not worry: you can put several operating systems on one computer and choose between them when you start your computer. Read about the various options for solving this problem later in this article.
Option 1: clean install Windows and Ubuntu
If there is nothing on your computer yet, or you have decided to remove everything and install operating systems from scratch, then it is best to prepare your hard disk in advance, namely to partition it into logical disks in an appropriate way. There are many programs for this, one of which - GParted - is included with Ubuntu, so we will use this one.
Boot from the Ubuntu disk, press ALT-F2 and run this command:
Then partition the disk as follows:
- Partition for Windows installation (from 20 GB), WITHOUT file system;
- Partition for your files (all remaining space), NO filesystem.
Pay attention that we left the partition for Windows and user files WITHOUT the file system, because we will use NTFS there - and it is better to provide formatting to this file system by Windows, since it's still her own FS.
After the hard drive is prepared, reboot the computer this time from the Windows boot disk and install the system on the first partition. If you are installing Windows XP, then when asked about the file system, select the "NTFS, quick format" item.
After installing Windows, go to "My Computer", there will be one unformatted partition for user files, format it to NTFS.
Then install Ubuntu. In this case, when asked about the method of partitioning the hard disk, select the "MANUAL" item. When you see a picture of hard disk partitions, you need to specify the NTFS type and mount point in the settings of the first partition, for example, "/ mnt / windows"; for a section with your files, for example "/ mnt / archive"; select mount point "/" for Ubuntu partition.
The mount point is the directory where the specified partition will be mounted. Thus, after installing Ubuntu, to access the Windows files (on Windows it will be the C :) drive, go to the "/ mnt / windows" folder (or the one you specified).
For the disk where Ubuntu is installed, you must specify the mount point "/" - this is the ROOT of the FILE SYSTEM, in other words, the directory at the top level.
Option 2: installing Ubuntu alongside Windows
If you already have Windows installed on your computer, you can easily install Ubuntu, keeping Windows in place and being able to choose between these systems when you start your computer. Only for this you will have to slightly "move" the partition where Windows is installed, or another partition on your hard drive.
Then select a partition with enough free space. Click on the "Change" button and resize it to at least 11 GB (11 264 MB). After there is free space on the hard disk, create 2 partitions on it:
- Swap partition (SWAP) for Linux (1 GB);
- Partition for installing Linux (EXT4, size from 10 GB for Ubuntu, I recommend 20 GB);
After that, install Ubuntu (read the detailed recommendations on mount points in the first part of the article above).
And besides! It is now possible to install Ubuntu directly on one Windows partition! This can be done using a program that automatically starts from the Ubuntu disk if you insert it into the drive while in Windows. Another way out of the situation is to install Ubuntu on a virtual machine using Oracle VirtualBox: you can create such a virtual machine or vice versa! However, all these methods will of course make Ubuntu run much slower than if it was installed on a separate partition of your computer, as described in this article.
Tell everyone:
The English language resource "OMG! Ubuntu" answers 4 frequently asked Google questions starting with "Can Ubuntu" ("Can Ubuntu ..."). Due to the linguistic peculiarities, it is a little more difficult to analyze the same topic in Runet, but in general, questions and answers to them are relevant for any region, therefore ...
Almost every user today has heard of the free Linux operating system. The open platform for development and the availability of the system made it very popular. But if you've never used it, installing it instead of Windows can be reckless. It is much more convenient to install any of the Linux versions as a second operating system on your device.
Reasons to install Linux next to Windows 10
Windows 10 is the latest operating system from Microsoft. It is successful and versatile. Few users will be able to completely stop using it in order to install Linux. In turn, Linux has a number of advantages over other operating systems:
- freedom and variety - there are many Linux assemblies, and each of them is free. Downloading, installing, using and even modifying them is completely legal;
- low requirements - some Linux builds will work even on very old computers. The operating system takes up little space and consumes a little RAM, which means that more resources will remain for your programs;
- fewer viruses - virus programs for Linux, of course, exist, but the chance of stumbling upon them is much less than in the operating system from Microsoft. As a result, getting rid of them is easier;
- free software - there are a lot of free software on Linux for every taste. It can be either analogs of paid programs on Windows, or completely new software. Finding the program you need is very easy;
- good compatibility with other systems is extremely important. Linux installs easily and works with any operating system: both Windows and Mac.
The cons, however, are also obvious:
- relying on experienced users - installing Linux is not at all difficult, but some actions in the system itself require a lot of technical knowledge;
- problems with the support of programs and games of other operating systems - not all games or programs support Linux, and the method of launching through wine does not always work correctly.
When you install Linux as a second operating system, you will not lose anything, and if you like it, you can completely move to it.
Installing various Linux assemblies
Since Linux is open to user development, there are many different versions of this operating system.
- Linux Ubuntu is a common version of the operating system that is installed with various programs. Has both "light" options and full-fledged complexes for working with media; Ubuntu is one of the most widespread versions of Linux
- Kali Linux - a version of the system with a lot of emphasis on safe operation;
 Kali Linux is known for increased security
 - Linux Mint - this operating system is based on the Ubuntu version and is a development of its ideas for the better;
 Mint Linux is an improved version of Ubuntu
 - Kubuntu is the official fork of the regular Ubuntu release. Differs in a different graphical shell (KDE);
 Kubuntu Linux - Ubuntu with a different graphical shell
 - Rosa Linux - Russian version of Linux with a number of proprietary developments;
 Rosa Linux - Russian assembly with a number of innovations
 - Arch Linux is a very lightweight and streamlined build for advanced users.
 Arch Linux - build for advanced users
Each user should choose an assembly to fit their needs before proceeding directly with the installation.
Preparation before installation
Before you start installing the version of Linux you have chosen, there are some preparatory steps to be taken with your hard drive. To begin with, you should save all the necessary files to the drive, since there is a risk of losing them during installation. Then you should partition the disk into partitions for the correct installation of the second operating system.
Partitioning a Partition Using the Disk Management System Utility

You can also split the partition directly during the Linux installation. But if you do this in advance, you can avoid some unnecessary risks during installation.
Partitioning a Partition Using Linux Installer
Regardless of which version of Linux you are installing, you will need to partition your disk. If you did not do this before installation, then during installation it can also be done.
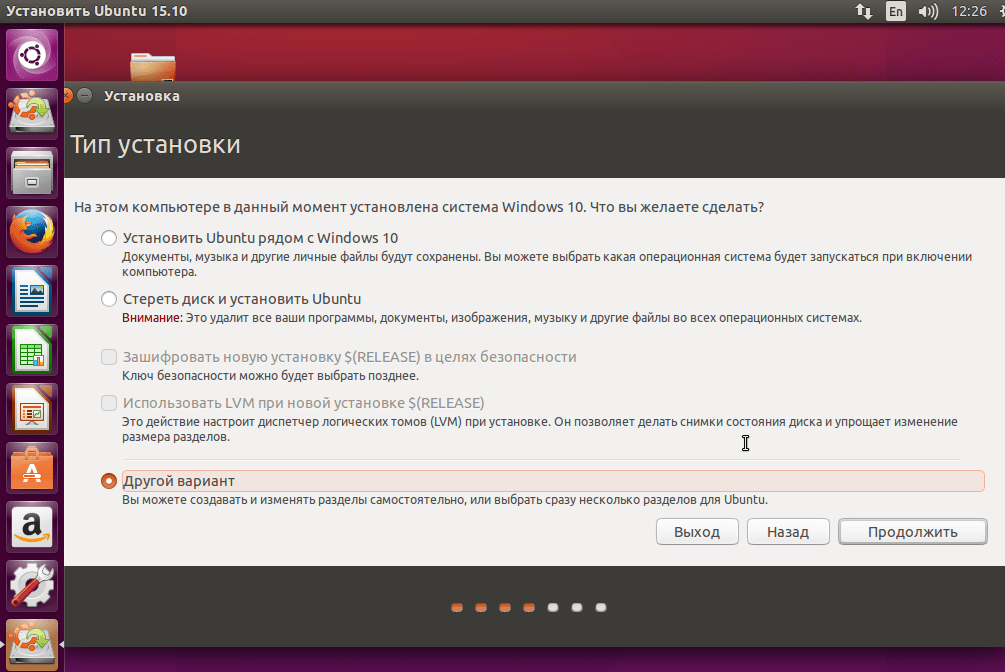
- To do this, when choosing the type of installation, select "Other option".
 When installing, select the line "Another option" and click "Continue"
 - The required utility will be launched. Here you can see the partitions of your hard drive. For installation, it is better to divide a partition that is not a system partition.
 Linux has its own disk utility that can also be used to partition a volume.
 - Select a non-system partition and press the "Change" button.
 Select a partition with enough free space and click "Change"
 - Please enter a different hard disk size. It is recommended to set a value greater than 20 thousand MB so that there is enough space both for the system and for its normal operation. All "extra" space will be cut off and become an unallocated area. Of course, it is necessary that this space is not occupied by files.
 In the "Change Partition" window, you can see the total amount of free disk space
 - Confirm the resizing by clicking OK.
 In the "Edit Section" box, enter the weight of the space you want to separate and click OK
 - A warning about the irreversibility of the process will appear. Accept the changes again and select the "Continue" button.
 Review and confirm changes when creating a partition in Linux
 - The split will be complete and you will see the line "free space". Select it and click on the plus sign.
 Select a new section and click on the plus to create a section
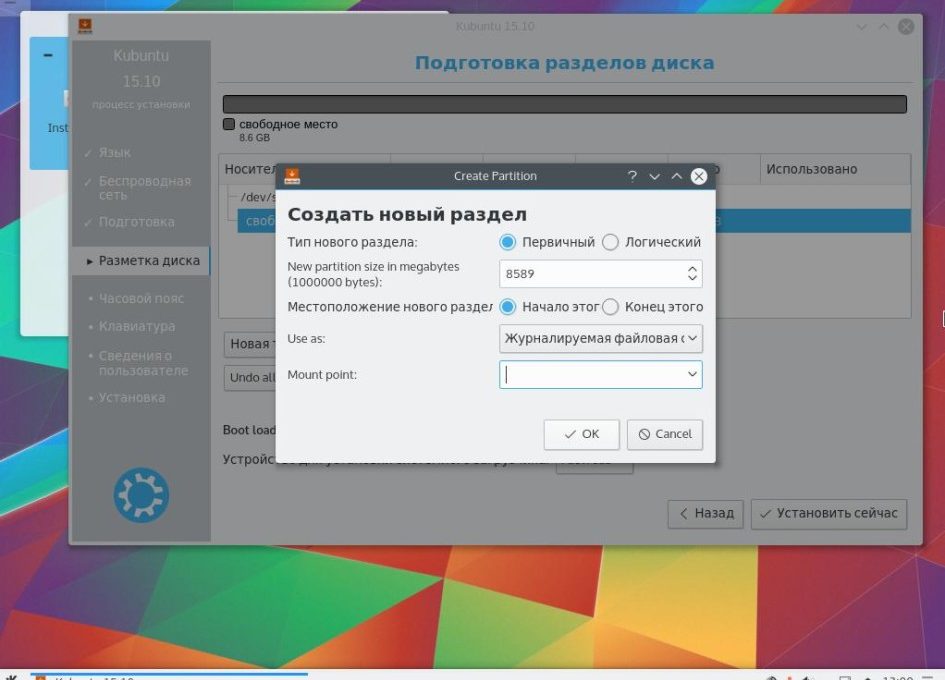
 - Fill out the section creation form. To install Linux, you will need to create a root partition, a swap partition, and a file storage partition. To create a root partition, specify a size of about 15 GB, set the partition type to "Boolean" and specify "/" in the "Mount point" line so that the partition is considered root.
 Enter the required data to create the root partition and click OK
 - Create a swap partition in the same way, choosing the appropriate partition type. It is worth allocating space for it as much as you have RAM.
 Fill in the required information to create the swap partition and click OK
 - In the last section for storing files, allocate all the space that is left. Select "/ home" as the mount point.
 Enter the required information to create a home partition and click OK
Partitioning is now complete, which means you can continue with the installation.
Install Linux Ubuntu next to Windows 10
You can download the latest version of the Linux Ubuntu system from its official website. Then follow these steps:
- Write the system image to a USB flash drive. This can be done using any program convenient for you. For example, the Rufus program can help you. Download and run it.
- Select the recording device on the top line. This can be a recordable disc or a flash drive.
 Specify your drive in the Rufus program
 - Specify the partition scheme - "GPT for computers with UEFI".
 Select GPT as partition schema
 - Then click on the image icon. In the explorer that opens, specify the path to your Linux image.
 Click on the disk icon and select the Linux image you downloaded from the official site
 - Make sure the "Create bootable disk" checkbox is checked and click "Start".
- After the boot disk is created, restart your computer and go to the Boot Menu. Select the boot of your drive there.
 Select your drive type in the Boot Menu
 - A start screen will appear to install Linux Ubuntu. Set the required language in the left pane and start the installation.
 Select your system language and click "Install Ubuntu"
 - Since the partition has already been created, select "Install Ubuntu next to Windows 10".
 From all installation types, select "Install Ubuntu next to Windows 10"
 - Then select a section. It will be fat32 if done correctly.
 Select the fat32 partition which should have enough space
 - If there is no partition, but there is an unallocated area, create it. To do this, in the devices tab, select Create Partition Table. Set the partition type to GPT.
- In the next window, specify the size of the partition, select fat32 as the file system and enter EFI in the Label line.
 Specify the weight of the section at your discretion
 - After selecting a partition, the installation will be fully automatic. To do this, simply select Ubuntu the next time the system boots.
 After rebooting, select Ubuntu as your operating system
 - After installation, indicate your time zone on the map.
 Set timezone in Ubuntu installation settings
 - Then select your language and keyboard layout.
 Choose the default keyboard layout for Ubuntu
 - Come up with and enter your new account details and click "Continue".
 Enter your new Ubuntu account credentials
 - The installation will perform the last steps and require a system reboot. Execute it.
 Agree to restart your computer by clicking "Restart"
Video: Detailed Installation of Linux Ubuntu on a Computer with BIOS
Install Linux Mint next to Windows 10
To install Linux Mint, you need to do the following:
- Go to the official site of this build and select the version to download. It is worth choosing based on the required options and the capacity of the system.
 Download the required version of Linux Mint from the official website
 - Choose torrent as the download method, or download the client from one of the mirrors.
 Download Linux Mint using any of the methods suggested on the site
 - Then write the Linux Mint image to your bootable media. This can be done using the Rufus program you are already familiar with.
 Burn the Linux Mint image to your bootable media
 - After starting the installation, you will see a window with a countdown.
 Wait for the timer to expire to begin installing Linux Mint
 - If you press any key, the advanced settings window will appear. It is not necessary to do this, but if you did, select the first item to start the installation. Or just wait until the time is up.
 Select Start Linux Mint to login
 - After a short boot, you will see the desktop of the new operating system in front of you. But the installation is not complete yet. Find the Install Linux Mint file on your desktop and double-click to open it.
 Run the Install Linux Mint file on your desktop
 - Language settings will open. Select the required language and proceed with the installation.
 Choose your language for Linux Mint system
 - Check the next box to automatically install the software.
 Check the box for installing additional programs and click "Continue"
 - Then select the type of installation. If you have partitioned the disk and separated the installation area beforehand, select "Install Linux Mint next to Windows 10".
 To install Linux Mint along with Windows 10, select the appropriate item
 - After selecting the installation section, the time zone selection will open. Enter your region.
 Select your region for the correct time zone setting
 - Then select the languages for your keyboard layout.
 Select the keyboard layout you want to use on the new system
 - Create and set your account name and password, if necessary.
 Enter your Linux Mint login details and confirm
 - Wait for the installation progress to finish. Progress can be tracked using the bar at the bottom of the screen.
 Wait for the end of the installation progress to access the system
 - Installation is complete and after restarting your computer, you can start using the operating system.
 Restart your computer when prompted
Video: Install Linux Mint on a Different OS Computer
Install Kali Linux next to Windows 10
The Kali build installation is slightly different from the previous ones.
- Download the image from the official build site, choosing the version that suits you.
 Select the Kali Linux version to download from the official website
 - Write the image to the bootable media using Rufus.
- After starting the boot program from the USB stick, you will see the installation options. Installing with graphics (Graphical install) will be the easiest, so we choose it.
 Choose a graphical setup for a more intuitive process
 - A list of language configurations will appear. Select the required language and confirm your choice.
 Specify the language for installing Kali Linux
 - If a window appears about the impossibility of correctly mounting the installation disk, just select the "Yes" item, having previously connected the drive to another connector.
 If an error occurs, install the drive with the operating system in a different slot and click "Yes"
 - Enter the password you created for the main account, and then repeat it in the line below.
 Enter the password twice for Kali Linux, which will be used for changes in the system
 - Configure the time zone to properly sync the time on your computer.
 Select the appropriate time zone from the list
 - The disk layout window will open. Indicate that you want to manually select a section.
 Indicate that you want to select the area manually
 - Pick the unallocated area ("Free space") that you created earlier.
 Select the unallocated area: it is labeled as "Free space"
 - Then select "Automatically mark up free space".
 Select the item "Automatically mark free space"
 - In the next menu, click on the item "All files in one section".
 Select "All files in one section"
 - Select the disk you were working with, click Finish and write changes to disk.
 Select a section and click "Finish Markup ..."
 - The computer will detect your Windows 10 operating system. Select Yes to select one of the operating systems when the computer boots, and continue with the installation.
 Select "Yes" to continue installation when Windows 10 is detected
 - Specify the system drive manually in the next window and the installation will be completed.
 Manually point to the system drive to install the operating system bootloader
Video: how to install Kali Linux on a computer
Installing Kubuntu alongside Windows 10
The installation process for Kubuntu Linux is similar to installing Ubuntu, which is not surprising at all. To install Kubuntu alongside your Windows follow these steps:
- Download the system from the official site and write it to the boot drive. Restart your computer, and by calling the Boot Menu by pressing F12 when the corresponding message appears, select the desired device to start the installation.
 Download the Kubuntu image from the official site
 - Press any key while the icon is flashing to open options.
 When the keyboard icon appears, press any key
 - Select Start Kubuntu to start installing the OS.
 Select Start Kubuntu to start installing the operating system
 - Wait for the graphical installation shell to load.
 Wait for the Kubuntu graphical shell to finish loading
 - In the next window, select your system language and click "Start Kubuntu". You need to select this option so that the system is available for use during installation on a hard disk.
 Select "Start Kubuntu" to access the operating system
 -
 It may take a while to load the desktop without installing
 - Then start the installation by clicking on the shortcut of the installation program.
 Select the Install Kubuntu file to start the installation
 - The installation window will open. Select Russian to continue.
 Specify the language that you want to see during the installation and in the system itself
 - It will check your internet connection and free space for installation. After its completion, click "Continue".
 After checking the Internet, click the "Continue" button
 - A window for selecting a section will open. If you want to install with a different operating system, select the Manual installation. Automatic partitioning can be used if the hard disk is completely free of files.
 Since you need to keep Windows 10, select the installation type "Manual"
 - It is necessary to create four sections in turn. The process itself is the same as creating partitions in Ubuntu. Create sections:
- Once the partitions are created, confirm the changes and the installation will begin.
 Accept the changes to proceed with the Kubuntu installation
 - While the files are being copied to your hard drive, select your time zone settings.
 Configure the time zone of the new operating system by selecting your region
 - In the next window, select the layout language.
 The intuitive keyboard layout helps you make sure you have the right language
 - In the last screen of settings, set the data from the account.
 Enter the details for the new account and click "Continue"
 - After that, wait until the installation of the system is completed.
 Wait until the Kubuntu installation process is complete
 - When the installation is complete, restart your computer.
 Restart when prompting window appears
Installing Rosa Linux alongside Windows 10
As with other assemblies, to install Rosa Linux you need to download the required image and burn it to media.
- Go to the Boot Menu by pressing F12 after restarting your computer. Choose to boot your drive. A window will appear with various diagnostic actions. Select the Install ROSA Desktop Fresh R6 line.
 Select Install ROSA Desktop to start installation
 - The language selection panel will open. Install the required one and proceed with the installation.
 Select your language when installing the system
 - Review and accept the Rosa Linux License Agreement.
 Accept the terms of the license agreement to proceed with the installation
 - Please specify your keyboard layout.
 Also select the language for the keyboard layout
 - In the next window, specify a convenient way to switch between layouts.
 Specify the desired way to switch the language layout
 - Specify the time zone to correctly determine the time.
 Enter your time zone in the list of regions
 - To finish setting the time, select the type of time display.
 Select the time display method on your system
 - In the partition selection, select "Use free space" if you want the system to create the necessary partitions in the unallocated area by itself.
 Select "Use free space" when installing rosa linux
 - Wait for the installation to complete.
 Wait for the installation to finish, the slides will change in the process
 - Select the partition as the boot device and set the boot delay if needed.
 Specify the system drive for the operating system loader
 - Set a password for system changes.
 Set any password you like, but remember it
 - Add a new user and enter his details.
 Fill in the data for the account in the new operating system
 - Provide a name for your computer.
 Set any name for your device
 - Check the boxes to mark the services that should start when the computer is turned on.
 Configure automatic start of operating system services
 - After the message that the installation is complete, restart your computer.
 After finishing the installation of the system, you need to restart your computer
 - Installation is complete - all that remains is to log in.
 Log in with your account password
Video: Install Rosa Linux on a Windows Computer
Installing Arch Linux next to windows 10
Installing Arch Linux will be significantly more complex than installing others. If you are not an experienced user, it is recommended that you select a different assembly. Otherwise, follow these steps to prepare for system installation:
- Download the system image from the official site.
 Download the Arch Linux build from the official site
 - Burn the image to disk. This can be done using special programs or Windows tools - through the context menu.
 Burn Arch Linux to media in a way convenient for you
 - Connect the bootable drive to your computer and restart your computer. During the reboot, go to the Boot Menu, the key for this will appear on the screen (usually F12).
 Press F12 to enter Boot Menu
 - Set the boot priority to your storage device. So, if it is a bootable disk, set boot the floppy drive before loading the hard disk.
 Place your drive first in startup order
 - After that, when you restart your computer, you will see a selection of actions. Click on Boot Arch Linux to start the installation.
 Select Boot Arch Linux
 - It will check for network connectivity. Enter the command "ping -c 3 www.google.com".
 Enter the command to test the network before installing
 - Then create system partitions from free space. Use the cgdisk / dev / sda command to run this utility.
 Select free space and create partitions one by one for installation
 - Create a root partition to write system files. It is recommended that you allocate at least 20 GB of free space for it.
- From the space that is left, create a Home section. This is where your files will be stored. But it is worth leaving about 1 GB for EFI space.
- Allocate the rest of the space in EFI space. Then click "Burn" to start installing Windows into the created partitions.
- Then format each of the sections. To do this, use the following commands to format all three sections in sequence:

- Then bind partitions to directories using the following commands:

Directly installing Arch Linux will also require you to enter the commands:
- Enter the command pacstrap -i / mnt base base-devel. This will start installing the operating system. Wait for the end of this process.
 Enter the command to start the installation and confirm the entry
 - Then enter genfstab -U -p / mnt >> / mnt / etc / fstab. This is necessary for the system to detect the partition.
 Enter the command to detect partitions during installation
 - Enter arch-chroot / mnt / bin / bash to access the new OS.
 Enter the last command to access the arch linux operating system
 - Set the currency format by entering nano /etc/locale.gen. Find the line with your country entry and remove the hash mark next to it. Then enter the locale-gen command and, after confirmation, the echo LANG = en_US.UTF-8> /etc/locale.conf command, where instead of en_US.UTF-8 there should be a line from which you removed the hash.
 Using the above command, set the region for the currency
 - To accept the language setting, enter export LANG = en_US.UTF-8 also with the appropriate language instead of the specified one.
 Also set the language zone using the special command
 - The next setting is to set the time zone. Enter ls / usr / share / zoneinfo / to display the available time zones, and then enter ln -s / usr / share / zoneinfo / Zone / Subzone / etc / localtime with your region instead of Subzone.
- To set the time to GMT, enter the command hwclock -systohc –-utc.
 Enter the command to synchronize the operating system time to GMT
 - Enter the command echo myhostname> / etc / hostname, where myhostname is the name of your computer for the network.
- Set a password for use by the computer using the passwd command. It can be anything, but it is important to remember it.
 Set the password using the passwd command
 - And then all that remains is to set the system bootloader. For a modern UEFI BIOS, this is done with the commands:

- With a normal BIOS, the commands will be different:
- pacman -S grub;
- grub-mkconfig -o /boot/grub/grub.cfg.
- Exit the installation with the exit command and then enter Reboot to restart the computer.
 Complete the installation with the exit command and restart the system with the reboot command
 - After restarting, enter the password to login. Installation completed.
 Log in to arch linux using your password
Installing Ubuntu on VirtualBox Windows 10
Before installing the Ubuntu operating system on VirtualBox, you need to do the following:

After that, open VirtualBox and follow these steps:
- Click on the icon that says New to open the New Virtual Machine Wizard.
 Click on the New button of the VirtualBox panel
 - The name of the virtual machine can be anything, and in the Type field select Linux.
 Enter any name for the virtual machine and click Next
 - In the next window, confirm the amount of memory for the virtual machine. Depending on the type of installation, the value will be set by itself. You can increase it as needed.
 You can leave the default value if it suits you.
 - Make sure the marker is set to create a new virtual machine and click on the Create button.
 Select to create a new virtual machine and click the Create button
 - Select the Dynamically allocated virtual disk type and click Next.
 Set the dynamic disk size of the virtual machine
 - Leave the default values in the disc location and size menu, or set the required size.
 The virtual machine disk value can also be left at the default
 - Finally, click Create again to finish creating the virtual machine.
 When all the settings for the virtual disk are specified, click Create
 - Click on the virtual machine you created and go to its settings.
 Select the virtual machine you created
 - In the Storage tab, add a new media by clicking on the blue plus icon under the media field.
 Click on the plus sign under the media overview
 - Specify your Ubuntu image that you downloaded earlier as the media.
 Download the Ubuntu image to your virtual machine
 - Open this image with a double click so that it will be placed in the system.
 After double clicking on the image, it should have loaded into the media menu
 - In the system settings section, make sure the CD / DVD drive is placed higher than the Hard Disk in the Boot Order section.
 Specify CD / DVD as boot priority so that the image is mounted at system startup
 - Now go to start and configure the operating system. To do this, select a virtual machine and click on the Start button.
 Click Start to start the virtual system
 - Wait for the system to boot up.
 Wait for the system to finish loading at the first start
 - Select Install Ubuntu. You will be taken to the language settings window. Select your preferred language and click Continue.
 Select the language for installing the system in the virtual machine
 - Check the box to download updates during system installation.
 Check the box to download updates and click Continue
 - Since you are installing the operating system on a virtual machine, feel free to choose the Erase disk and install Ubuntu option, in which all other files on the disk will be erased.
 Choose disk cleanup - since we are installing the system on a virtual machine, files will not be harmed
 - Set the time zone to the one in which your region is located.
 To set the time, select the region where you are
  Wait for the Ubuntu installation to finish on the virtual machine
 - Restart your computer after the installation is complete by clicking Restart Now.
 Restart the virtual machine by clicking the Restart Now button
 - Enter your password and sign in. The installation of Ubuntu on the virtual machine is now complete.
 Enter your password to login
Recovering Windows 10 Boot After Installing Ubuntu
If errors occur during system installation, the Windows boot loader may fail. This will make it impossible to start Windows 10. Fortunately, this is not difficult to fix. You will need a Windows 10 installation disc, which you can prepare just like any other bootable drive. It is important that the Windows version is exactly the same as the one you have installed. Mount the image and then do the following:

Installing a second Linux operating system is a good decision, but it is important to choose the assembly based on your goals and technical knowledge. If you have certain skills, you can easily install any of the assemblies. Using Linux alongside Windows 10 will help you unleash the full potential of your computer.
Related entries:
No related records found.
Linux can come in handy for many reasons. For example, your old computer cannot be upgraded to newer versions of Windows or macOS, or you need specific Linux applications, or you are just curious to try a new one. Or maybe you just bought a new computer without an operating system and want to save money by choosing free Linux.
Installing Linux is easy. Of course, there are distributions like Arch, which is quite difficult to install for a beginner. But most modern distributions are very easy to install. Perhaps even simpler and faster than Windows.
Back up important data before installing Linux on your main computer. While working with partitions on your hard drive, you can inadvertently erase something important. Of course, if you follow the instructions and carefully read what you are doing, then nothing unexpected will happen. But - not a superfluous thing in any case.
You can install Linux on computers running Windows and macOS, or on an empty hard drive. You can choose Linux as your main system, or use it alongside your old system.
1. Download the Linux distribution
First of all, you need to choose a Linux distribution. The DistroWatch.com rating will help you decide.
Then you need to download the selected distribution. It's easier to do this: open the site of the required distribution kit, find the downloads section and select the one that suits your processor's bitness.
As a rule, Linux distributions on the official sites are offered to download in two ways. The first way is normal download. The second is through P2P via a torrent client. The second way is, of course, faster. So choose it if you want to save time.

When the distribution kit is downloaded in ISO format, you need to burn it to a CD or a regular USB flash drive.
Burning to CD can be done using standard system tools: "Burn disk image" Windows or "Disk Utility" macOS. It is enough to click on the loaded image with the right mouse button and select the corresponding item in the menu.

You will need special utilities to burn ISO to a USB flash drive. For Windows, choose Rufus, and for macOS, choose UNetbootin. These programs have a very simple interface, it is rather difficult to get confused in them.
3. Prepare the disk partition
This step should be performed if you want to keep the system installed on you and use Linux at the same time. If you decide to transfer your computer to Linux completely or install the OS on an empty hard disk, skip this paragraph.
Windows

Open Windows Disk Management Tool. Select the disk or partition from which you plan to cut some space for your Linux installation. For most distributions, 10 GB is more than enough. But if you plan on installing a lot of apps, take more. Right-click on the partition and select Shrink Volume. Enter the size and click OK.
The process can take quite a long time, so please be patient.
When Disk Management finishes resizing partitions, an empty unallocated space appears on the disk, marked in black. We will install Linux there.
Later, if you don't need Linux, you can delete partitions with it and give the freed space back to Windows using the same "Disk Management Tools".
macOS

You can allocate space for your Linux installation through the macOS Disk Utility. Select your drive and click on the "+" sign to create a Linux partition. It may take a while to create a new partition.
4. Prepare the bootloader
Windows
This item only applies to new computers with preinstalled Windows 10, 8.1, or 8. These computers use a UEFI boot loader that will prevent you from booting any system other than Windows.
To fix this, go to your computer's BIOS settings and disable the Secure Boot option. Then reboot. Done, you can now download and install other systems alongside your Windows.
macOS
Unlike most computers, Mac requires a couple of additional steps to install Linux on a dual boot with macOS.
First of all, disable SIP. Reboot your Mac and press Cmd + R. The Recovery menu appears. Select "Terminal" in it and enter csrutil disable.
Restart your Mac again. SIP is disabled.
Manual
Suitable if you want to set the dimensions for your partitions yourself or, for example, create a separate partition for your files. To do this, select "Another option" and click "Continue".

Linux will display what partitions you have on your computer. You can delete them, format, or, conversely, leave the sections with the information you want to keep.
To install Linux instead of your system, select the partition with the installed system and remove it with the "-" button. Then create new partitions in the vacant space.

- Root partition for Linux system files. Select the Ext4 file system and mount point /.
- A swap partition, or swap partition, comes in handy if you don't have enough RAM, but a fast SSD. Select Swap Partition from the list of file systems.
- Home section where your files will be stored. Select the Ext4 file system and the / home mount point.
Click "Continue" and confirm the changes. The installer will erase the partitions you selected and create new ones in the vacated space.
How to install Linux next to the current system
There are two ways to install Linux alongside your system.
Auto

Most Linux installers will immediately detect the systems you have installed. If you did not create a separate disk space for Linux, then you can try selecting the "Install next to Windows" option. The installer will create the necessary partitions on its own, and you will not have to do anything manually.
Manual

If you want to decide for yourself how much space to allocate to the system, and followed the instructions in step 3, click "Other option" and click "Continue". You will see your disk partitions and the empty space that we have prepared for Linux. Create a root partition there (mount point /) as described above. The home section is not necessary in this case: you can copy and modify files on your main system.
Click Continue. The installer will leave your files where they are. It will simply create new partitions in the free space. You will be able to choose which system you want to boot at startup.
8. Complete the Linux installation


You will then be asked to introduce yourself. Enter your name and create a password. Do not forget the password, as you will always need it to complete tasks on behalf of everyone. You can encrypt your home folder if you want.
Then just wait. When the installation is complete, you will be prompted to remove the installation disc and reboot. Do not forget to disable boot from external drives in the BIOS if you enabled it.
What to do after installation
When you reboot and your Linux desktop appears in front of you, you can do everything you do in Windows and macOS: surf the Internet, edit documents and listen to music. Do not forget to update and take a look at the "Application Store" (or its equivalent, depending on the distribution kit) to install the applications you need.
Try Linux and you will see that it is no more difficult in everyday life than Windows or macOS.