
Today, shops have a wide variety of door lever handles to suit every taste. But in general, the technology for their installation is the same and does not require special skills.
We will analyze the installation process step by step doorknob on interior door... A simple laminated door and a set of Leverset handles are used as an example.
What is required?
To do this job you will need the following tools:
- screwdriver (you can drill) with a crown? 46 mm;
- roulette;
- Phillips screwdriver;
- square;
- chisel;
- pen drill? 22 mm (or? 24 mm);
- wood drill (for adjusting and drilling guides);
- hammer;
- pencil.

Installation steps
First of all, we put a mark on the door at the height at which we plan to install the handle. The standard ergonomic height is 105 cm. But if there is a small child in the house or it seems high to you, then you can deviate from the size. In the example, the handle for the convenience of the whole family is located at a height of 95 cm. We draw lines for orientation on three sides.
 We put marks where the handle is supposed to be. The distance from the edge to the middle of the handle is 60 mm.

 Mark the middle at the end. This is where the tongue latch will be located.
Read also: Energy-saving lamps: advantages, features, types, selection criteria
 Drilling in the end with a first drill? 22 (or? 24) mm hole for latch depth. It is convenient to use a pencil when comparing the resulting drilled distance with the size of the latch.
 At a distance of 60 mm from edge to center, drill a hole with a crown? 46 mm. In order for it to be even and symmetrical, we do this on both sides in turn.
 Note! Was the wood drill used as an auxiliary one, because there was a crown available? 44 mm. In this case, 3 holes were drilled on each side: the central one for the guide crown, the other two on the sides for the handle fastening screws.
This was done because the crown did not overlap the required hole size. Then a hole of a larger diameter was drilled with a crown. With a crown? 46 mm, no such manipulation is required. This advice can be useful for those who do not always have the required tools at hand.

 We attach the tongue overlay to the place of its installation and draw a circle with a pencil. It is necessary to prepare the surface of the laminated door in order to screw it on.
 With a chisel, we begin to process the outlined area to a depth of 3 mm. This distance can vary depending on the thickness of the metal from which the plate is made. It is important to make it correct and accurate, because if there is insufficient depth, the pad will touch the hole for the tongue, which will cause an unpleasant sound when closing, rapid abrasion and unreliability of the mechanism during operation. If the depth is, on the contrary, large enough and the pad is slightly planted inward, then the door will be difficult to close - the tongue will not fit tightly enough into the hole.
Read also: Chess fence (photo): types and stages of installation
 It is worth remembering that you must be careful when working with laminate flooring. A hammer and chisel are useful for neatly removing the layer.

 Particular care should be taken when removing the coating from the narrow longitudinal stripes of the recess. At this point, the laminate tends to expand in the opposite direction, so it will be more convenient to do this at an angle of 90 °.
 After everything is ready, install the pad with a hammer. We fasten it with a screwdriver. The paper was used to avoid damaging the mirror surface.

 We put handles on both sides of the door. It's simple enough and doesn't require any tools.

 Next, we put on them decorative overlays and lever handles in turn.

 Now we start making a hole in which the tongue will enter. To do this, you first need to mark exactly where it will be located. A regular tube of toothpaste can help. We apply it with a thin narrow strip on the edge of the tongue to get an imprint on the jamb.
 Having lowered the handle down (the tongue is retracted), carefully bring the door and release it in a place where it is expected to always close.
Sections of the article:
Today it is difficult to imagine an entrance or interior door without a handle. Of course, there are some types of doors that do not require this element. But in most cases, the handle is simply necessary for the convenient operation of the door leaf. What kind of handles are there and how to install handles on interior doors on your own?
Types of door handles and methods of their installation
Door handles are classified according to several criteria. According to their purpose, they can be divided into those that are not responsible for the operation of some other device and those that are installed in combination with a latch or lock. The simplest type of pens is considered to be stationary models... A feature of such products is the simplicity of execution. Stationary pens are rarely particularly graceful or elegant.

Such fittings rotate or rotate only if it is out of order. The installation process of stationary handles is not very difficult. You should not pay special attention to the description of the installation of such products. They are simply fixed to the door leaf with screws or screws. Another option for installing stationary handles is to secure with a threaded stud. The latter method involves drilling a hole through the door leaf at a height of 800-900 mm from flooring... Well, then everything is elementary - a hairpin is inserted into the drilled place, onto which handles are screwed on both sides of the door leaf.
Other types of handles are used in combination with a lock or latch. The installation process of such products is more complicated due to the presence of a locking system. Such handles are rotary or push-down. The first ones are made in a spherical shape and they are also called knob pens. Part of their design is a simple locking mechanism. In addition to the above differences, door handles differ in the type of material from which they are made, as well as in design characteristics.

There is also a number of not particularly important nuances that allow the door handles to be differentiated from each other. To describe everything existing species and subspecies of these hinged elements, a separate material will be required. In this case, it is more expedient to understand the principle of installing one of the main types of handles, namely fittings with a locking mechanism in the structure.
Required tool
To install a door handle with a latch, you will need to prepare some tools in advance. So, during the installation process, you will need an electric drill or screwdriver, a hammer, a chisel and a chisel, as well as a set of feather drills of different diameters. In addition, it is necessary to prepare a sharpened pencil, a measuring tape, and a square.

It would be appropriate to say that the best tool a hand-held milling machine is used to create a seat for the decorative cover of the latch. But, given the fact that this equipment is rarely found on the farm, when installing the handle on the interior door yourself, you will have to be content with chisels and a hammer. It should be emphasized that a chisel is a rather clumsy tool and the quality of the work performed with its help directly depends on the experience and skills of the master. When installing the handle, it is very important not to damage the decorative coating of the door leaf. Therefore, you will have to wield a chisel and a hammer as carefully and verified as possible.
Door handle installation guide. Process features
The first step is to get ahead of the place to install the handle. There is a certain standard of height at which it is recommended to fix such fittings. This parameter is 800-900 mm from the floor covering and was entered based on the average height of a person. Of course, when installing a handle on a door leaf, the physiological characteristics of the inhabitants of the dwelling should be taken into account. If we are talking about short people, then the standard height must be reduced. For tall inhabitants of the house, on the contrary, it is advisable to fix the handle above the established norm. The process of installing the door handle itself consists of several sequential stages, which will be discussed below.

The first step is to mark the place under the handle. This is not the most difficult operation, which includes a number of stages. First, put a mark on the door leaf. A handle will be installed in this place. Then this mark must be transferred to the center of the end of the door leaf. At this point, you will need to drill a hole for the latch. To accurately anticipate the location of the handle itself, you should measure the distance from the edge of the latch to the middle of the hole in the mechanism into which the square fastening rod will be inserted. Then the resulting size must be indicated on the door leaf. As you can see, the whole process of marking for installing a handle with a latch is reduced to obtaining these two points.
At the next stage of installing the handles on the interior doors, you need to drill holes. The first step is to prepare a place for the square fixing bar on the side of the door. After this hole is ready, you can start creating the recess on the end side. So, to drill the side of the door leaf, you need an electric drill and a feather drill with a diameter of 25 mm. It is necessary to drill from both sides. This will avoid damage to the decorative coating of the door leaf. After the drill appears from the back of the door, you need to continue drilling in the opposite direction. When this hole is ready, you can start creating a recess at the end of the door leaf.

To do this, use a 22 mm drill bit. After drilling the first hole, it is necessary to make a sweep from the end of the door for a decorative latch on the latch. To do this, it is necessary to install the mechanism in the prepared end hole and outline the contour of the strip with a sharp pencil. After that, the latch can be removed and using a hammer and chisel of the desired size, create a shallow groove for flush installation of the decorative strip.
The most the best option will be used for these purposes hand router... But such a tool is a rarity for ordinary apartments, but there is a chisel and a hammer in almost every house.
In the future, the installation of a handle with a latch on the door involves the assembly of the entire mechanism inside the canvas. To do this, first of all, a latch is inserted into the door through the end hole. The mechanism is fixed with a pair of screws or screws. By the way, it will be emphasized that during this operation it is advisable to monitor the performance of the latch. It should not stick, which sometimes happens due to the ingress of wood dust and shavings inside the mechanism. To avoid such troubles, it is recommended to thoroughly clean the end hole before the final fastening of the latch.

The next operation is the installation of a square bar. There is nothing complicated here either. It must be passed through the square hole in the latch into the side of the door leaf. After that, a handle is put on the square on one side of the door. By the way, the set comes with one right handle and one left. It is important not to confuse them here. The handle is put on a square and fixed to the door leaf with screws. Usually, three fasteners are provided for each side.
The second handle is installed in the same way on the door leaf. After fixing both handles, make sure they are working properly. If everything, including the latch, works as it should, then you can proceed to the final phase of the installation. It consists in screwing special decorative caps onto the handles, which hide the fixing points of the fittings from the eyes and make the product aesthetically pleasing. You will also need to tighten the hidden screw under the handle to secure it. It is usually screwed in with a hex wrench.
This completes the installation of the handle on the interior door. To use the mechanism for its intended purpose, it remains only to install the counterpart in the door frame. This operation is performed according to a certain technology that will not create difficulties even for beginners. The first step is to transfer the location of the middle of the latch to the door frame. This should be done with the door leaf loosely closed. Then, in the part of the box where the door closes, it is necessary to drill a hole about 10 mm deep exactly in the center. A decorative overlay is installed on top, which should come complete with a latch. There is no need to deepen it into the body of the door deck, just screw it on. After that, you need to check how the latch functions.

This completes the installation process of the door handle with a latch. According to the same algorithm of actions, the handle with the lock is installed. The difference in these two processes lies only in the size of the end seat and the need to drill another hole on the side surface of the door leaf. The cylinder of the locking system will be installed in this place. Otherwise, the process of installing the door handle is the same.
Interior doors are sold without fittings. Therefore, the purchase and installation of door handles is done separately. To do this, you can use the services of a carpenter or insert it yourself.
Types of door handles
When choosing accessories, you need to know what types of handles are, and how they differ from each other. The variety offered in stores allows you to choose them according to the style of the room and ensures ergonomics in use. Depending on the installation method, products are divided into two classes:
- waybills;
- mortise.
Overheads are attached to the surface and, as a rule, there are no difficulties with them. And mortise requires preliminary preparation of the hole in the door leaf.
Mortise products can be of two types:
- Rotary, they are also called knob handles, which, when the handle is turned, open or close the latch that holds the interior door closed. In most cases, they are in the form of a ball or disk.
- Push buttons work on the same principle as rotary ones, only the mechanism is activated when the handle is pressed. As a rule, they are sold together with a lock or latch, hence their other name - push handles-latches. Fittings with a push mechanism are widely used for both interior and exterior doors.
What type of product is better to choose depends only on your preferences. You should also consider the style of the room. Designers advise buying them the same for all doors in the same room.
The height at which the door handle should be located is not clearly fixed by any standard. On average, it is located at a distance of 1 meter from the floor. This value can fluctuate up or down, depending on your preference. It can also be influenced by the growth of those who use the door consistently. When installing, you can build on the level at which the other handles are in the room so that the height of their location is the same.
Instruments
In order to insert a handle into an interior door, you need to have a certain set of tools. It includes:
- tape measure, square and pencil;
- chisel;
- screwdriver, drill;
- drill, crown.
The use of all necessary tools greatly facilitates the process of work. It is quite possible to embed fittings without a screwdriver and a crown, but in this case the work will take much longer.
Installation of fittings is ideally done when the canvas is removed from the hinges. If this is not possible, then you need to securely fix it in order to efficiently and evenly perform the markup and tie-in.
Read the instructions for the doorknob well before starting the cut-in. All sizes are indicated there, and you will know what diameter of the crown and feather you need to work.
The instructions below will help you put the handle on the door leaf and avoid mistakes. And for those who first encountered such a case, it will be useful to watch a video on this topic in order to have a visual idea of the upcoming installation work.

Step-by-step instructions for installing a door handle
- Layout of the canvas.
- Drilling holes for handle and lock.
- Installing the lock
- Handle insert.
- Loot markup.
- Cutting a groove in a loot
Let's pay special attention to each stage of the work, having analyzed it in detail.
Canvas markup
The installation begins with the markings on the door leaf. First, you should decide what height will be chosen for the location of the handle. Using a square, tape measure and a pencil, mark the places on the canvas in which you need to make holes. To do this, we measure the required distance from the floor and draw a horizontal line with a pencil, first on one side, and then transfer it to the end and the other side.
At the end in the middle of the drawn line, mark the place in which a hole will be made for the lock tongue. On the same line on both sides at the same distance from the beginning of the canvas - this is, as a rule, 60 mm - we mark the places where the handle itself will be inserted.

Drilling hole for handle and lock
Using a drill and a crown, we make a hole for the doorknob. It is necessary to check on each side of the canvas to a depth of half the thickness of the interior door. For convenience, experts recommend making a mark on the outside of the crown with a marker. First, on one side, we drill to the required depth, and then on the other, to complete drilling. This is done so that the crown does not go to the side and so as not to damage appearance when sampling material for fittings. You need to hold the drill at an angle of 90 degrees and do not allow it to deviate either vertically or horizontally. With the help of a chisel we smooth out all the irregularities.
We make a hole for the lock using a drill and a feather. The work should be done carefully, since the distance between the pen and the angle of the end is not at all large.
Some professionals prefer to make a hole for the latch first, and then for the handle. In what order you will do it is not important.

Installing the lock
To install the lock, you need to insert it into the corresponding hole. Apply an overlay on top and draw a pencil around it around the perimeter. Now you need to select the material with a chisel to a depth equal to the width of the lining in order to drown it in the canvas. For the convenience of work, you can use several chisels of different widths.
The cover is attached to the door with screws. Holes for them are recommended to be made in advance using a thin drill, attaching an overlay and marking the necessary places with a pencil.
Handle insert
There are products in which the screws are on the outside. You don't need to disassemble them. Putting in place one part, it is required to get into the latch holes with two guides, in which a thread for the bolts is provided. Then you need to attach the other half and bolt. They need to be tightened evenly so that the handle works well and the latch easily returns back.
Products in which the screws are hidden must be disassembled. Included with them are instructions and a key for disassembly. The handle can be easily removed if you find a stopper on it and press it with a key. The collapsible part is screwed on with bolts, after which the handle is put in place. Do not use force, assembly should be easy if you do it right.

Loot markup
After installing the handle, you need to make a corresponding hole for the tongue in the tray. Therefore, first of all, it is important to carry out the correct marking so that the door closes well, and the lock fits into the groove without effort and friction.
We close the interior door and mark the top and bottom of the tongue with a pencil on the saucer. Using a square, we determine the exact middle of the lock and mark this value on the loot. With a drill and a feather, make a hole and remove excess material with a chisel.
Cutting a groove in a loot
Before screwing on the cover, it is important to check how the door closes. This will allow you to be sure that the tongue groove is correct and will not be difficult to operate. When closed, the door should have a slight play, that is, it should wobble a little. This is necessary because the thickness of the metal of the latch striker will be added to the groove.
The strip is fastened flush with the strip. To do this, as with installing the lock, it must be drowned in the loot to the required depth.
A slight backlash may remain even after you have screwed on the trim. This defect is easy to fix. The striker always has a tongue with a small hole for a screwdriver. It is specially designed to bend it. Using a flat screwdriver inserted into this tab, you can adjust the doors by bending it slightly.
The entire process described can be clearly seen in the video by inserting the fittings into the interior doors. The installation of the handle can be considered successful if it turns easily and the latch enters the groove without friction and effort.
Requires a minimum set of tools:
- Drill
- Chisel 19 mm
- Crown with a diameter of 50 mm
- Drill bit 23 mm wide
- Drill bit for wood or metal 4 mm
- Hammer
- crosshead screwdriver
- And a pencil
So, let's start to embed the lock.


Drill a hole in the center with a 4mm drill

We put the lock flush with the door and make a mark after the fact

We drill through the hole with the same drill, observing a right angle.

With a 50 mm crown we make an inset on one side of the door.
Attention!
In your specific case, a different crown size may be required.

We finish on the other side.


We take a self-tapping screw of a suitable length, close the door by slamming the box and through a 50 mm hole we put a self-tapping screw into the remaining 4 mm hole and press a mark in the door frame.


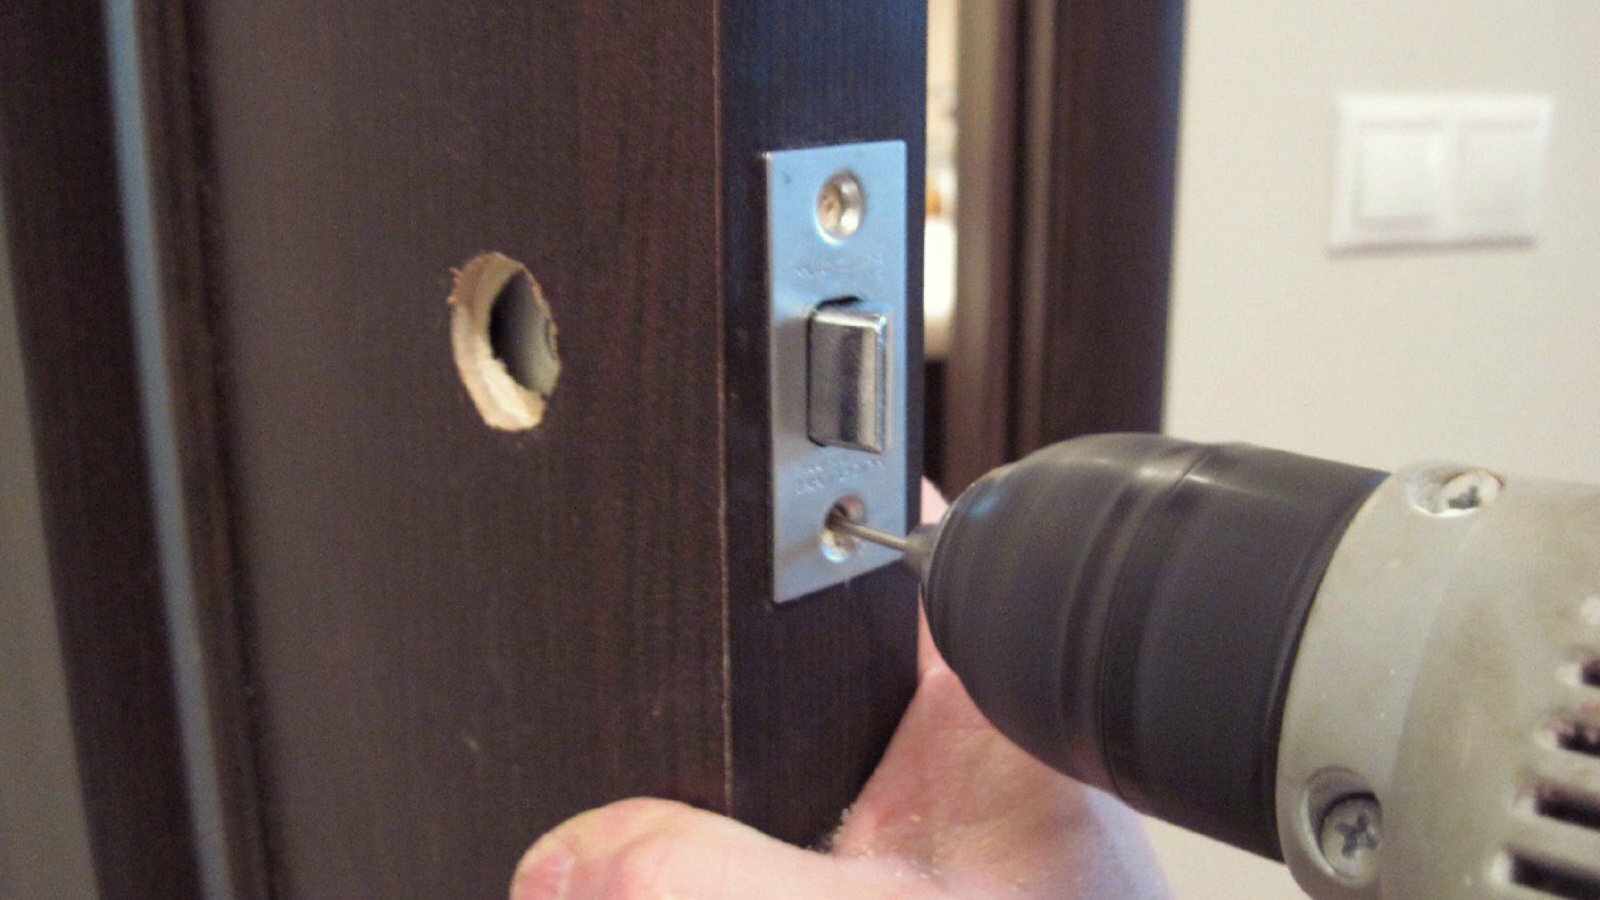
Along the mark with a 23mm feather drill, cut a hole to a depth sufficient for the lock latch to enter.

With the same drill at the mark, we drill a hole for the lock.

We insert the lock and make a mark with a sharp pencil to drown it into the door leaf.


With a chisel we make notches strictly according to the mark and make a selection so that the lock sits in the secret, then we fasten it with self-tapping screws.

We begin to assemble the lock, insert the outer part into the grooves (as a rule, it does not require disassembly).


Then carefully remove the decorative "cup" sitting in the grooves, then press the latch and remove the handle.


We connect the two sides with screws.

We insert the handle so that the latch works.

We snap a decorative "cup".


We attach a strike plate, make a mark, select the excess with a chisel and fasten it.

Done!))) Correctly embedded lock is free to close by pressing on the door leaf until it slams.
Video explanation for installing the lock
Instructions for installing a door lock (knob)
1.Door markings

On the door leaf, apply the markings for installing the knob (lock) according to the template. The recommended distance from the floor is 965 mm.
2. Marking holes

After you have applied the markings, drill two holes: 50 mm in diameter for the knob (lock) handle and 23 mm in diameter for the latch mechanism.
H. Installing a strike plate

Install the striker at the same height as the latch so that the additional latch tab remains recessed into the latch body when closing, which is an obstacle during spinning.
4 Dismantling the knob (lock)

To disassemble the knob (lock), press special key onto the spring-loaded latch at the handle attachment point and remove it.
5. Adjustment of the latch length

6. Installing the latch

Install the latch into the groove in the door (make sure that the bevel of the latch is directed towards the door closing). Install the cover plate with the rod so that the rod and withdrawal sleeves fit exactly into the grooves on the latch body.
7. Installing the knob cover(castle)

First, slide the inner plate of the jujube overlay onto the rod and secure it with the screws (or screws). Then screw on the outside of the pad.
8. Installing the handle

Install the handle so that the groove on the rod matches the groove on the knob handle, press the handle until it “clicks”.
9. Repositioning the mechanism in the lanyard handle

For models of latches with a latch handle (versions 01 and 03), installation is also provided for both left and right doors. To do this, it is necessary to remove the cylinder mechanism and the locking mechanism from the handle body and swap them (according to the figure), in accordance with the side of the door opening.
Installation order.
1. Determine the location of the knob and apply the markings, guided by the template and installation instructions.

2.On the installed latch body, mark the installation location of the striker on the door jamb and select the groove for the striker.
3.Fit the striker and secure it with screws.
4. Alternately outside and inside the room, check the knob's functionality.
5.For models of latches with a latch handle (versions 01.03), installation on left and right doors is also provided. For this, the locking mechanism and the cylinder mechanism from the handle body must be reversed.

As you can see, inserting the lock into the door is not such a difficult task, the main thing is not to rush.
—————————————-
Photographer: Vladislav Mazitov
Do-it-yourself installation of a door handle on an interior door, since door blocks are not completed with fittings. To do this, you need to select a tool to perform the required work. Each fitting has instructions for use. The installation height from the floor covering, convenient for a person, is indicated, as well as the design diagram. If there is no indication of the installation height, one condition is necessary for the door handles. A person should not open the door in a bent position (about 1 m from the floor).
Dimensional drawing for door handle installation
Depending on the wishes of the person, only the installation of the handle of the door opening mechanism or door handles with a mechanical or electromechanical lock is performed. The industry produces various systems for locking a home or room. The peculiarity of locks is that millions of designs must be opened with different keys.
Installation work must be performed in a specific sequence:


Step-by-step instructions for installing a handle on a door
Tools for the job:
- screwdriver (drill);
- joiner's meter, pencil for marking;
- a set of drills for wood, a crown for drilling large diameters.
All door handles can be divided into overhead and mortise. Mortise handles can be divided into rotary designs and rotary with a lock. To protect the lock from unauthorized opening, it is necessary to create production facilities for the production of locks, keys of various modifications and sizes.

Door handle installation diagram
They must be protected from water, frost and picking. Many designs require certain professional skills from the master. Installing a doorknob is impossible without special skills and tools. If it is a supporting one, then it is not associated with the opening mechanisms.
When marking, it is required to determine a place that will not interfere with the rotation of the key and will be at the level of a person's hand.

Installation process of door lock mechanism with handle
As a rule, they are a decorative decoration of the door. The knob knobs from German manufacturers are especially distinguished. The next most difficult installation is considered to be the design of the rotary handle with a keyless door locking. Using a simple pencil and tape measure, you need to mark the location of the hole for the handle and lock.

The process of marking the door for the installation of the handle


Select a metal drill according to the diameter of the swivel rod for metal doors and wood drill for wood. With a drill and drills - a pen, drill a hole for the latch to the depth necessary for the latch strip to fully enter.
The next task is to accurately drill the hole for the handle. After removing the latch, drill a signal hole with a small drill. Insert the latch and visually determine the accuracy of the hole in the door leaf and the hole in the latch.

Door handle hole drilling process


After making sure of the accuracy, make the hole to the required size. After collecting and fixing the handle in the door leaf, we make markings for the loot with a recess. Using the selection method, pre-assembling and disassembling, we bring the size of the loot to the required size. Such a handle should be the same size as the thickness of the door leaf.

Marking the door for the groove

When marking the installation site of the tongue, a groove is hollowed out with a chisel for a strip with screws for fastening and for a latching strip in the door frame. On both sides, the rotary handle is fixed with screws and cotter pinned to prevent it from being pulled out.
Installation of mortise locks with handles
Mortise locks with a twist handle and a lock at the end of the door leaf, a special design of the lock cylinder are produced by manufacturers of more than a million types of locks. The number of such models is sufficient for metal and wooden doors... Do-it-yourself installation of mortise mechanisms begins with careful marking on one side of the door of the assembly mechanism diagram.

Door marking scheme for installing a door lock
Use a chisel to gouge a groove in the body of the door leaf according to the dimensions of the locking system mechanism. The mechanism is installed at the level of the web end and is closed by a cover strip.
When working, you have to use chisels different sizes, periodically sharpening on a grinder or block at a certain angle.
After making sure that the lock structure is completely recessed into the door leaf, we use a drill to perform a signal hole with a thin drill for the rotary handle, after removing the lock from the door. 
We check the accuracy of the hole and drill the door using a crown of the required size from both sides of the door to the middle of the door leaf. After the installation of the lock and handle is completed, it is necessary to tighten all the screws. Having checked the operation of the lock without closing the door, you can start marking the groove for the loot.
In the door frame opposite the lock, make a mark on the box for the latch. Opening the door leaf, make a markup, arrange and fix a groove with a groove. 

If the marking of the cut is made with an error and the tongue of the lock does not fit or there is a large backlash, it is necessary to dismantle the cut and mix the groove with a chisel tool. The cover plate and the lock strip should fit snugly, but without friction.

Replacing the handle
If necessary, unscrew the fastening screws and use a chisel to deepen the seat. Or make a cardboard lining in size and thickness.
Watch in the video the process of installing a lock on an interior door.