
Complex cookers for the kitchen, simultaneously combining a hob and an oven, are becoming more and more a thing of the past. Modern housewives are less and less likely to use ovens for their intended purpose. They are increasingly turning into a warehouse of pots and pans.
Why overpay money for an unnecessary metal cabinet when you can buy a comfortable and aesthetic hob, and the free space formed under it is perfect for storing dishes and other things. Even an inexperienced master can install a hob in a countertop, because its installation does not require experience and qualifications at all.
Varieties of hobs
So, before proceeding with such a procedure as installing a hob into a worktop with your own hands (you can see the photo in this article), you should deal with the varieties of these devices. There are the following main types of hobs:
- Electrical.
- Induction.
- Gas.
It is advisable to entrust the installation and installation of the latter option to a professional, since an incorrect connection can lead to serious problems. When using gas stoves indoors, special requirements must be observed. In the process of installing electrical panels, it is also important to observe caution and safety rules when working with high voltage. It is necessary to provide high-quality electrical power with grounding. 
When buying a hob, it is important to pay special attention to it, since the installation of the hob in the worktop should be carried out with a small margin around the edges. In addition, you need to decide on the location of the tie-in. Spend in advance
Countertop installation
If you have purchased a glass or stone countertop, it is advisable to entrust its installation to professionals. Since you do not know about all the intricacies of the process, you can damage an expensive item. If you can handle the installation yourself, but with some building skills. 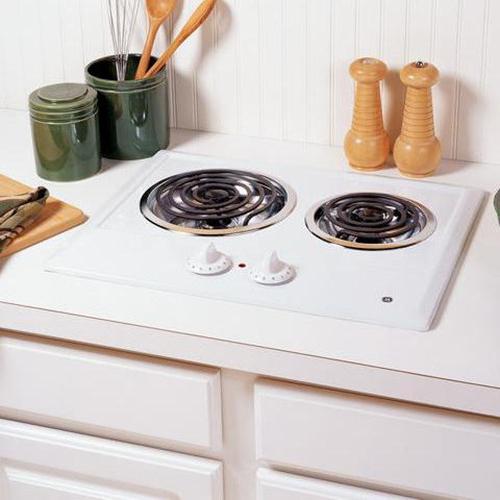
You will need the following:
- Grout for tiles.
- Tiles for facing the surface of the countertop.
- Mounting or tile adhesive.
- Tiles with tungsten coating.
- Gun with silicone sealant.
- Electric jigsaw.
- Waterproof wood board.
- A set of tools - a square, a screwdriver, screws.
Replacing the countertop should begin with the dismantling of the old one. Despite the fact that you will not need the old countertop in the future, you must remove it very carefully to avoid damage to the kitchen set.
It is very important to fit the new countertop to the dimensions of your furniture. It is likely that you will need to cut off the excess. In this case, the unprotected edges of the chipboard are exposed. This material perfectly absorbs moisture, so the cuts must be well treated with a sealant. If the countertop is mounted with saw cuts to the stove, it is advisable to close them with special end strips.
Required Tools
Before proceeding to such a process as installing a hob in a countertop (photos show what they are), you need to prepare the following tools:
- Pencil.
- Roulette.
- Jigsaw.
- Drill driver with a drill for wood with a diameter of 8-10 mm.
- Sealant.
Preparatory process
To begin with, you should make sure that there are accessible outlets in the place where the hob will be installed in the countertop. The presence of an outlet, a suitable length of the gas supply hose, without squeezing and kinks for a gas stove - these are two fundamental aspects.
If the wiring is old and there is no certainty that it is reliable, it is recommended to run an independent cable for the stove directly from the meter.
Installing the hob in the countertop
- First you need to make a hole in the countertop. To do this, according to the instructions, an opening is marked. If there is no instruction, then
the full dimension is outlined, while on each side you need to retreat about 5 mm. - Using a drill, a hole is drilled so as not to go beyond the contour boundary. Then we continue to work with a jigsaw. To reduce chipping, it is recommended to take a file with fine teeth. In addition, you can paste over the contour with stationery or masking tape.
- After the drank is completed, you need to paint over or sealant the sawn edges to prevent the countertop from swelling.
- Next, the hob is installed in a 28 mm worktop, fixed and connected to the network.
Panel insertion must be carried out with maximum precision. Otherwise, even an error of 1 cm can ruin the countertop, which is one of the most expensive elements of a kitchen set.
Countertop made of artificial stone
Compared to their chipboard counterparts, an artificial stone countertop is the most durable. Despite this, the main problem is the installation of the hob in an artificial stone countertop.
In most cases, an artificial stone countertop is ordered with pre-drilled holes for a specific hob. But what if the countertop is already installed, but the hob is not yet? In this case, the most reliable and best option would be to give the countertop to qualified specialists who, using a professional tool, will make the necessary hole.
If you still decide to take a chance, then this work can be done using the technology described above, but instead of a jigsaw, you will need to take an angle grinder and a diamond-coated disc designed for cutting concrete. 
It is important to remember that self-installation of the hob in the countertop must be well thought out at all stages of installation. Only in this case, less time will be spent on this type of work, and their quality and subsequent result will significantly improve.