
PVC panels for walls - the easiest, fastest and economical way finishes. Polyvinyl chloride has a number of properties that contribute to its long-term use as a finishing material for any premises (bathrooms, balconies, living rooms, offices and shops). Decorating walls with PVC panels is not such a difficult job, anyone who knows how to use a hammer, level and screwdriver can handle it.
How to fix PVC panels to the wall, how to install the lathing and what qualities PVC tiles for walls have - in this article.
What are wall panels
PVC panels are often used in modern renovations, they are mounted both on walls and ceilings. Wall decoration with "clapboard" is performed very quickly, and the cost of such repairs will be significantly lower than tiles or drywall, for example.

The panels consist of an upper decorative layer, dense plastic on the seamy side and thin plastic partitions that act as stiffeners.
Of the advantages of PVC panels as wall finishes, it can be noted:
- the material is suitable for finishing any premises (with high humidity, with temperature fluctuations, with high traffic);
- lamellas can be easily washed with a damp cloth, do not absorb odors, and no stains remain on them;
- the low weight of the material facilitates its transportation and installation;
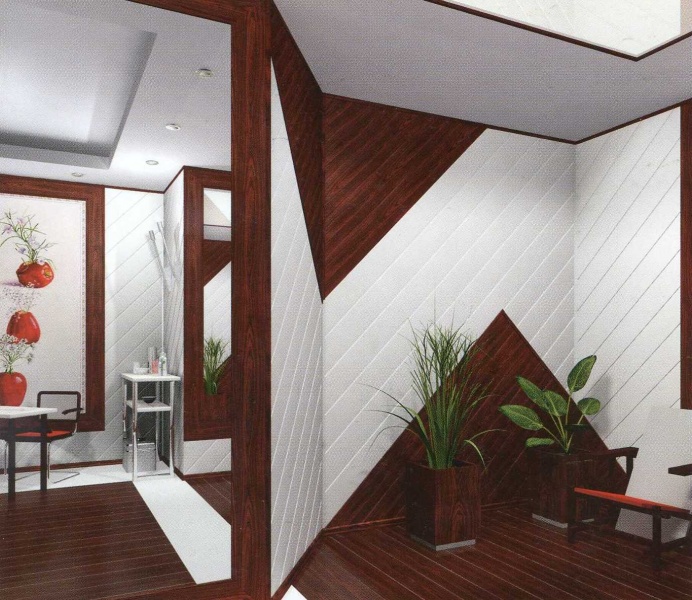
- a huge assortment of textures and colors (you can find cladding imitating wood, stone, tiles, plain, multi-colored, glossy or matte lamellas);
- compliance with sanitary standards - the material is not susceptible to infection by mold and fungus, living microorganisms do not develop in it, bacteria do not accumulate;
- the ability to hide communications and electrical wiring for finishing;
- fire safety - the material does not burn, but melts;
- simple installation of PVC panels, which is easy to do yourself;
- long service life - the finish does not fade over time, does not turn yellow and does not deform;
- thanks to the internal chambers, the panels soundproof and warm the room.

Advice! If the room needs additional insulation, air gaps inside the lamellas can be filled with any heat-insulating material.
When purchasing material for wall decoration, you need to pay attention to its quality:
- panels should not be too light;
- the shade and pattern on the decorative surface must be uniform and clear;
- each lamella must contain a sufficient number of internal partitions, because they provide the rigidity of the material;
- it is better to choose material from the same batch so that there are no color mismatches;
- together with the panels, you need to buy moldings - decorative elements that cover joints, corners, slopes and cut lines of polyvinyl chloride.

The main and, probably, the only drawback of PVC panels is considered to be their fragility - the material can be easily damaged by mechanical stress. Therefore, the cladding must be transported with care and the fixing of the PVC panels must be done carefully.
How to install PVC panels
Wall cladding with plastic panels can be done in two main ways:
- Directly to the wall with glue.
- On a wooden or metal crate.
PVC panels can only be glued onto a very flat and smooth surface. If the wall in the room is exactly like this, then the wall cladding will take very little time and effort. There is not much to say about how to glue the panels - they are simply applied to the wall, leading the upper edge into the ceiling molding, and the joint line and the back wall are coated with a special glue for plastic.

How to properly attach plastic to the crate
The type of lathing largely depends on the purpose of the room and the climate inside it. For wet and cold rooms (bath, kitchen, balcony, pantry), a crate made of metal profile... The same profile that is used for the installation of drywall sheets will do.
For the rest of the premises, you can use wooden blocks. In this case, you will need a special tool to cut the wood to the desired size.

Attention! For damp rooms, you can also use a wooden frame, but before installing it must be treated with an antiseptic and dried thoroughly.
In the installation of the battens, it is especially important to observe the level. Regardless of how the panels will be positioned (vertically or horizontally), the frame must be absolutely flat. Then there will be no distortions, crooked joints and protrusions of plastic.
Installation of the lathing on the wall
Before attaching a profile or wooden blocks to the walls, the surface must be prepared. To begin with, the wall is cleaned of the old finish: the wallpaper is removed, the paint is removed, and so on.
They tap the plaster and determine the weak points, they must be removed and replaced with a new layer of plaster mixture. Cracks, chips and other large damage to walls are also repaired. The surface should not be perfectly smooth, however, the smoother the wall is, the easier it will be for the master to fill the crate with high quality.
The metal profile or bars are cut to size, having previously determined the location of the PVC panels.

Attention! If the decision is made to mount the panels horizontally, then the guides of the battens should be located in the opposite direction, that is, vertically. The opposite rule also applies: when the "lining" is located vertically, the profile is mounted in a horizontal plane.
It is necessary to start the installation of the vertical lathing from the corner of the room. To do this, use a plumb line in one of the corners to draw a straight line. The profile will be mounted relative to this straight line.
With horizontal lathing, the zero strips should be fastened at a level of 1-2 cm from the floor and ceiling. If the ceiling is also supposed to be sheathed with "clapboard", you need to leave a margin of a few extra millimeters.

Most often, PVC panels are mounted vertically, thus reducing material consumption and simplifying installation. In addition, the range of such panels is much wider.
A special molding is attached under the ceiling, into the grooves of which the upper edges of all panels will be wound. Then you need to drill holes in the wall with a puncher relative to the drawn line. The step between the holes should be no more than 15 cm.
The first profile or bar is attached to the wall with self-tapping screws or dowels. Its evenness must be checked by the building level. Departing from the first profile 50 cm, you can install the second. Installation continues until they reach the opposite edge of the wall - the floor or ceiling line.
How to install panels on a crate
The "lining" begins to be mounted from the corner opposite to the doorway. It is this corner of the room that will always be in sight, it needs to be revetted with special precision.
A corner molding is installed directly into the corner (there are moldings for both internal and external corners on sale, as well as universal parts). The part is attached to the profile with self-tapping screws.

Now you need to dock the first panel. First, measure the desired height of the lamella (distance from floor to ceiling) and lead its upper edge into the ceiling molding. There are latches on both sides of the panel: on the left - narrow, on the right - wide. The narrow latch is inserted into the groove of the corner molding until it stops, and the wide locks are designed for installing fasteners. A self-tapping screw is screwed into them, a nail is hammered in or special clips-clamps are used.

The installed panel is checked using a level. If all is well, you can mount the second part. Thus, continue installing the PVC panels until they reach the opposite corner of the wall.
Here, the panel will almost always have to be trimmed vertically. To do this, use a hacksaw. The edge is wound into an end, corner or universal molding to hide the cut line. The last panel is not fastened with self-tapping screws or clamps - it is enough that it is held by the molding.

To further strengthen the joints, the edges of each panel can be lightly greased with silicone sealant.
In order to beautifully handle door and window slopes, the panels are carefully trimmed and their edges are covered with decorative overlays. Places for sockets and switches are pre-cut in the panels with sharp scissors or a hacksaw, after installation, they are closed with decorative overlays.
After all the walls have been tiled, you need to check the correct installation level again with the level. The lower edges of the plastic panels are covered with a skirting board.

Installing PVC panels is quite simple. Absolutely no difficulties will arise when the walls in the room are even and smooth - the panels are simply mounted with glue. However, you need to understand that it will be quite difficult to replace the damaged panel and, moreover, completely dismantle the cladding during the next repair - the panels will have to be torn off along with pieces of plaster.

Installation of plastic panels on the frame is more difficult, it will take more time and will require increased costs. But, if necessary, the damaged panel can be removed very quickly and "painlessly" for the rest of the coating. In any case, wall decoration with PVC panels is the easiest and cheapest way to renovate a room.

If you started to make repairs in the bathroom or on the loggia, but do not know how to install plastic panels on the wall, you need to thoroughly understand this issue. Learn the subtleties and nuances of this process so that home renovation is only a joy and does not bring unnecessary trouble. The cost of such an interior is many times lower, and the design options are countless.
What are the plastic panels attached to?
Plastic sheathing is a great way to solve several problems at once: the parts are easy to mount on the wall, and they do not require much maintenance. However, in order to accomplish the task, it is important to know how to fix the plastic panels to the wall correctly. Here are the important points regarding the installation of such cladding:
- Fastening of PVC panels to the wall can be carried out using nails, self-tapping screws or using a special glue "Liquid nails".
- If the walls are even, then you can mount the fasteners directly to them: in the case of a wooden or soft surface, self-tapping screws are suitable, and for concrete you need to take a dowel-nails.
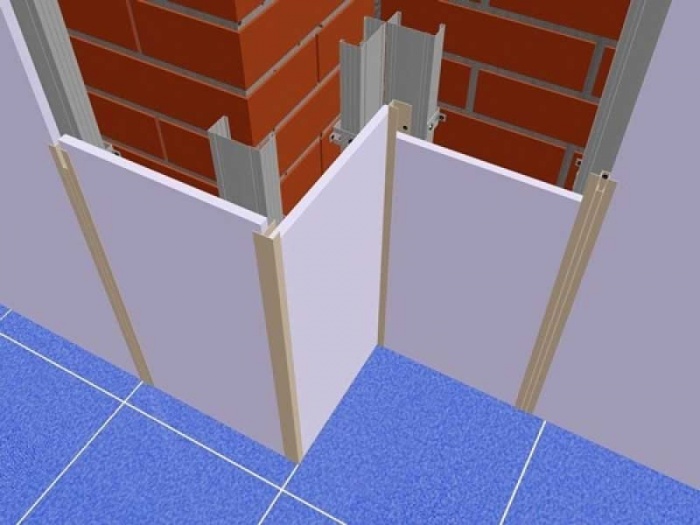
- If the walls are difficult to level, a special wooden or metal frame grate is first installed.
Each mounting method has its own nuances:
- If nails are used, then it will not be possible to remove the plates in order to use them elsewhere: during dismantling, the parts will simply break into several parts.
- Clamps or staples with a special stapler work best.
How to properly fix PVC panels on the wall
To understand how to attach plastic panels to a wall, remember a few helpful tips:
- Cut the elements themselves, placing them face up.
- To protect your eyes, be sure to wear construction goggles when cutting parts.
- When driving in nails, it is important to hit clearly on the nail head, otherwise dents will remain. It will be impossible to fix such a defect.
- Until the end of the installation process, do not remove the protective film so as not to leave dirty marks on the casing.
- After installation, wash the walls only with soapy water so as not to spoil the structure or design.
On a wooden crate
The question of how to fix plastic panels on the wall will help solve the lathing made of wood. The slats must be screwed with a distance of about fifty centimeters. Wooden beams should be perpendicular to the direction of PVC: if the details of the future interior are arranged vertically, then wooden structure it is best to nail it horizontally.
- Install the hardware first. Fix the outer and inner corners to the surface first, then the finishing element - the ceiling plinth, and at the end - the molding with lamellas.
- Next, install the first piece that connects the fasteners. Secure with nails or staples from the side of the wide mounting shelf.
- To prevent the whole structure from turning out to be a curve, check the first one before attaching the next part. It should be level.
- Mount the narrow shelf of the second element to the first, leaving no gaps.
- So attach all PVC panels in sequence. Only the very last element is different: it must be inserted with effort in order to fix the entire structure. If the size does not fit the remaining space, cut the part with a knife along the trim.

With a metal frame
If there is always high humidity in the room, for example, in a sauna or bathroom, then the tree will quickly swell, and you will have to make repairs again. How do you attach plastic panels to the wall in this case? Metal mounting structures will do. To simplify the process of installing the cladding, special clips are used. Thanks to them, you can easily remove interior elements and attach others.
When installing the sheathing, remember that the material may expand as the temperature changes. When using a wide beam, sound insulation or insulation can be attached to the free space. So simple plastic panels will help to solve several problems at once: create a tasteful interior and keep warm inside the room.
Installation of PVC panels without lathing on liquid nails
For even walls, use construction glue, but during such repairs, wear a respirator and ventilate the area. The benefits will cover all temporary inconveniences. "Liquid nails" do not affect the plastic, they dry quickly, which gives the right to adjust the details on the wall. Such glue is environmentally friendly and does not depend on changes in climatic conditions (changes in temperature and humidity).
- Before gluing the panels, it is necessary to prepare the walls: remove old wallpaper, tiles and plaster, level out all inaccuracies and prime the surface.
- At the very beginning, remove the boards from the packaging for thirty minutes to allow adaptation to the humidity in the air.
- Prepare the glue itself: cut off the tip, put on the cap, open it and install the product in the construction gun.
- Draw dots, a lattice, or a zigzag pattern on the wall.
- At the time of gluing, press the part against the wall so that the glue better adheres to the entire element evenly. You can use a rubber roller. The first couple of minutes it is easy to adjust the position of the structure, and after 20 minutes the glue will set.
- The final step is to “sew up” the seams between PVC parts and other elements of the bathroom with sealant. The wall profile is ready.

The modern building materials market offers great amount a variety of building materials, including finishing materials. However, with all their diversity, when, when renovating an apartment, the owners begin to discuss what kind of material they want to revet the walls in the bathroom, toilet or even the kitchen, the choice often falls on plastic panels. Decorating walls with plastic panels is an easy and affordable way to update your interior.
Decorative plastic panels
Plastic panels are a material made from PolyVinyl Chloride, which is used for surface cladding works. Wall decoration with PVC panels is often chosen because they have a low weight, low cost, and the material from which they are made does not contain harmful substances asbestos and cadmium that are dangerous to humans.
Polyvinyl chloride is a versatile polymer that is used for the production of bottles, syringes, linoleum, hoses, water pipes. Products made from this material have a smooth, easy to clean surface, which allows them to be used, for example, in hospitals or kitchens. PVC panels are lightweight and have a cell-like structure.
In order for a PVC plastic panel to catch fire, it needs to be heated to almost 400 degrees, and during the combustion process it does not emit toxic substances.
PVC panels are waterproof cladding material and can be used in domestic areas such as kitchens, bathrooms, toilets.
Decorative PVC panels are soundproof and heat-resistant. To protect them from exposure to sunlight and moisture, the panels are impregnated with a varnish coating that makes them smooth and repels dust. On the front side, PVC plastic panels are covered with different patterns that imitate natural materials (wood, stone, etc.).
Plastic wood-like panels are often installed in the kitchen, and stone-look panels are often installed in the hallway. Such panels can be easily cut both lengthwise and across, so no problems arise during their installation. It is also easy to connect them, and you can make them in such a way that they will be a continuous canvas, or you can leave gaps by inserting some interesting decor between them.

Types of PVC panels
PVC can be used for finishing:
- walls;
- ceilings;
- exterior decoration of the house.
Decorative panels that are produced for wall cladding (wall plastic panels) have a thickness of up to 10 mm, in contrast to ceiling panels, the thickness of which is not more than 5 mm.
In addition, PVC panels designed for the ceiling have thinner walls and partitions.
Clapboard is often used for exterior decoration of the house. Moreover, it can be used for interior decoration... It is also easy to install and easy to clean. Lining, as a facing material for external walls, fully justifies itself - it is frost-resistant, does not lose its beautiful appearance at low or high temperatures.
It is better not to use ordinary plastic panels when decorating external walls, since they do not tolerate ultraviolet rays of the sun very well.

In appearance, PVC wall panels are divided into:
- matte;
- mirrored;
- glossy.
All these panels differ both in color and texture, have a different pattern, and a different coating.
By shape, decorative plastic PVC panels are divided into:
- rack;
- tiled;
- leafy.
Rack plastic panels are similar to lining. They can be fixed to the wall both horizontally and vertically. These panels are up to 3 meters long, 13 - 30 cm wide, and their thickness varies from 8 to 12 mm. They are connected to each other with a special locking “thorn-groove”.

Tiled plastic panels for walls are rectangular or square tiles, ranging in size from 30 to 98 cm. They are fixed to the walls like a rack, but visually they look completely different.

Sheet panels for walls are a chipboard sheet with a pattern applied to the front side. Such panels are glued to the wall, or nailed.
Size by long side such panels vary from 1.22 m to 2.44 m, and the thickness - from 3 to 6 mm. Such panels do not belong to plastic, but their decorative layer also has a polymer coating.
According to the way in which the pattern is applied, PVC plastic panels are divided into:
- laminated;
- with a picture applied with a film;
- with a pattern applied by direct printing.
Lamination is the application of a film with a pattern to the surface of a plastic panel. It is the laminated panels that imitate natural stone or wood.
The method, in which the pattern is applied using thermal film, consists in the fact that the white panel is covered with any color, after which the thermal film is glued on top.
The direct printing method (also called offset printing) is that the image is first transferred to the front side of the PVC panel, after which it is varnished on top.

Plastic panels are also divided into types according to the presence of a panel seam:
- seamless;
- embossed;
- with a chamfer.
When installed, seamless panels do not show the joints, and they give the impression of an ordinary smooth wall. In relief panels, the seam is clearly visible and is part of the decor. Beveled wall panels are the same seamless panels that have a small indentation for decoration, which makes them embossed.
In addition, mirrored plastic panels and plastic panels made to look like brick belong to separate varieties.
Mirror plastic panels have appeared relatively recently, but have already gained immense popularity. These panels cover a special reflective film, so they like to be used not only in apartments, but also in restaurants, hotels, bars, and other public spaces.
The advantages of mirrored plastic panels are undeniable:
- they visually increase the space due to reflected light;
- they can be installed on surfaces of various shapes, including round ones;
- they look great with any design ideas;
- such panels are attached to various bases;
- they can be washed in the same way as ordinary glasses are washed.
The disadvantage of mirror panels is the fact that they do not like moisture. Therefore, it is not recommended to install them in rooms such as baths and kitchens. Also, mirrored plastic panels do not like high temperatures.

Wall decoration with plastic stone panels looks very elegant. A brick or stone wall always looks very beautiful, but due to the high cost of the material and the complexity of the masonry, not everyone can afford such a facing. But plastic panels for a stone or PVC panels that imitate brickwork are not only easy to install, but also easy to care for.
The advantages of such panels include:
- a variety of types of imitations for any stone and any masonry;
- low weight and easy installation;
- easy care;
- service life;
- price.
Such panels look great both in the kitchen and in the hallway, as well as in public places.
How to choose plastic panels for wall decoration
Even if you know exactly what color plastic panels you want to see, for example, in your kitchen, and have chosen a drawing, nevertheless, pay attention to some more points so that you do not regret your choice in the future.
You need to track the following when buying:
- inspect the cut carefully and note the thickness of the lintel. The strength of the cladding depends on this - the thicker the lintels and the polymer itself, the stronger the finish will be;
- plastic should be the same thickness everywhere;
- cells and edges should be even and look neat;
- the pattern on the surface must be clear and uniform;
- keep in mind that panels from different boxes may have different shades;
- pay close attention to the quality of the polymer. Take one panel and fold it over.
After the plate has unbent, no joints or damage should remain on it.

Installation of plastic panels on the wall
It is quite easy to install decorative plastic panels on the wall with your own hands, and one of the most pleasant moments is that such an installation does not require wall preparation.
You will also need the most common tools.
Preparatory work
Before you go to the hardware store for plastic panels, you should calculate exactly how much finishing material you will need.
For the calculation, you need to decide how exactly you will install the plastic panels - vertically or horizontally. If you are going to mount the panels vertically, then you just need to measure the perimeter of the room, summing the lengths of all four walls, and subtract the width from it doorways... The size of the perimeter must be divided by the width of one panel, and add three or four more pieces to the resulting amount for trimming and "just in case."
If your room has two walls of 3 m, and two of 5 m, then the perimeter will be (3 + 3 + 5 + 5 = 16 m). If the width of the plastic panel is 0.5 m, then you need 16 / 0.5 = 32 panels. So take 35.

If you plan to install the panels horizontally, then you need to determine not the perimeter, but the area (by multiplying the length of each wall by its width, and then adding the obtained values), and then also subtract the door (and window) openings. After that, you need to determine the area of one panel, and divide the first value (area of the room) by the second (area of the panel).
With the same room dimensions and a standard ceiling height of 2.5 m, the areas of the two walls will be equal to 7.5 m (3 x 2.5) and 12.5 (5 x 2.5) m, respectively, that is, the total area of the room will be is equal to (12.5 + 12.5 + 7.5 + 7.5 = 40 sq. m). The area of one panel 2.5 m high and 0.5 m wide will be (2.5 x 0.5 = 1.25 m). Accordingly, you need 40 / 1.25 = 32 panels.
By the way, there will be much more trimmings with this installation method. So the stock also needs to be increased. Take 37 pieces.
You also need to calculate the number of battens that will be needed for the lathing. To do this, divide the height of the walls (2.5) by the distance that you will need to leave between the elements of the lathing (usually 0.5 m is left). That is, in our case, it will turn out to be 2.5 / 0.5 = 5.
Now you need to find out the length of all rails in linear meters. To do this, we multiply the resulting value by the perimeter of the room (in our case, it is 16 m). Accordingly, the length of the slats in linear meters is 5 x 16 = 80 m.

Wall markings
Decorating the walls with do-it-yourself panels involves marking, since the crate must be fixed strictly according to the level, otherwise you cannot avoid distortions. It is so that you do not have to measure out every purchased rail and you need to make a markup.
The bottom row of plastic panels is positioned exactly 2 cm above the floor surface.
Accordingly, having measured this distance, you need to put a point, and then draw a horizontal line using a level along the entire perimeter of the room. Exactly the same straight line must be drawn along the edge of the future finish. From the line drawn below, you need to measure up 50 cm, and mark this place. So you need to put marks to the very top. Through these marks, you will need to draw horizontal parallel lines along the entire perimeter of the walls. The markup is ready.

Installation of the lathing
Before installing the battens, prepare the walls. Careful leveling of the wall surface is not required, but you need to remove old finishing materials and anything that can fall off and come off. If there are large indentations in the surface of the wall, it is advisable to seal them up. If something sticks out, these parts of the wall need to be knocked off or cut off.
After that, you should treat the wall with an anti-fungal coating. And then you can already proceed directly to the installation of the lathing.
The elements of the lathing should be located strictly perpendicular to the plastic panels. If you are going to mount panels horizontally, then the battens of the crate must be fastened vertically, and, accordingly, vice versa. The slats are installed at a distance of no more than 50 cm from each other, and better still less. The smaller the distance, the less the wall made of plastic panels will "walk". The lathing is fixed on ordinary dowels.
If you want your cladding to look even and beautiful, the crate for plastic panels should be placed in the same plane. If you get unevenness somewhere, you need to put pieces of plywood. Then the cladding will look dignified.

Installing profiles
The installation of plastic panels itself begins with the fact that the selected profiles must be installed in one of the corners. They are attached to the elements of the lathing.
As a result of such fastenings, a kind of frame is obtained. Plastic panels are inserted into this frame.
DIY wall decoration with plastic panels
Now you need to install the plastic panel, cutting it to the height of the wall, if you install the panels vertically, and, accordingly, along the length of the wall if you chose the horizontal installation method. You can cut the panel with a regular saw with a metal blade.
With the cut-off side, the plastic panel is inserted into the frame at the corner, pushed all the way (for this you just need to knock on it with your hand), and check with a level how strictly vertical this panel stands. Then this panel is attached to each element of the installed battens.
Note that you need to start from the farthest corner of the room, since it is visible from the entrance in the first place, and it is impossible for any extra joints or edges to be visible there.
Having fixed the first panel, the second is installed next to it, then the third, and so on. There should not be any difficulties, it will be a little more difficult only with the very last panel, because it will have to be cut in width and immediately fixed in the profile. It is not always possible to do it smoothly, and the plastic may wrinkle slightly. But with the appropriate skill and accuracy, this little difficulty can be dealt with.

Installation of moldings
After you have installed all the plastic panels, and your wall has acquired a beautiful and neat look, you need to close the corners and joints. This can be done with the help of special plastic moldings that will complement your work.
After finishing the work, the same plastic molding must be installed around the perimeter of the ceiling, and a plastic skirting board must be installed on the floor.
When installing plastic panels, holes should be made in the lining for sockets and switches. This can be easily done with a regular sharp knife. Your plastic panel wall is now complete.
By the way, if you wish, you can install plastic panels and diagonally. It turns out quite interesting, but the work will become more complicated, and there will be much more waste.
Nevertheless, this installation method is quite popular.
What are the ways of attaching plastic panels to the wall? How to choose material? What tools do you need? All this and step-by-step instruction installation of plastic panels.
Advantages of plastic panels
Polyvinyl chloride is a practical and durable material. It is widely used to decorate the surfaces of walls and ceilings. With the help of a wide variety of its shades, shapes and textures, the interior can be made stylish and beautiful. Advantages:
- material immunity to moisture;
- simple fastening system wall panels that beginners can do;
- long service life;
- fire safety;
- hygiene;
- convenience in the process of washing and cleaning;
- low cost;
- resistance to mold and mildew.
The disadvantage of PVC panels is low impact strength. It is necessary to carefully check the delivered building material and carefully assemble.
Tools for fixing PVC panels to the wall
Before installation, it is necessary to prepare a tool and auxiliary materials that will help in the work:
- for marking - a tape measure with a pencil or a washable marker;
- for cutting the blade - a hacksaw with fine teeth;
- building level, plumb line;
- triangle;
- for working corners - plastic profile or reiki;
- for fixing on the surface - self-tapping screws, dowel-nails, clamps;
- puncher, screwdriver;
- antiseptic solution, sealant, glue.
Accessories that will be needed in the process:
- external and internal corners;
- docking, starting and F-shaped profiles;
- ceiling and floor skirting boards.
To save time, choose a store where the entire set can be purchased in the same place as the main material.
The choice of plastic panels?
The characteristics of polyvinyl chloride depend on the manufacturer. There are panels from Europe and China on the market. In terms of quality, the overwhelming majority of participants in the first group win. The strength of the panel depends on the thickness of the walls and the number of rigid ribs inside. Optimum indicators: thickness of the front side of the panel - 2-1.5 mm, number of stiffeners - 20-29, total lamella weight 2-1.7 kg / m2.

You shouldn't make a purchase if:
- deformed or damaged stiffeners;
- the lines of the drawing are indistinct, the edges are blurred;
- shades of panels from one stack differ from each other;
- the surface is scratched;
- the sizes of the segments are different (in this case, fastening the plastic panels to the wall will be complicated due to loose fixation).
In order to check how reliable the material is, you need to press on its surface with your finger. The front side should bend and return to its original state. If the panel deforms, it indicates that it has a high chalk content and will have a short service life.
Calculation of the required number of plastic panels
Calculations are necessary in order to avoid overpayments due to the additional purchase of material. It will also waste time if there are not enough building materials. Fastening PVC panels to the wall assumes their vertical or horizontal arrangement. The choice depends on your taste preferences. The calculation for the vertical is carried out as follows:
- 1. We measure the room (length along the perimeter);
- 2. Subtract the width of the door and window openings;
- 3. Divide the remainder by the width of one panel.

The result is the number of panels required to decorate the room. It is imperative to add a few additional units to it in case the material is accidentally damaged.
Horizontal calculation:
- 1. We measure the area of the room;
- 2. Subtract the area of door and window openings;
- 3. The resulting number is divided by the area of one panel from the kit offered in the store.
We add 10% to the resulting value - in reserve. When installed horizontally, the material will need to be cut out, resulting in a small residue in the form of scraps.
PVC lathing: material calculation
When decorating the walls with plastic, you will need to hide the wires for electricity. To do this, mount the panels on the crate. In order to buy the optimal amount of materials, calculations will also be required here. The lathing is made of metal profile elements and timber battens.

Calculation procedure:
- 1. We measure the height of the walls in the room;
- 2. The resulting indicator is divided by the step of placing the slats in the future crate (recommended 50 cm);
- 3. The result is multiplied by the perimeter of the room - you get the length of the profile in linear meters;
- 4. We measure the height of the corners in the room;
- 5. Multiply by their number - we get the total footage of the profile for processing corners;
- 6. Add the perimeter of door and window openings.
As a result, you will get two values - the length of the battens for the lathing and the corner profile. Don't forget to add a headroom in case the material gets damaged during installation.
How to install wall panels in a bathroom
For rooms with high humidity, in particular, a bathroom and a bathroom, PVC panels are best suited because they are not afraid of moisture, mildew and mildew. With the help of modern decor options, the design of these rooms can be made stylish and concise without high costs. You don't have to buy expensive collectible tiles for this - use PVC.
The process can be presented in three ways:
- using adhesives;
- using self-tapping screws;
- using clamps.
The adhesive is suitable for perfectly flat and smooth surfaces. Choose any of those sold on the market: liquid nails, universal "Moment" or a specialized composition for PVC panels. The glue will simplify and reduce the cost of bathroom renovation, because there is no need for the construction of the lathing. The disadvantage of this option is the difficulty of replacing the damaged panel with a new one, since it will be firmly glued to the wall. It will be necessary to dismantle it together with the outer layer of wall decoration, which will then need to be restored.
It's easier with self-tapping screws. The option is convenient for masking pipes and wires. To speed up the process, it is recommended to use a screwdriver. There is no need to level the surface. The disadvantage is the need to erect a lathing base from wooden battens. This is an additional investment of time and money. Before attaching the wall panels to the clamps, a metal crate must be installed on the wall.
Decorating the bathroom with glue
Before installing the plastic panels, you need to prepare the base. To do this, you need to thoroughly clean the walls, putty, let them dry and level. Before that, the old coating is completely removed from the wall - wallpaper, tiles or peeling paint.
The putty will well hide all cracks, cracks and irregularities on the walls. The size of the drops is allowed up to five millimeters. If plastic is glued to deep pits or bumps, then over time it will deform or come off. Why remove the old coating from the wall? It contains dust, dirt and grease. All this will interfere with the normal adhesion of the adhesive coating. If whitewashing is applied to the wall, it is thoroughly washed off, the fat is cleaned off with detergents... Then a primer is applied and the wall is leveled.

Steps instruction:
- 1. Preparation of the wall: remove the old coating, clean, putty, sand;
- 2. Clean the back of the panel with a damp cloth, dry;
- 3. Apply glue to the back of the building material using the method of dots with a step of 20 mm;
- 4. Attach carefully.
When using liquid nails as an adhesive, the panel is then tapped and peeled off the surface for 5-7 minutes. The composition requires chapping. After a short break, PVC returns to the wall.
The frameless method does not involve forming corners. As a final finish, cladding with ordinary plastic corners is suitable. They have no grooves, so use transparent silicone to mount them.
When finishing around the outlets, cut holes for them first. Take the measurements you want and mark where you want to make the cutout. During work, you need to turn off the electricity.
Skirting boards are installed last. For this, self-tapping screws are used - with the help of them the material is attached to the wall, before that holes are drilled. The joint zones between the lamella segments are filled with silicone sealant or ordinary polyurethane foam... This must be done so that moisture does not get under plastic surface renovated wall.
Choice of glue?
The modern market offers universal adhesives:
- Moment Crystal;
- Clayberite 636;
- Emficol 34012A.

They are suitable for PVC fasteners without professional help. Specialists use plastic adhesive. The basic rule of thumb is to buy in a specialty store. By doing this, you will protect yourself from acquiring a fake or expired product. If you decide to buy PVC adhesive on the market, pay attention to the date of manufacture and the appearance of the package. Good quality adhesive composition will provide:
- quick adhesion to surfaces;
- long-term and reliable fixation;
- resistance to temperature extremes, moisture, frost.
Kitchen "apron": fastening technology in the spacer
Most often, the so-called. "apron" in the kitchen is made out using expanded clay or tile... But you need to know how to lay tiles. For those who do not want to spend money on calling the master and are confident in their abilities, they can equip the kitchen with PVC panels. Modern options plastics successfully imitate expensive collections of ceramic tiles.

The "spacer" technology does not require the use of lathing, adhesive and special fasteners. It is suitable for small kitchens where the work area is covered with a single panel sheet. Step-by-step instruction:
- 1. Place the panel on the table top with its lower edge, cut the material taking into account the required dimensions of the intended "apron";
- 2. Place the upper part behind the hanging cabinet so that it reliably presses the sheet against the wall; fixation can be improved with fasteners in the form of staples;
- 3. Fix the lower part of the panel with a plinth - it must be securely fixed to the table top, it is better to choose a massive and durable option for the floor.
The advantage of this method is that the "apron" can be easily changed to another at any time.
We attach PVC to the lathing frame
Before cladding, the wall must be cleaned, but without serious leveling of the surface. Redecorating a bathroom, bathroom or kitchen requires additional treatment of the walls with an antiseptic composition and waterproofing.

For the manufacture of the lathing, wooden blocks of 2x2 cm are taken. For rooms with a high moisture content - bathrooms and showers - metal elements are recommended. Before using wood, the material is thoroughly dried to avoid possible deformation. The bars are treated with an antiseptic. If you decide to use metal, then select the profile element marked UD (main part of the contour) and CD (contour guides).
The erection of the lathing structure must begin with marking. First, we define the lower level - it can be on the floor or higher, depending on the design idea. The baseboard will be installed here. As a guide, take the most protruding section of the wall - it will determine the overall indent of the lathing. Add 2-3 mm to the indentation. This must be done because wood deforms even under a slight influence of moisture.
Then the top line of the batten and the side levels are determined. Use a builder's level to level the top and bottom, and a plumb line for the sides. Fixation is performed on straight hangers. The screws are placed in increments of up to 25 cm for wood and up to 15 cm for metal. We fasten the bars first along the edges, then to the center. This avoids design distortions and inaccuracies.
After fixing the top, bottom and side rails, proceed to the installation of the inner ones. This is done taking into account the choice of the type of arrangement of the lamellas themselves - vertical or horizontal. Subsequently, the lamellas will be attached perpendicularly to the internal guides.

Step-by-step instruction:
- 1. Install moldings - external, internal (corner, bottom, top);
- 2. Fasten the first panel and fix it with a kleimer (the edges of the lamella enter the upper and lower profile);
- 3. The second panel is inserted into the groove of the first one, it is similarly fixed, and so on;
- 4. Install the material to the end of the wall;
- 5. Fasten the last panel so that it fits tightly all the way into the corner area.
If there are pipes in the room that need to be hidden behind the panels, the crate is formed in such a way that they will be under its frame. Additional angles will be required. Counters, valve taps and other elements to which access must be periodically opened can be hidden behind a decorative door. To do this, the panel must be "planted" to the guide on small hinges.
When choosing and installing a room, bathroom, kitchen, follow the rules:
- do not combine plastic with expensive finishing materials - stone, tiles, granite, it will look tasteless;
- for small rooms, choose panels in light shades or with photo printing;
- for rooms with high humidity, smooth materials are suitable; a pronounced and deep texture will require constant cleaning, otherwise mold or mildew will appear;
- When choosing panels, try to adhere to the general ensemble and colors in the decor.
Plastic panels are a unique modern product with which you can create incredible images. With a little fantasy, you can make your home unique and original. Study the suggested instructions and feel free to start the repair!
PVC material is great for self-assembly, so the installation of plastic slats is available to anyone who gets down to business, having previously prepared tools and materials:
* square, electric drill, drills from Pobedit, jigsaw, water level, screwdriver, stapler (brackets 10 mm or more), pliers, tape measure, hammer, CD-pen, ladder;
* dowels / nails, plastic material, starter strips, corners and connecting elements, battens and bars, ceiling and floor skirting boards, a can of liquid nails.
Plastic cladding installation process step by step
1. We make a lattice base so that it serves as a frame structure for fixing the panels. The size of the beams for the lathing is 30 * 40, 30 * 50, 50 * 50 mm, but not less than twenty. We recommend treating the wood with an antifungal impregnation if the dampness in the room is high, and maybe even choose a galvanized profile.
Bars are fastened to concrete with dowel-nails (6 mm in diameter, length from 60 mm), and to wood - with self-tapping screws. The lathing must be leveled at the time of fixing to the surface using plywood pads. The distance between the slats must be up to 500 mm. It is necessary that the slats are perpendicular to the panels and must be located at the beginning and end of the surfaces to be faced (floor-ceiling, window openings).

We make a crate for mounting panels
2. On the prepared crate at the junction of the walls, from where the installation of the panels will begin, the starting bar is fixed using a furniture stapler \ clips \ self-tapping screws \ nails (this is a rail with a "L" - and "P" -shaped section). If the wall is taller than the length of the panel, the “H” connectors will be required.
3. Insert the first PVC panel into the groove of the profile, making sure that the connection is tight, there are no gaps between the panels. Be sure to check the level of the location of the first panel. Then we attach a wide shelf to the crate with staples.

4. Install the subsequent panels in the same way, inserting them into the fixed groove with a narrow shelf. The sequence of work is as follows: we insert it with a narrow shelf into the groove, click it, check it with a plumb line, fix the panel with a stapler on the crate. We fix the last panel in the corner profile. It is advisable to cut it so as not to wrinkle the corner strip.
5. Slots formed when joining plastic elements, we close up with special slats with corners (there are external and internal, we select it in place). You can use a starter strip that looks like an English letter F in section, that is, an F-shaped when the joint is finished with a window, a corner surface or a doorway. Bringing the plank to the floor, cover the cracks with a plinth. End strips, plinth trim will help to give the surface a finished look.

Requirements for working with PVC materials
* constant temperature in the room, if there is a difference, then within 20 ° C;
* installation only in the warm season, so that the environment is warmed up to at least +10 degrees, the need to "keep" plastic materials warm before installation;
* holes are needed in the lattice sheathing, if there is a lot of humidity, for ventilation of the space;
* transverse installation (horizontally) implies that the edge on the facade must be at the bottom so that water does not flow;
* The plastic changes in length, "growing" by one tenth of a percent with every ten degrees, leave gaps.
Pros and cons of using PVC panels
Many colors, ease of installation, good sound and heat insulation are the advantages of the material. And the disadvantages include the fire hazard of PVC and the need to disassemble the entire coating if one element is damaged.
Video - installation of plastic panels